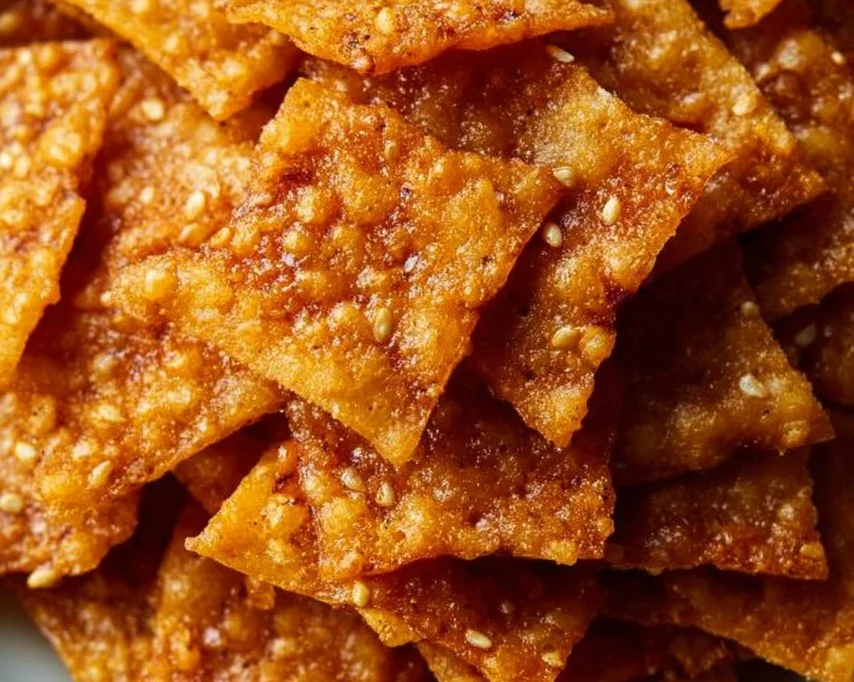
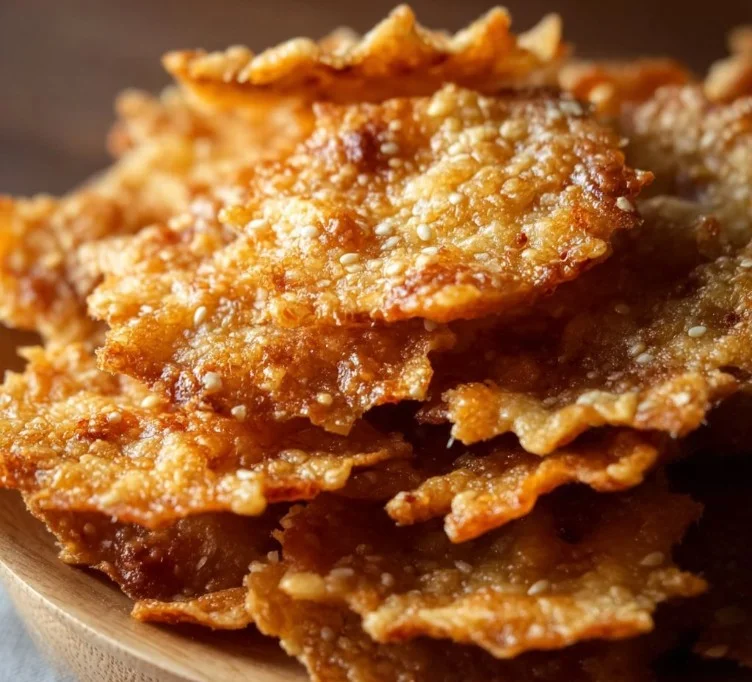
25 Minute Addictive Taco Crackers You Can’t Resist — hey friend, come closer. I remember the first time I tossed a handful of plain store-bought crackers into a bowl, sprinkled on that bold taco flavor, and baked them until they crackled with heat and crunch. You looked up from your coffee, and in two bites the whole batch vanished. These crackers are the kind of snack that feels like a warm hug on a busy afternoon or a festive bite during game night. They blend pantry-friendly ingredients like a neutral oil, taco seasoning, garlic and onion powders, and a kiss of chili flakes with humble crackers to create an irresistible, comforting snack that is perfect for cozy evenings, potlucks, or a crunchy addition to lunchboxes. If you love quick snack recipes that double as party pleasers, you are going to want to make these again and again. For another crunchy homemade treat, try my take on an air-fryer banana chips recipe for something sweet to balance these spicy crackers.
Why You’ll Love This Recipe
- Quick and easy to prepare
- Simple, accessible ingredients found in most kitchens
- Perfect for late fall snack sessions, holiday gatherings, or cozy movie nights
- Comforting, satisfying, and surprisingly impressive for guests
What makes this version unique is the balance: a whisper of oil to help every cracker wear seasoning like a tiny jacket, a vibrant taco seasoning that brings familiar savory notes, and a controlled bake at a low temperature to coax out crispness without burning. Emotionally, these crackers are a nostalgia trigger and a confidence builder. You will feel proud for turning a few pantry staples into something everyone loves, and you will be relaxed because the whole process is effortless and forgiving. If you are a fan of easy snack recipes and crave homemade crackers with a flavor punch, these Taco Crackers are exactly the little victory you need in your day.
Ingredients Needed
Pantry Staples and Simple Swaps
- Oil (about 1/4 cup)
- Use a neutral vegetable oil for a clean profile. If you prefer a little fruity depth, substitute extra virgin olive oil but use a touch less to avoid a pronounced oil flavor. The oil helps the seasoning cling and encourages even browning.
- Seasoning blend (about 2 tablespoons taco seasoning)
- Use a store-bought taco seasoning for consistency, or make your own. Adjust the amount to suit your heat preference. For a milder batch, use 1 tablespoon; for bold heat, add more chili flakes or a pinch of smoked paprika.
- Garlic powder (1 teaspoon)
- Ground garlic gives even coverage without introducing moisture. If you prefer fresh garlic, mince just a little and reduce the amount slightly to avoid sogginess.
- Onion powder (1 teaspoon)
- A gentle, savory backbone. Dried onion flakes can be used but shake them a little first so they distribute uniformly.
- Chili flakes (1 teaspoon)
- Adds visual heat and quick-spread spice. Omit entirely if serving kids or anyone with a low heat tolerance.
- Crackers (1 cup)
- Use any sturdy, thin cracker that will crisp in the oven. Saltines, water crackers, or small round butter crackers all work. To make these gluten-free, choose a certified gluten-free cracker. If you prefer whole grain or seed crackers, they will add extra flavor but may toast faster.
Notes about quantities: the recipe scales easily, so double or triple if hosting. The balance of seasoning to cracker is forgiving; taste and adjust by eye when tossing.
Ingredients & Equipment Notes (Optional)
- Large bowl or resealable food-grade bag: for even coating. A bag makes tossing almost effortless.
- Medium mixing bowl: to whisk the oil and seasonings so they emulsify and cling better.
- Baking sheet(s): rimmed sheets are helpful to contain any stray seasoning. Use parchment or a silicone mat for easier cleanup and even heat.
- Spatula or tongs: for gentle stirring halfway through baking.
- Oven thermometer (optional): oven temps vary; an oven thermometer is a small investment for consistent results.
- Cooling rack: helps the crackers crisp up after baking and prevents steaming on the baking sheet.
Why tools matter: a whisked seasoning mix evenly distributes spices on the crackers. Using a bag or large bowl prevents clumping and wasted seasoning. Baking sheets with silicone mats reduce hot spots and make cleanup kinder.
Instructions – How to Make “25 Minute Addictive Taco Crackers You Can’t Resist”
- Preheat the oven to 250°F (120°C).
- Why this matters: a low oven temperature gently dries and crisps the crackers instead of blasting them, which can lead to burnt spices or uneven color. Visual cue: the oven should feel warm, not hot, when you hold your hand briefly near it.
- Whisk together 1/4 cup vegetable oil, 2 tablespoons taco seasoning, 1 teaspoon garlic powder, 1 teaspoon onion powder, and 1 teaspoon chili flakes in a medium bowl until smooth and homogenous.
- Why this matters: whisking creates a luminous seasoning slurry that coats evenly. Mini tip: if your taco seasoning is clumpy, press it through a small sieve first so the oil can pick up every bit of flavor.
- Place 1 cup of crackers into a large mixing bowl or into a resealable plastic bag. Pour the seasoned oil over the crackers, and gently toss or seal and shake until each cracker is lightly and evenly coated.
- Why this matters: even coating ensures every bite has a hit of spice and salt. Visual cue: crackers should glisten lightly, not pool with oil. Mini tip: do this in two quick movements rather than vigorous scrubbing to preserve cracker shape.
- Spread the coated crackers in a single layer across a prepared baking sheet; avoid piling so air circulates and crispness develops. If necessary, use two sheets rather than crowding one.
- Why this matters: single-layer spreading allows the heat to crisp every face of the cracker. Visual cue: each cracker should sit flat with no stacking.
- Bake for 10 minutes, then open the oven and gently stir or flip the crackers with a spatula so the underside briefly sees the heat. Return to the oven.
- Why this matters: stirring promotes uniform color and crispness and prevents a few from overbrowning. Visual cue: after the first 10 minutes, you may see a light golden tint forming along edges.
- Continue baking for an additional 5 to 10 minutes, watching closely during the last minutes until the crackers are golden and crisp. Total oven time is usually 15 to 20 minutes. Remove from the oven when they reach the desired golden color and a satisfying crisp sound when tapped.
- Why this matters: total time depends on cracker thickness and your oven. Visual cue: look for a consistent golden hue; smell is also a clue when aromas of toasted spices fill the kitchen. Mini tip: if you want extra crunch, let them cool on a rack for 10 minutes; they will firm up as they cool.
- Allow the crackers to cool completely on the baking sheet or on a cooling rack before transferring to a serving bowl or airtight container.
- Why this matters: cooling prevents residual heat from creating steam that softens texture. Visual cue: crackers should snap when bent after cooling. Mini tip: taste one after cooling to determine any final seasoning needs; sprinkle a tiny pinch of flaky salt if desired.
- Adjust and enjoy. If you find the crackers need more zing, toss with a pinch more taco seasoning while still slightly warm so the seasoning adheres. For a sweeter contrast, pair with a honeyed dip or a mild yogurt-based dip.
- Why this matters: small finishing touches can elevate the experience. Visual cue: a final dusting will sit on the surface, not sink in.
Serving Suggestions & Storage Tips
Serving ideas and presentation:
- Serve in a colorful bowl lined with parchment for a casual party. These crackers look charming next to a small jar of pickled jalapeños or a bowl of creamy avocado dip.
- For a picnic or game day spread, arrange them on a wooden board alongside fresh veggies, mild cheeses, and olives for textural contrast. They pair beautifully with mild cheeses like Monterey Jack or queso fresco because the creaminess tempers the spice.
- For a kid-friendly option, offer a small side bowl of ranch-style dip or plain Greek yogurt mixed with a little honey for dipping.
Pairings that sing:
- Creamy dips: avocado crema, sour cream-based dips, or mild queso can balance heat.
- Fresh elements: diced tomatoes, sliced cucumbers, or a cilantro-lime slaw keep the palate bright.
- Beverage matches: nonalcoholic sparkling citrus drinks or iced herbal teas cut the spice and refresh.
Creative variations:
- Mix in roasted nuts like almonds or pepitas for a party snack mix.
- Add a touch of lime zest to the seasoning blend for brightness.
- For smoky depth, fold in 1/4 teaspoon smoked paprika to the oil seasoning.
Storage:
- At room temperature: store fully cooled crackers in an airtight container for up to 4 days. Use a wide-mouthed container to prevent breakage.
- Refrigerator: not necessary and not recommended as moisture can soften them.
- Freezer: for long-term storage, flash freeze in a single layer for 30 minutes, then transfer to a freezer-safe container or bag. They will keep up to 1 month. Thaw at room temperature before serving and re-crisp in a warm oven for 3 to 5 minutes.
Best reheating methods:
- Oven: preheat to 300°F (150°C) and warm crackers on a baking sheet for 3 to 5 minutes. This revives crispness without burning.
- Toaster oven: 2 to 4 minutes on medium heat will do the trick for small batches.
- Avoid microwave reheating as it will make crackers pliable and limp.
Helpful Notes & Variations
Ingredient substitutions:
- Oil: swap vegetable oil with light olive oil or avocado oil for different flavor profiles. Use slightly less strong-flavored oil so the taco seasoning can shine.
- Taco seasoning: make your own with ground cumin, chili powder, paprika, oregano, salt, and a pinch of sugar if you like a balanced blend. Store-bought blends are quicker and consistent.
- Garlic and onion powders: if you have granulated versions, you can use them interchangeably, but reduce quantity by a small pinch if granulated yields a stronger taste in your experience.
- Chili flakes: swap for cayenne if you want a uniform heat without the visual specks, or use crushed red pepper for a classic look.
Dietary adaptations:
- Gluten-free: choose certified gluten-free crackers and ensure taco seasoning is gluten-free.
- Low sodium: use reduced-sodium crackers and a low-salt taco seasoning or decrease the seasoning quantity and add a pinch of salt only after tasting.
- Vegan: this recipe is naturally vegan if your crackers are plant-based.
Flavor add-ins:
- Citrus: a touch of lime zest folded in after baking adds brightness.
- Herbaceous lift: stir in finely chopped cilantro or chives just before serving for a fresh note.
- Cheesy twist: sprinkle with nutritional yeast after baking for a cheesy, umami finish that is great for dairy-free diets.
Common mistakes and how to avoid them:
- Mistake: Overcrowding the baking sheet. Result: soggy or uneven crackers. Fix: use multiple sheets or bake in batches.
- Mistake: Baking at too high a temperature. Result: spices burn and crackers may char. Fix: keep to low oven temps and check early.
- Mistake: Tossing the crackers too vigorously with seasoning. Result: broken crackers. Fix: use gentle folds or seals in a bag with light shakes.
Experience-based tips:
- Taste your taco seasoning before mixing if it is homemade so you can adjust the salt and heat.
- If you like an extra layer of flavor, let the seasoned crackers sit for 5 minutes before baking so the spices begin to absorb into the oil and the crackers pick up more flavor.
- For very thin crackers, reduce total bake time and check at the 12-minute mark to prevent over-toasting.
For a different dessert or party snack to serve alongside, consider making a light cake like the lemon blueberry layer cake for a bright finish to the evening.
Conclusion
These 25 Minute Addictive Taco Crackers You Can’t Resist stand out because they take the ordinary and make it unexpectedly delightful: a handful of pantry staples becomes a snack that is crunchy, savory, and entirely moreish. They offer comfort on a quiet night, ease for busy hosts, and a flexible canvas for your flavor tweaks. Try this recipe when you crave a quick, homemade snack that will disappear faster than you expect. If you want to explore more charming food stories and kitchen tips, I often turn to thoughtful food blogs like a favorite German food blog for inspiration, and I love reading features like The Food Diaries feature for ideas on presentation and flavor. Now go bake a batch, leave a comment and star rating to tell me how it went, and share a picture on Pinterest or social media so we can swap snack-time triumphs.
- Frequently Asked Questions (H2)
Can I make this recipe ahead of time?
Yes. You can bake the crackers a day ahead and store them in an airtight container at room temperature. They hold their texture best when fully cooled and sealed; for peak crunch, re-crisp in a warm oven for a few minutes before serving.
How should I store leftovers and how long do they last?
Store cooled crackers in an airtight container at room temperature for up to 4 days. For longer storage, freeze in a sealed container or freezer bag for up to 1 month. Avoid refrigeration because moisture will soften the crackers.
What is the best way to reheat or serve this recipe after storage?
Revive stored crackers in a preheated 300°F (150°C) oven for 3 to 5 minutes or use a toaster oven. This restores crispness without further toasting the spices. Serve with a chilled dip or crisp fresh vegetables to complement the heat.
Can I adjust or substitute ingredients to fit my preferences?
Absolutely. Swap vegetable oil for olive or avocado oil for flavor changes, use a milder or stronger taco seasoning to control spice, choose gluten-free crackers if needed, or add lime zest for brightness. The recipe is very forgiving and welcomes substitutions.
Do you have tips to ensure the best texture and flavor every time?
Yes. Use a light, even coating of seasoned oil so crackers do not become greasy. Spread crackers in a single layer to ensure proper air circulation and crisping. Watch the oven during the final minutes and cool crackers fully before storing to lock in the crunch. Gentle tossing and a brief rest before baking can help spices adhere for a more even, flavorful result.
Taco Crackers
Ingredients
Method
- Preheat the oven to 250°F (120°C).
- Whisk together the oil, taco seasoning, garlic powder, onion powder, and chili flakes in a medium bowl until smooth.
- Place the crackers in a large bowl or resealable bag. Pour the seasoned oil over the crackers, and gently toss or shake until evenly coated.
- Spread the coated crackers in a single layer on a prepared baking sheet.
- Bake for 10 minutes, then gently stir or flip the crackers. Return to the oven.
- Continue baking for an additional 5 to 10 minutes until the crackers are golden and crisp.
- Allow the crackers to cool completely on the baking sheet or on a cooling rack.
- Adjust seasoning if needed while still warm.