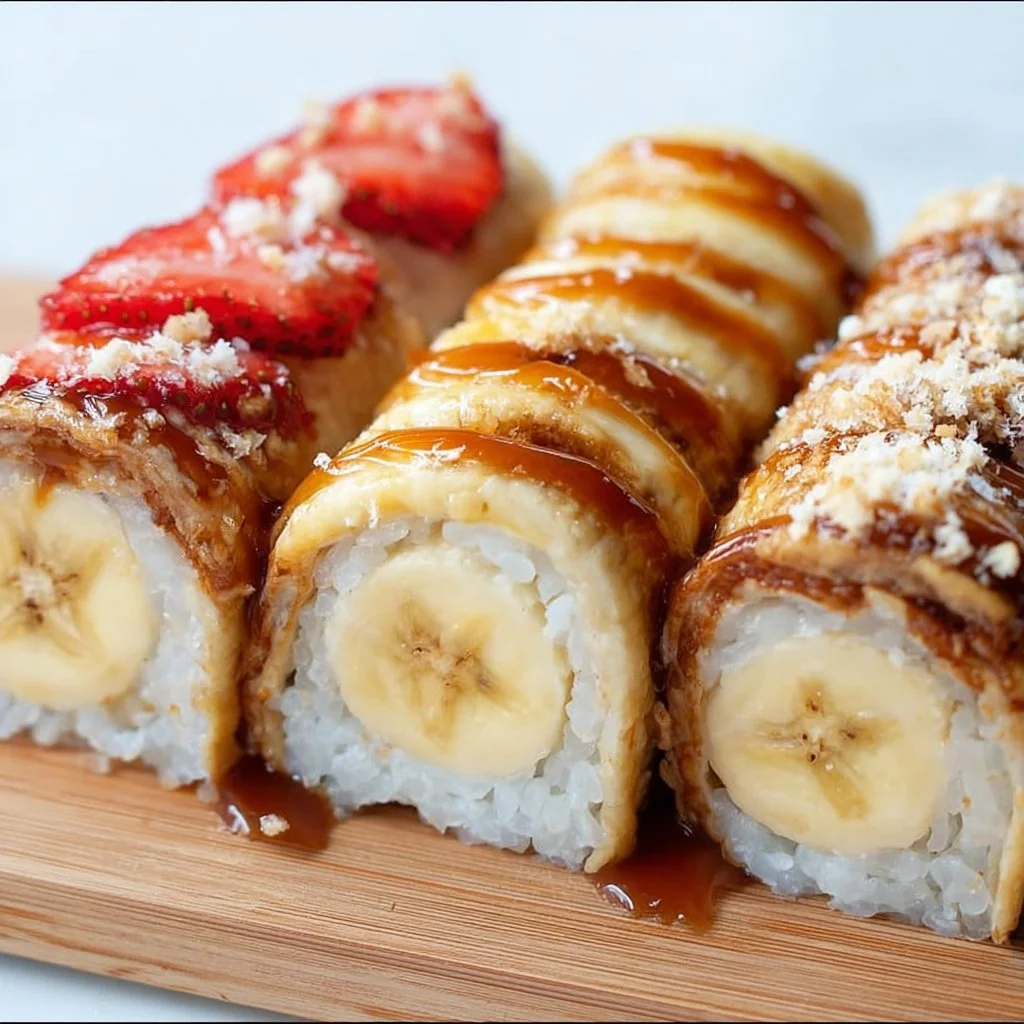
Banana Sushi — hey friend, come closer. I remember the first time I rolled a banana into a tortilla and sprinkled it like treasure; my kids squealed and the whole afternoon felt sunnier. This playful snack combines ripe but firm bananas, soft tortillas, and your favorite spreads like peanut butter, cream cheese, or Nutella, topped with crunchy peanuts, freeze-dried strawberries, or shredded coconut. It is simple, seasonal and comforting, perfect for afternoon snack time or a cozy movie night. If you love banana cream desserts, you will adore how familiar flavors turn into a handheld treat that feels both indulgent and wholesome. Explore related banana cream treats here.
Why You’ll Love This Recipe
- Quick and easy to prepare – ready in under 10 minutes
- Simple, accessible ingredients you likely have on hand
- Perfect for spring picnics, back-to-school lunches, or cozy winter afternoons
- Comforting and impressive – feels fancy but is totally doable
What makes this Banana Sushi special is its versatility and emotion. The combination of a soft tortilla hugging a banana and a creamy filling triggers childhood nostalgia, while the toppings add texture and a splash of color that delights both kids and adults. This version gives clear options for peanut butter, cream cheese, or Nutella, so you can tailor it to tastes or dietary needs and feel confident in serving something playful and polished.
Ingredients Needed
To keep things clear and original, I grouped the ingredients by variation so you can pick the flavor you want to make.
Base items (use same for every variation)
- 1 taco-size flour tortilla (gluten-free tortilla option works wonderfully if needed)
- 1 ripe but still slightly firm banana, peeled (if very ripe you can chill it first so it slices neater)
Peanut butter variation
- 3 tablespoons peanut butter, divided (use smooth or crunchy based on texture preference)
- 1/2 cup chopped peanuts for topping (toast lightly if you like a deeper flavor)
Cream cheese + strawberry variation
- 3 tablespoons softened cream cheese, divided (room temperature makes spreading easier)
- 2 fresh strawberries, thinly sliced for layering
- 2 tablespoons crushed freeze-dried strawberries for bright color and crunch
Nutella variation
- 3 tablespoons Nutella (hazelnut spread), divided
- 2 tablespoons shredded coconut for topping (sweetened or unsweetened, based on preference)
Clarifications and substitutions
- Tortillas: taco-size is a perfect wrap size; if you only have larger tortillas, trim the excess after rolling or roll a little looser.
- Bananas: choose bananas that are ripe but not mushy; they should hold shape when sliced.
- Nut allergies: swap peanut butter and chopped peanuts for sunflower seed butter and roasted sunflower seeds for a nut-free version.
- Vegan options: use dairy-free cream cheese and a plant-based chocolate-hazelnut spread to keep it vegan-friendly.
If you enjoy crunchy banana snacks, you might also like my method for making air-fryer banana chips as a complementary treat: air-fryer banana chips inspiration.
Ingredients & Equipment Notes (Optional)
- Sharp serrated knife or sushi-style knife: makes cleaner, neater 1-inch slices so your sushi rounds look tidy.
- Cutting board: a stable surface prevents slips while rolling and slicing.
- Small spatula or butter knife: ideal for spreading peanut butter, cream cheese, or Nutella evenly.
- Damp paper towel: use under the cutting board if your surface slips.
- Measuring spoons: to portion the spreads consistently.
- Plate or small tray: for staging finished sushi before serving.
Why these tools matter: a serrated knife reduces banana crush, spreading tools help you get thin even layers so the tortilla rolls without tearing, and a damp paper towel keeps everything stable when you cut. If you want to experiment with presentation, a small bamboo sushi mat can help you press the roll snugly before slicing, similar to how I shaped mine in the photos. If you are curious about tortilla-based bites beyond desserts, check out a creative savory bake technique here: easy baked sushi cups idea.
Instructions – How to Make “Banana Sushi”
- Prepare your workspace and ingredients.
- Why it matters: A clean, organized station speeds everything up and keeps the banana from browning while you work.
- Visual cues: Have your tortilla flat, banana peeled, and spreads ready in small bowls or directly on the cutting board.
- Lay one taco-size tortilla flat on the cutting board.
- Why a step matters: A flat tortilla prevents lumps when spreading and helps the roll stay even.
- Mini tip: If your tortilla is cold and a bit stiff, warm it for 5-10 seconds in the microwave wrapped in a damp paper towel to make it pliable.
- Spread 2 tablespoons of your chosen filling evenly across the top of the tortilla, leaving about 1 inch of space at the far edge.
- Why it matters: An even layer creates consistent flavor in every bite and the 1-inch gap helps prevent the filling from oozing out when rolled.
- Visual cues: The spread should have no dry spots and should be thin enough to allow the tortilla to fold without cracking.
- Place the banana at one end of the tortilla.
- Why a step matters: Positioning the banana at the edge makes rolling intuitive, like preparing a jelly roll.
- Mini tip: If the banana is very curved, gently straighten it; slight cracks are fine and won’t affect final taste.
- Roll the banana snugly into the tortilla, tucking edge over as you go until it is sealed.
- Why it matters: A snug roll ensures the banana stays centered and each slice looks like sushi.
- Visual cues: The seam should be tucked underneath the roll so it sits flat when cut.
- Mini tip: Roll slowly and gently compress the roll just a little so it holds its shape.
- Place the roll seam-side-down on the cutting board.
- Why it matters: This stabilizes the roll for topping and slicing.
- Mini tip: If the seam pops open, dab a touch of the remaining spread to seal it.
- Take the remaining tablespoon of peanut butter, cream cheese, or Nutella and spread it evenly over the top of the tortilla roll.
- Why it matters: This extra layer gives a sticky surface for toppings to adhere and adds a pretty stripe above the sushi-style rounds.
- Visual cues: The top should glisten slightly from the spread and be smooth enough for toppings to stick.
- Sprinkle the roll with your chosen topping: chopped peanuts, crushed freeze-dried strawberries, or shredded coconut.
- Why a step matters: The toppings provide texture and a pop of color that makes these playful bites feel special.
- Mini tip: Press toppings lightly into the spread so they do not fall off when sliced.
- Slice the roll into 1-inch sushi rounds using a sharp serrated knife.
- Why it matters: 1-inch slices create perfect bite-sized sushi that are easy to eat with chopsticks or fingers.
- Visual cues: Clean cuts reveal the banana core surrounded by a colored ring of spread and tortilla.
- Mini tip: Wipe the knife between cuts if the filling sticks.
- Plate and serve immediately.
- Why it matters: Fresh banana keeps a bright color and firm texture; serving right away avoids browning and sogginess.
- Presentation tip: Arrange on a sushi platter, add a sprinkle of extra toppings, and serve with chopsticks or small skewers for fun.

Serving Suggestions & Storage Tips
Serving ideas
- Party platter: Alternate the three filling variations for a colorful sushi-inspired tray.
- Kids’ lunchbox: Pack 3 to 4 small pieces in a leakproof container with a mini fruit salad or carrot sticks.
- Dessert bar: Serve slices alongside yogurt, berries, and granola for a build-your-own dessert station.
Presentation tips
- Add a drizzle of honey or a dusting of cocoa powder for adults.
- Use small bamboo picks or tiny cocktail umbrellas to make the bites feel extra festive.
- Arrange on a sushi board and sprinkle with sesame seeds for a playful nod to real sushi.
Pairings
- A cup of vanilla yogurt or honey-laced Greek yogurt is a lovely dip for extra creaminess.
- Fresh fruit slices, apples, or berries pair well, balancing sweetness and acidity.
Storage
- Refrigerator: Store leftovers in an airtight container for up to 24 hours; banana can brown slightly but will still taste great.
- Freezer: Not ideal for long-term freezing as banana texture changes after thawing, but you can freeze uncut rolls for up to one month and thaw briefly in the fridge before slicing.
Best reheating methods
- These are best served fresh or chilled. If you prefer a warm banana, briefly microwave a slice for 6-8 seconds on low power, but note the tortilla may get softer.
If you enjoy playful finger foods and want an inspired savory counterpoint for a potluck, try pairing these bites with a visually similar savory recipe like a spicy sushi bake for adults to nibble on: spicy sushi bake inspiration.
Helpful Notes & Variations
Ingredient substitutions
- Peanut-free option: Use sunflower seed butter and top with roasted sunflower seeds.
- Dairy-free or vegan: Use vegan cream cheese and plant-based chocolate-hazelnut spread in place of Nutella.
- Gluten-free: Choose gluten-free tortillas or soft gluten-free flatbreads.
Dietary adaptations
- Lower sugar: Use unsweetened shredded coconut and natural nut butter; skip Nutella and freeze-dried strawberries that may contain added sugar.
- Protein boost: Add a thin spread of Greek yogurt mixed with a touch of honey under the cream cheese for protein and tang.
Flavor add-ins
- Toasted sesame seeds add nutty aroma when sprinkled with the peanut version.
- Cinnamon or cacao powder lightly dusted over the Nutella roll adds warmth.
- A smear of jam or slice of apple inside with cream cheese creates a tart contrast.
Common mistakes and how to avoid them
- Rolling too tightly: This can crack the tortilla or squish the banana. Roll snug but not overly tight.
- Slicing with a dull knife: Mauls the banana; use a serrated knife and wipe it between cuts.
- Leaving too long before serving: Bananas brown; serve soon after slicing or brush with a tiny bit of lemon juice for minimal color change if needed.
Experience-based tips
- Slightly chill the banana if extremely ripe; it firms up and slices better.
- Toast peanuts lightly to enhance flavor before chopping.
- If making for a party, assemble rolls and add toppings a few minutes before guests arrive so they stay crisp.
Quick Topping Ideas
- Honey + crushed pistachios for floral sweetness
- Cocoa nibs + banana chips for crunch
- Mini chocolate chips + sea salt for a sweet-salty finish
Conclusion
Banana Sushi stands out because it transforms humble ingredients into a joyful, shareable snack that feels both nostalgic and inventive. Whether you’re making the peanut butter classic, the cream cheese and strawberry version, or the Nutella and coconut treat, each bite offers a balance of creamy, sweet, and crunchy textures that appeal to kids and grown-ups alike. I love how fast it comes together and how customizable it is for allergies or preferences, which makes it a go-to for last-minute parties or cozy nights in. If you want more playful banana snack ideas, take a peek at this playful take on banana sushi from other creators: Banana Sushi (a fun & healthy snack for kids) – The Many Little Joys, or compare variations like this accessible family-friendly version: Banana Sushi – My Fussy Eater | Easy Family Recipes. For a quick video demonstration and visual inspiration, I recommend this classic tutorial: Banana Sushi – Weelicious. Try the recipe, leave a comment and star rating to tell me which topping you loved most, and pin this for the next snack-time plan.
- Frequently Asked Questions (H2)
Can I make this recipe ahead of time?
Yes, you can prepare the rolls ahead but with caveats. Assemble the rolls and keep them whole in an airtight container in the refrigerator for up to 24 hours to prevent the banana from browning too much. Add the topping layer and slice into rounds shortly before serving for the freshest texture and appearance.
How should I store leftovers and how long do they last?
Store leftover sliced Banana Sushi in an airtight container in the fridge and eat within 24 hours for best taste and texture. Whole rolls stored in the fridge may last up to 24 hours; beyond that bananas darken and may get softer.
What is the best way to reheat or serve this recipe after storage?
These are best served fresh or chilled. If you prefer a warm banana, microwave a slice for 6 to 8 seconds on low power, but be aware the tortilla may soften and toppings can lose crunch. For the best presentation, re-top with fresh chopped peanuts or coconut after reheating.
Can I adjust or substitute ingredients to fit my preferences?
Absolutely. Swap peanut butter for sunflower seed butter for a nut-free version, use dairy-free cream cheese for a vegan option, and choose gluten-free tortillas when needed. You can also experiment with other fruits like thin apple or pear slices tucked alongside the banana for a different texture.
Do you have tips to ensure the best texture and flavor every time?
Yes. Use bananas that are ripe but firm, warm tortillas briefly to make them pliable, spread fillings evenly and leave a small margin to prevent spills, and slice with a sharp serrated knife, wiping between cuts. Add crunchy toppings just before serving to keep them crisp and visually appealing.
Banana Sushi
Ingredients
Method
- Prepare your workspace and ingredients to keep banana from browning.
- Lay one taco-size tortilla flat on the cutting board.
- Spread 2 tablespoons of your chosen filling evenly across the top of the tortilla, leaving a 1 inch gap at the far edge.
- Place the banana at one end of the tortilla.
- Roll the banana snugly into the tortilla, tucking the edge over as you go until sealed.
- Place the roll seam-side-down on the cutting board.
- Spread the remaining filling evenly over the top.
- Sprinkle your chosen topping over the roll.
- Slice the roll into 1-inch sushi rounds using a sharp serrated knife.
- Plate and serve immediately.