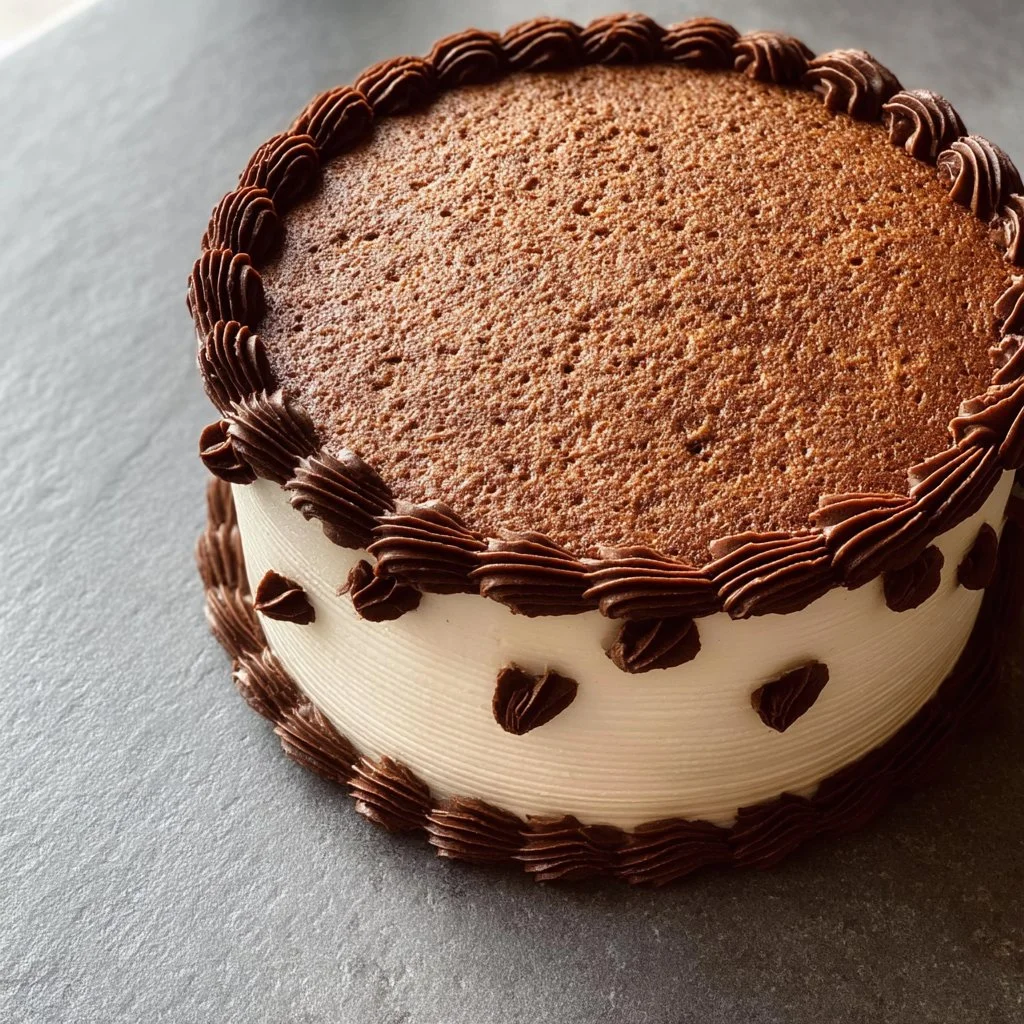
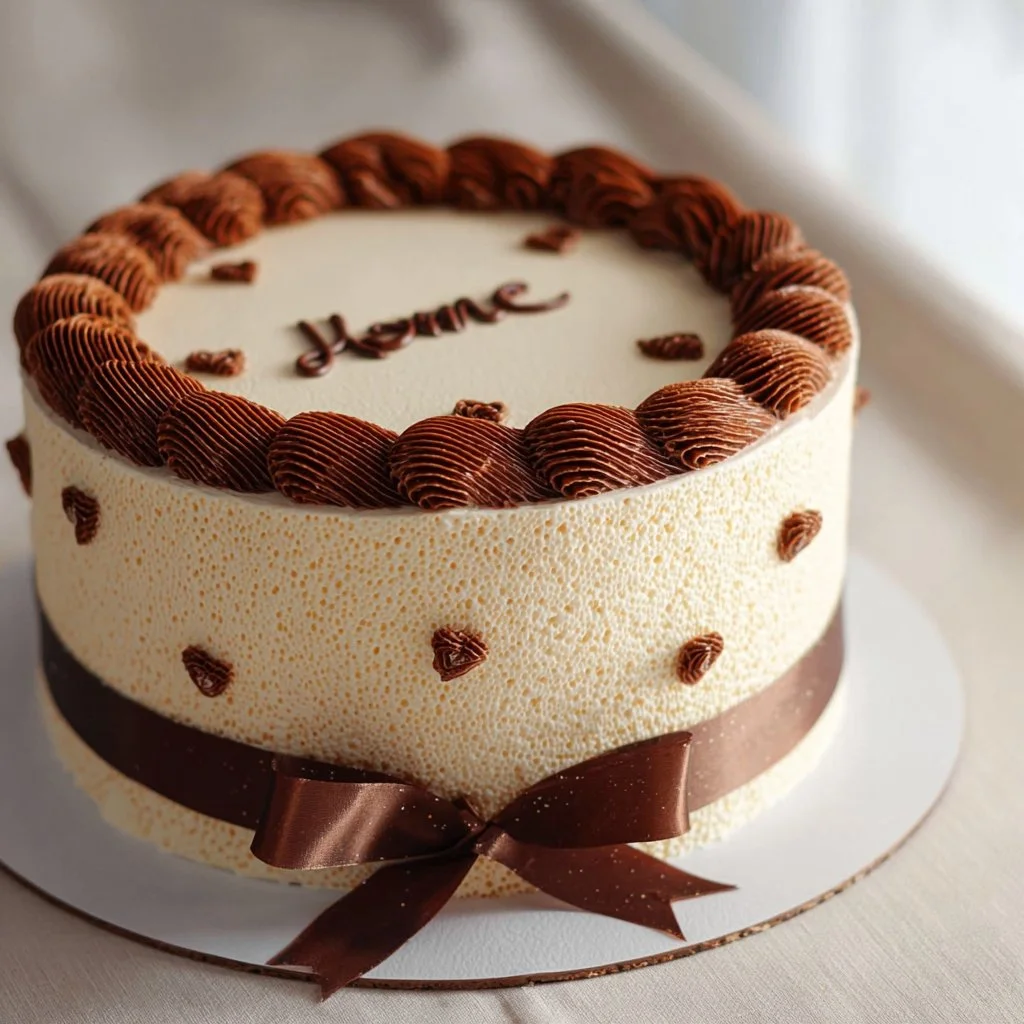
Brown Cake, can we just pause for a second and appreciate how a simple, chocolate-kissed cake makes a rainy afternoon feel like a hug? I remember the first time I baked this: flour dusted on the counter, the warm scent of cocoa rising as the oven hummed, and that first forkful that somehow tasted like childhood and comfort all at once. This recipe brings together pantry staples — all-purpose flour, granulated sugar, cocoa, buttermilk, vegetable oil, eggs, baking powder, baking soda, salt, and vanilla — into a tender, moist cake that’s perfect for cozy nights, school bake sales, or any time you want something reliably comforting. If you enjoy bold, home-baked desserts, you’ll find this recipe straightforward and deeply satisfying, and it pairs beautifully with a variety of frostings and toppings; for inspiration on other rich, comforting desserts, check out this take on Guinness chocolate cake with Irish buttercream for a boozy-free idea swap.
Why You’ll Love This Recipe
- Quick and easy to prepare
- Uses straightforward, budget-friendly pantry ingredients
- Perfect for cozy, cool-weather baking or an everyday celebration
- Comforting, tender crumb that pleases family and guests
What makes this brown cake special is how it balances simplicity and texture. The buttermilk and vegetable oil create a moist, tender crumb that stays soft for days, while the cocoa gives a warm chocolate flavor without overpowering the cake. It’s a recipe that builds confidence: the steps are forgiving, and even first-time bakers can expect an impressive result. I love how this cake becomes a blank canvas — a little frosting, a dusting of powdered sugar, or a simple fresh-berry garnish transforms it into something festive. Making this cake always feels like a small, reliable act of care for the people I bake for.
Ingredients Needed
Dry ingredients
- 1 3/4 cups all-purpose flour — spoon and level for accuracy; can substitute with 1-to-1 gluten-free flour blend if needed, but be aware texture may change
- 1 1/2 cups granulated sugar — regular white sugar for structure; swap up to 3/4 cup brown sugar for deeper caramel notes (see variations)
- 1/2 cup unsweetened cocoa powder — use Dutch-processed for a smoother, less acidic taste, or natural cocoa for brighter cocoa flavor
- 1 teaspoon baking powder — for lift
- 1 teaspoon baking soda — works with buttermilk to add tenderness
- 1/2 teaspoon salt — balances sweetness
Wet ingredients
- 1 cup buttermilk — brings tenderness and a slight tang; if you do not have buttermilk, use 1 cup milk plus 1 tablespoon lemon juice or vinegar, let sit 5 minutes
- 1/2 cup vegetable oil — neutral oil keeps the cake moist; swap with light olive oil or melted coconut oil if desired
- 2 large eggs — at room temperature for better emulsification and volume
- 1 teaspoon vanilla extract — pure vanilla if possible for depth of flavor
Notes on items and substitutions
- Buttermilk: Fresh is best for lift and tang, but the milk-plus-acid trick works well.
- Cocoa powder: Check whether your cocoa is natural or Dutch-processed and adjust leavening slightly in advanced recipes; this version is written to work with common supermarket cocoa.
- Oil versus butter: Oil yields a moister cake that stays soft even when refrigerated. If you prefer butter flavor, substitute melted unsalted butter in an equal amount, but the cake may firm up more when chilled.
- Eggs: Room-temperature eggs combine more evenly, creating a smoother batter.
Ingredients & Equipment Notes (Optional)
Helpful tools that make this easier
- Two 9-inch round cake pans: Even heat and size matter for consistent baking; use light-colored pans to avoid over-browning.
- Parchment paper rounds: Line the bottom of pans to make flipping cakes effortless.
- Mixing bowls: One large for dry ingredients and one medium for wet; a stand mixer or hand mixer speeds up the final mixing but a whisk and sturdy spoon work too.
- Measuring cups and spoons: Accurate dry measurements (spoon and level) help the cake rise predictably.
- Wire rack: Cooling on a rack prevents soggy bottoms.
- Toothpick or cake tester: For checking doneness.
Why these tools matter: using correct pan sizes and lining them with parchment gives even baking and easy release. A wire rack helps steam escape so the cake sets up properly rather than sweating and going gummy on the underside.
Instructions – How to Make “Brown Cake”
- Preheat and prepare pans.
- Preheat your oven to 350°F (175°C). Grease the bottoms and sides of two 9-inch round cake pans and lightly dust with flour, or line bottoms with parchment circles and just grease the sides.
- Why this matters: a properly preheated oven ensures even rise and predictable baking times; lining pans prevents sticking and preserves cake edges.
- Combine dry ingredients.
- In a large mixing bowl, whisk together 1 3/4 cups all-purpose flour, 1 1/2 cups granulated sugar, 1/2 cup cocoa powder, 1 teaspoon baking powder, 1 teaspoon baking soda, and 1/2 teaspoon salt until evenly mixed.
- Visual cues: the mixture should be uniform with no clumps of cocoa; the color should be a deep, even brown.
- Mini tip: Sifting the cocoa powder into the bowl can help prevent streaks and lumps.
- Add wet ingredients and blend until smooth.
- Make a well in the center of the dry mix and pour in 1 cup buttermilk, 1/2 cup vegetable oil, 2 large eggs, and 1 teaspoon vanilla extract. Stir gently with a spatula or use a mixer on low speed until the batter is smooth and homogenous.
- Why this step matters: combining wet and dry just until incorporated prevents overworking the flour, which keeps the cake tender.
- Visual cues: you should have a glossy, pourable batter without dry streaks. It will be slightly thick but easy to move with a spatula.
- Mini tip: Scrape the bowl sides and bottom to ensure even mixing and avoid pockets of flour.
- Divide batter between pans.
- Pour and spread the batter evenly into the prepared 9-inch pans. You can weigh the pans to be precise or eyeball equal amounts.
- Why this matters: even distribution helps both layers bake at the same rate and stack neatly when assembling.
- Mini tip: Tap each pan gently on the counter to release large air bubbles for a smoother crumb.
- Bake until set.
- Bake for 25 to 30 minutes, rotating pans halfway through if your oven has hot spots. The cake is done when a toothpick inserted into the center comes out clean or with a few moist crumbs attached, not wet batter.
- Visual cues: the top will spring back when lightly pressed and begin to pull away from the pan edges. The aroma will be rich and warm, with cocoa notes.
- Mini tip: If your toothpick shows a streak of batter, give it another 3 minutes and check again.
- Cool properly before removing.
- Let the cakes cool in the pans on a wire rack for 10 minutes, then run a knife around the edges, invert to release, peel off parchment, and allow the layers to cool completely on the rack before frosting.
- Why this matters: cooling 10 minutes stabilizes the crumb so the cake keeps its shape. Cooling fully before frosting prevents melting or sliding frosting.
- Mini tip: If you’re in a hurry, set the racks near a cool spot and ensure air can circulate under the pans to speed cooling without condensation.
Serving Suggestions & Storage Tips
Serving ideas
- Classic frosting: Spread a rich chocolate ganache or a silky chocolate buttercream between the layers and on top for a decadent presentation.
- Whipped cream and fruit: For a lighter feel, fill with whipped cream and fresh raspberries or sliced strawberries for a bright contrast to the chocolate notes.
- Simple and rustic: Dust with powdered sugar or cocoa and serve with house-made caramel sauce for an elegant, low-effort finish.
Presentation tips
- Layer evenly: If the cake domes slightly, use a serrated knife or cake leveler to create flat layers for neat stacking.
- Garnish thoughtfully: A few toasted chopped nuts, orange zest, or a sprinkle of flaky sea salt can elevate a simple frosting.
- Serve temperature: For the softest mouthfeel, allow slices to come to room temperature for 15–20 minutes if stored in the refrigerator before serving.
Pairings
- Beverages: Because alcohol is not allowed in this recipe, try pairing slices with rich hot chocolate, coffee, or spiced chai.
- Side dishes: A small scoop of vanilla or coffee-flavored ice cream complements the chocolate notes beautifully.
- Occasions: This cake suits casual family dinners, potlucks, or as a show-stopping birthday layer when frosted.
Storage
- Short-term: Keep leftover slices in an airtight container at room temperature for up to 2 days if unfrosted; frostings with dairy should be refrigerated.
- Refrigerator: Store in the fridge for up to 5 days in an airtight container; bring to room temperature before serving for best texture.
- Freezer: Wrap layers tightly in plastic wrap and foil, then freeze for up to 3 months. Thaw overnight in the refrigerator and then bring to room temperature before frosting or serving.
Best reheating methods
- Microwave: For a quick warm-up, place a slice on a microwave-safe plate and heat for 10 to 15 seconds, checking for a warm, not hot, center.
- Oven: Wrap slice in foil and warm in a 300°F (150°C) oven for 10 to 15 minutes to revive freshness and crumb structure, especially for larger slices or whole layers.
For a bright breakfast twist or brunch idea, consider serving small squares of this brown cake alongside a fruit-forward casserole like the blueberry buttermilk pancake casserole for a weekend spread that feels indulgent and homey.
Helpful Notes & Variations
Ingredient substitutions
- Flour alternatives: Use a cup-for-cup gluten-free baking mix if needed; results may be slightly denser.
- Sugar variations: Substitute half the granulated sugar with packed brown sugar for a deeper toffee note.
- Oil alternatives: Swap vegetable oil with an equal amount of melted unsalted butter for richer flavor, but expect a slightly firmer crumb.
- Egg replacements: For each egg, you can use 1/4 cup unsweetened applesauce in an emergency, though texture will be somewhat denser.
Dietary adaptations
- Dairy-free: Replace buttermilk with an unsweetened almond milk plus 1 tablespoon vinegar; use dairy-free margarine if swapping in butter.
- Lower-sugar options: Reduce sugar by up to 1/4 cup for a less sweet cake; texture will still be good but slightly less tender.
- Vegan adaptation: Use a vegan buttermilk substitute, a plant-based oil, and flax eggs (1 tablespoon ground flaxseed + 3 tablespoons water per egg, chilled) — results can vary, and gluten-free mixes may help bind the crumb.
Flavor add-ins
- Espresso: Add 1 tablespoon instant espresso dissolved in a tablespoon of hot water to deepen chocolate flavor without making it taste like coffee.
- Citrus: Fold in 1 teaspoon orange zest for a bright counterpoint to the cocoa.
- Spice: Pinch of cinnamon or a 1/8 teaspoon ground nutmeg for autumnal warmth.
Common mistakes and how to avoid them
- Overmixing: Mixing too long after adding wet to dry can develop gluten and make the cake tough. Mix until just combined.
- Overbaking: Remove from oven as soon as a toothpick comes out clean or with a few moist crumbs. Overbaked cake will be dry.
- Incorrect measuring: Avoid packing flour into the measuring cup. Spoon flour into the cup and level off with a knife for accuracy.
- Pans too hot or incorrect size: Using smaller pans will produce taller layers that may bake unevenly. Stick with two 9-inch pans.
Experience-based tips
- Test oven temperature: If your oven runs hot or cool, use an oven thermometer to adjust the baking time.
- Room-temperature ingredients: Let eggs and buttermilk sit at room temperature for 15 minutes to combine more smoothly.
- Make-ahead: You can bake the layers a day ahead, wrap them well, and assemble the next day for less day-of stress.
Conclusion
This Brown Cake stands out because it is both unfussy and deeply comforting. It takes pantry basics — flour, sugar, cocoa, buttermilk, oil, and eggs — and turns them into a tender, reliably moist layer cake that suits weekday dessert cravings and celebrations alike. The texture is soft, the flavor warm and chocolatey without being cloying, and the recipe is forgiving for new bakers while offering opportunities for creative tweaks for seasoned cooks. If you want inspiration for a buttery variation, explore the Everyday Brown Butter Cake to compare how butter changes profile. For an unconventional savory-linked dessert idea, the creative assembly of a crispy potato-based dish can spark plating ideas similar to the crisp textures you might contrast with cake, such as Crispy Hash Brown Cake with Potato Slayer. And if you’re thinking about how to layer and bake other show-stopping cakes, Alton Brown’s gold layer technique gives great structural tips that translate well to any layer cake: A Far, Far Better Gold Layer Cake Recipe. I hope you try this recipe soon, then come back and leave a comment and star rating to let me know how it turned out.
Frequently Asked Questions
Can I make this recipe ahead of time?
Yes. You can bake the layers a day in advance and keep them wrapped tightly in plastic wrap at room temperature for up to 24 hours, or refrigerate for up to 3 days. If you need to store them longer, freeze the layers individually wrapped in plastic and foil for up to 3 months. Thaw in the refrigerator overnight before frosting.
How should I store leftovers and how long do they last?
If the cake is unfrosted, store at room temperature in an airtight container for up to 2 days. Once frosted, keep it refrigerated and covered; it will stay good for up to 5 days. For longer storage, freeze slices or layers, wrapped well, for up to 3 months.
What is the best way to reheat or serve this recipe after storage?
For a quick warm slice, heat individual portions in the microwave for 10 to 15 seconds. For a larger piece or full layer, wrap in foil and warm in a 300°F (150°C) oven for 10 to 20 minutes. Bringing refrigerated cake to room temperature for 15 to 20 minutes before serving improves texture and flavor.
Can I adjust or substitute ingredients to fit my preferences?
Yes. You can substitute milk plus acid for buttermilk, swap oil for melted butter for richer flavor, use gluten-free flour blends for gluten-free needs, or reduce sugar slightly for lower sweetness. For vegan versions, flax eggs and plant-based dairy alternatives can work, though texture may vary.
Do you have tips to ensure the best texture and flavor every time?
Use room-temperature eggs and buttermilk for easier mixing and better rise. Measure flour correctly by spooning into the cup and leveling. Mix until just combined to avoid developing too much gluten. Check for doneness a few minutes early with a toothpick to prevent overbaking, and cool layers completely before frosting to keep the frosting from sliding.
Brown Cake
Ingredients
Method
- Preheat your oven to 350°F (175°C). Grease and flour two 9-inch round cake pans or line bottoms with parchment paper.
- In a large mixing bowl, whisk together all-purpose flour, granulated sugar, cocoa powder, baking powder, baking soda, and salt until evenly mixed.
- Make a well in the center of the dry mix and add buttermilk, vegetable oil, eggs, and vanilla extract. Mix until smooth.
- Pour the batter evenly into the prepared pans, then bake for 25 to 30 minutes until a toothpick comes out clean.
- Allow the cakes to cool in the pans for 10 minutes before inverting onto a wire rack to cool completely.