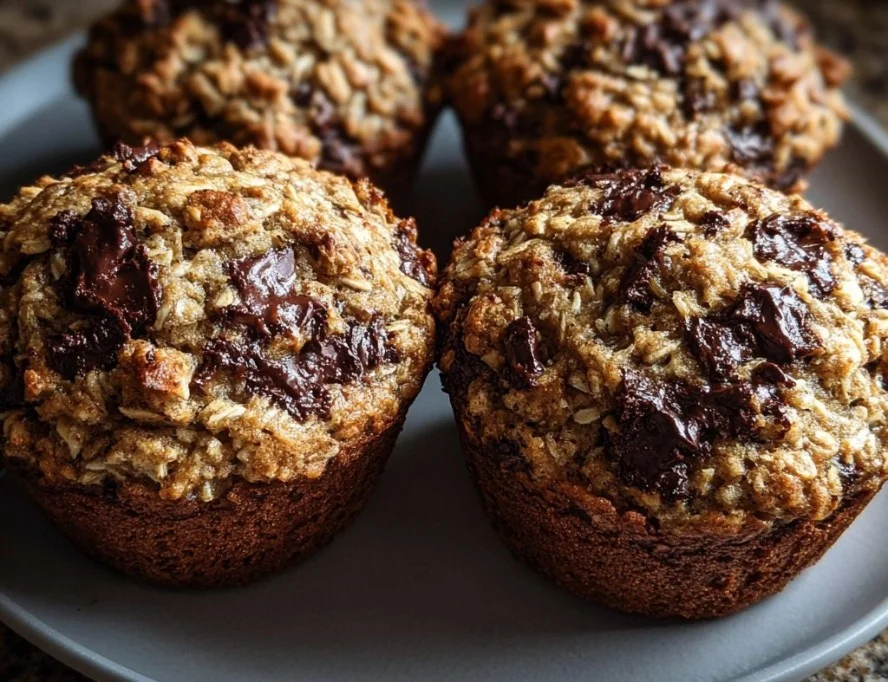
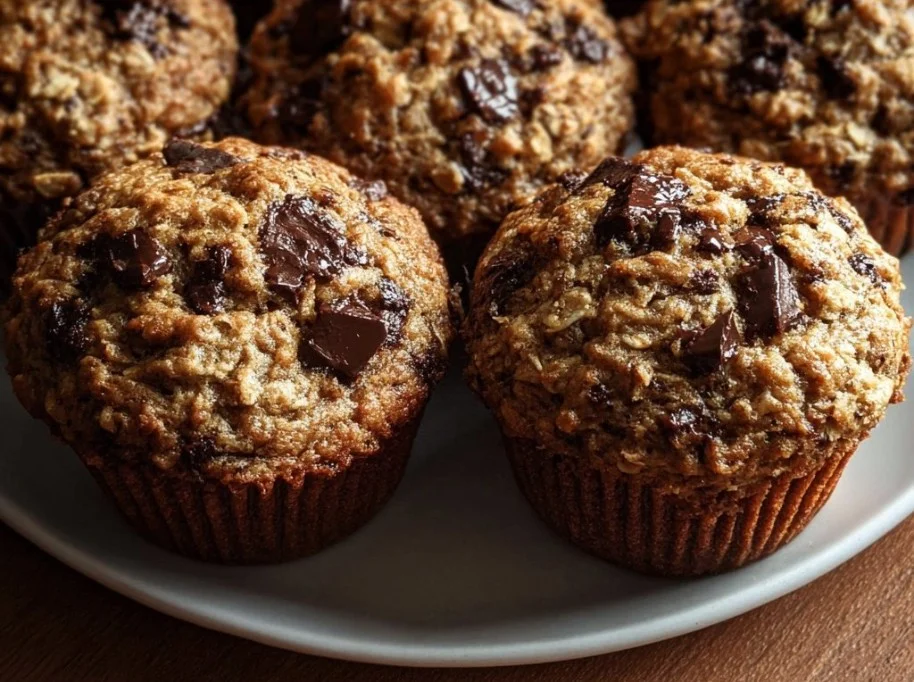
“Fearless 3-Day Oatmeal Chocolate Chip Breakfast Muffins are my secret to calm mornings,” I told my sister, stirring the batter as the house woke up. She laughed, but then sneaked a muffin and declared it official. I remember testing this recipe over three hectic mornings, using rolled oats, all-purpose flour, chocolate chips, a splash of milk, an egg, and a little oil to stitch everything together. These muffins felt sturdy enough to travel in a lunchbox and tender enough to comfort a sleepy kid. If you enjoy morning bakes, you might also like my berry croissant breakfast bake for a special weekend treat.
Why You’ll Love This Recipe
- Comforting and dependable texture that holds up over three days without drying out.
- Balanced sweetness from granulated sugar and pockets of chocolate chips for morning joy.
- Hearty texture from rolled oats gives you a lasting energy boost and a homemade feel.
- Simple pantry ingredients, approachable steps, and forgiving mixing make this great for bakers of all levels.
- Portable, freezer-friendly, and perfect for breakfast-on-the-go or a calm coffee moment.
- Emotional connection: these muffins were born from real mornings when I needed reliable, delicious food that does not demand perfection.
Ingredients Needed
- 1 1/2 cups all-purpose flour
- Use regular plain flour; spoon into the measuring cup and level off for accurate measurement.
- 1 cup rolled oats
- Old-fashioned oats are ideal for bite and texture; quick oats will work but yield a softer crumb.
- 1/2 cup granulated sugar
- Regular white sugar gives clean sweetness and helps with browning. You can reduce to 1/3 cup if you prefer less sweet.
- 2 teaspoons baking powder
- Your lift agent; check the freshness date for best rise.
- 1/2 teaspoon baking soda
- Reacts with the wet ingredients for tender crumb and subtle lift.
- 1/2 teaspoon salt
- Balances sweetness and enhances the oat flavor. Use fine table salt or a little less if using Kosher salt.
- 1 large egg
- Brings structure and richness; room temperature helps it blend smoothly.
- 1 cup milk
- Whole milk gives the richest result; 2% or plant-based milk like oat milk works fine as well.
- 1/4 cup vegetable oil or melted butter
- Oil makes the muffins moist and shelf-stable; melted butter adds flavor. Use whichever you prefer.
- 1 teaspoon vanilla extract
- A simple splash elevates flavor and ties the chocolate and oats together.
- 3/4 cup chocolate chips
- Semi-sweet chips are classic; use mini chips for more even distribution or chopped chocolate for melty pockets.
Ingredients & Equipment Notes (Optional)
- Equipment: 12-cup muffin tin, paper liners or nonstick spray, mixing bowls (large and medium), whisk and spatula, measuring cups and spoons, wire rack.
- Choose rolled oats for texture; do not substitute with instant steel-cut oats.
- If using melted butter, let it cool slightly so it does not cook the egg when mixed.
- For uniform muffins, use an ice cream scoop or large spoon to portion batter into cups.
- Line your tin if you want easier cleanup and prettier muffins, but greasing the pan works well too.
Instructions – How to Make “Fearless 3-Day Oatmeal Chocolate Chip Breakfast Muffins”
- Preheat the oven to 375°F (190°C) and prepare your muffin tin.
- Why it matters: A hot, ready oven ensures the leavening reacts quickly and gives you an even rise.
- Visual cue: The oven should show a steady 375°F on the dial; your rack should be in the middle position.
- Mini tip: Line a 12-cup muffin tin with paper liners or grease it well to prevent sticking and simplify cleanup.
- Combine the dry ingredients in a large bowl.
- Why it matters: Mixing the flour, rolled oats, granulated sugar, baking powder, baking soda, and salt together ensures the leavening and salt are evenly distributed so every muffin rises and tastes balanced.
- Visual cue: You should see an even, pale mixture with tiny specks of oats throughout. There should be no clumps of baking powder or sugar.
- Mini tip: Whisk briskly for about 20 to 30 seconds to aerate the mixture slightly, which helps a lighter crumb.
- Whisk the wet ingredients in a separate medium bowl.
- Why it matters: The egg, milk, vegetable oil (or melted butter), and vanilla must be fully combined so they integrate smoothly into the dry mix.
- Visual cue: The mixture should look glossy and uniform, without streaks of oil or unmixed egg.
- Mini tip: If using melted butter, let it cool a bit before whisking with the egg so it does not scramble. Room temperature milk helps blend faster.
- Pour the wet ingredients into the dry ingredients and stir until just combined.
- Why it matters: Overmixing develops gluten and will yield tough muffins. A few lumps are fine and expected.
- Visual cue: Look for a shaggy batter where flour streaks have almost disappeared but small lumps remain.
- Mini tip: Use a spatula to fold gently about 10 to 12 strokes; stop when you can no longer see large pockets of dry flour.
- Gently fold in the chocolate chips.
- Why it matters: Chocolate chips should be distributed without overworking the batter. Folding gently keeps the batter tender and ensures pockets of chocolate without sinking.
- Visual cue: Chips should be evenly scattered, with a handful on the surface of the batter in the bowl.
- Mini tip: If you want chips to stay near the top of each muffin, reserve 1/4 cup to sprinkle on top just before baking.
- Divide the batter evenly among the 12 muffin cups.
- Why it matters: Even portions make for uniform baking so all muffins finish at the same time.
- Visual cue: Each cup should be about three quarters full; they will rise and form a gentle dome.
- Mini tip: Use a 1/3 cup measuring scoop or a large cookie scoop to portion batter quickly and evenly.
- Bake for 18 to 22 minutes until a wooden skewer inserted into the center of a muffin comes out clean or with a few moist crumbs.
- Why it matters: Proper baking time ensures the center sets without overbaking the exterior, preserving moisture for days.
- Visual cue: Muffin tops will be golden with set edges and slightly domed; the centers will spring back when lightly pressed.
- Mini tip: Start checking at 18 minutes; ovens vary. If the skewer comes out with wet batter, give them another 1 to 3 minutes.
- Let the muffins cool in the tin for a few minutes before transferring to a wire rack to cool completely.
- Why it matters: Cooling briefly in the tin allows the structure to set so muffins do not fall apart when removed. Cooling on a rack prevents sogginess from trapped steam.
- Visual cue: After 5 minutes, muffins will pull slightly away from the liner edges and feel firmer to the touch.
- Mini tip: Run a butter knife around the edge of any stubborn muffins before lifting them out. For immediate eating, cool 10 minutes; for storing, cool completely so condensation does not make them soggy.
Serving Suggestions & Storage Tips
- Serving ideas: Split warm muffins and spread a little butter, honey, or nut butter. They are also lovely with a smear of cream cheese or a dollop of yogurt on the side.
- Pairings: Serve with a steaming mug of coffee, a milky latte, or a fresh fruit salad. For brunch, pair with scrambled eggs or a savory frittata for balance. Consider offering mini jam jars for guests who love a fruity contrast.
- On-the-go: These muffins are sturdy and travel well in paper bags or lunchbox compartments. They are a quick breakfast for busy mornings or a midday pick-me-up.
- Storage – room temperature: Place cooled muffins in an airtight container lined with a paper towel to absorb any excess moisture. They will stay fresh for up to 2 days at room temperature.
- Storage – refrigerator: If you need longer storage, refrigerate in an airtight container for up to 5 days. Bring to room temperature or reheat gently before eating.
- Freezing: For the best make-ahead plan, freeze fully cooled muffins in a single layer on a baking sheet until solid, then transfer to a freezer-safe bag or container. Frozen muffins keep well for up to 3 months.
- Reheating: Thaw frozen muffins at room temperature or microwave for 20 to 40 seconds from frozen, depending on your microwave power. To refresh texture, warm in a 325°F (165°C) oven for 5 to 8 minutes.
- Creative serving: Slice a muffin horizontally and toast lightly, then sandwich with banana slices and peanut butter for a kid-friendly treat. For a brunch spread, present muffins on a tiered tray alongside mini versions of other bites like bite-sized pancake mini muffins for variety.
Helpful Notes & Variations
- Substitutions:
- Flour: Substitute up to 1 cup of whole wheat flour for part of the all-purpose flour for nuttier flavor. Do not replace all the flour with whole wheat without adjusting liquid slightly.
- Milk: Swap dairy milk for unsweetened plant-based milk such as oat or almond if dairy-free. Oat milk complements the oatmeal flavor nicely.
- Oil vs butter: Vegetable oil keeps the texture moist for several days; use melted butter for richer flavor. If using butter, allow it to cool a bit before mixing.
- Dietary adaptations:
- Gluten-free: Use a 1-to-1 gluten-free baking flour blend and ensure your oats are certified gluten-free. The texture will be slightly different but still very satisfying.
- Lower sugar: Reduce granulated sugar to 1/3 cup or substitute with coconut sugar for a more caramel note. Adjust to taste.
- Egg-free: For an egg-free version, try a commercial egg replacer or a flax egg (1 tablespoon ground flaxseed mixed with 3 tablespoons water, set 5 minutes). The muffin may be a touch denser.
- Flavor add-ins:
- Swap half the chocolate chips for chopped toasted walnuts or pecans for crunch.
- Stir in 1/2 cup dried fruit like raisins, cranberries, or chopped dates for chew.
- Add 1/2 teaspoon ground cinnamon and a pinch of nutmeg for a warm spice version.
- For a lemon lift, add 1 teaspoon lemon zest and swap vanilla for lemon extract.
- Common mistakes and how to avoid them:
- Overmixing: Mix until just combined. Overmixing yields dense, rubbery muffins. If you see long strands of gluten or the batter seems elastic, you have mixed too much.
- Soggy bottoms: Ensure muffins cool on a wire rack and are completely cool before storing. Trap heat equals sogginess.
- Uneven baking: Use room temperature wet ingredients and a properly preheated oven. Rotate the pan at the halfway point if your oven has hot spots.
- Sinking centers: Check that your baking powder is fresh and do not open the oven during the critical first 12 minutes of baking.
- Inspiration: If you enjoy playful cookie shapes and chocolate inspiration, I like to swap a portion of chips for chopped chocolate similar to ideas I explored when baking heart-shaped chocolate chip cookies for special occasions.
Conclusion
These Fearless 3-Day Oatmeal Chocolate Chip Breakfast Muffins stand out because they are unfussy, forgiving, and built to be enjoyed over several mornings without losing charm. They bring together simple pantry staples into a reliably tender, oat-forward muffin dotted with pockets of chocolate that make busy days feel a little sweeter. Whether you are prepping a batch for school lunches, a weekend brunch, or freezing for future rush mornings, this recipe gives you both comfort and convenience in one pan. For more inspiration on oatmeal chocolate chip treats, you might enjoy this take on classic cookies from Mad Hungry on Fearless Fresh, and if you are planning a grocery run, check out the latest seasonal finds in the February 2026 Fearless Flyer at Trader Joe’s. Try the recipe this week and leave a note about what twist you loved most.
Frequently Asked Questions
Can I make this recipe ahead of time?
Yes. These muffins are ideal for making ahead. Bake them, cool completely, and store at room temperature for up to 48 hours in an airtight container. For longer storage, refrigerate up to 5 days or freeze for up to 3 months. Freezing individually wrapped or in a single layer before bagging helps maintain shape and texture. When you need a quick breakfast, thaw a muffin or warm one from frozen in the microwave for 20 to 40 seconds.
How should I store leftovers and how long do they last?
Leftovers should be stored in an airtight container to preserve moisture. At room temperature they last 1 to 2 days best. In the refrigerator they remain good for up to 5 days, though bring refrigerated muffins to room temperature or warm briefly before serving for best texture. For longer storage, freeze cooled muffins in a freezer-safe container for up to 3 months, separating layers with parchment so they do not stick.
What is the best way to reheat or serve this recipe after storage?
For a fresh-from-the-oven feel, microwave a refrigerated or thawed muffin for 15 to 30 seconds on a microwave-safe plate. From frozen, microwave for 30 to 60 seconds depending on microwave power. For a crisper top and restored texture, reheat in a 325°F oven for 5 to 8 minutes either from thawed or slightly longer from frozen. Splitting and lightly toasting the muffin brings out the oats and adds a pleasing crunch.
Can I adjust or substitute ingredients to fit my preferences?
Absolutely. Swap milk for plant-based milks like oat or almond, use melted butter instead of oil for richer flavor, or substitute up to 1 cup of whole wheat flour for a nuttier loaf. For gluten-free diets, choose a quality 1-to-1 gluten-free flour and certified gluten-free oats. Reduce sugar to 1/3 cup for less sweetness or add spices like cinnamon for a warm profile. Note that substantial swaps, like removing the egg, may alter texture; try a flax egg or commercial egg replacer to keep structure.
Do you have tips to ensure the best texture and flavor every time?
- Measure flour correctly by spooning into the cup and leveling off, rather than scooping directly from the bag which can pack too much flour.
- Keep wet ingredients at room temperature so they combine smoothly.
- Mix until just combined to avoid gluten development that leads to toughness.
- Use fresh baking powder for reliable rise; baking powder older than 6 months may give weaker lift.
- Let muffins cool on a wire rack to avoid soggy bottoms and to set the crumb before storing.
- If using butter instead of oil, allow melted butter to cool so it does not cook the egg when mixed.
- For added freshness, sprinkle a few extra chocolate chips on top before baking to create an inviting golden top with melty chocolate.
If you try any of the variations, I would love to hear which one became your go-to. Happy baking and may your mornings feel a little braver with each warm muffin.
Fearless 3-Day Oatmeal Chocolate Chip Breakfast Muffins
Ingredients
Method
- Preheat the oven to 375°F (190°C) and prepare your muffin tin.
- Combine the dry ingredients in a large bowl.
- Whisk the wet ingredients in a separate medium bowl.
- Pour the wet ingredients into the dry ingredients and stir until just combined.
- Gently fold in the chocolate chips.
- Divide the batter evenly among the 12 muffin cups.
- Bake for 18 to 22 minutes until a wooden skewer inserted into the center of a muffin comes out clean.
- Let the muffins cool in the tin for a few minutes before transferring to a wire rack to cool completely.