There’s something deeply comforting about rolling your own sushi at home — the gentle rhythm of spreading rice, the bright pops of seasonal vegetables, the delicious payoff when you take that first bite. “Sushi at Home Recipes: Easy and Delicious Ideas for Beginners – Fascinating Names | Cooked Sushi Recipes, Sushi Roll Recipes, Sushi Recipes” is a friendly, seasonal guide for home cooks who want to try sushi-making without the intimidation. Using main ingredients like short-grain sushi rice, nori sheets, and an array of cooked or pickled fillings (think roasted sweet potato, steamed shrimp, or savory tamago), this collection is perfect for cooler evenings when you want food that feels both comforting and a little adventurous. If you like cozy meals and want a project-night dish, this is for you — it pairs beautifully with warm, cheesy comfort foods like cheesy fall soups.
Ingredients & Equipment
Below is a pantry-friendly list for beginner-friendly cooked sushi and sushi rolls with seasonal touches. Quantities depend on how many rolls you plan to make; this list assumes 4–6 rolls (serves 3–4).
Ingredients
- 3 cups short-grain sushi rice (uncooked)
- 3 1/4 cups water (for rice, adjust per rice cooker)
- 1/2 cup rice vinegar
- 3 tbsp sugar
- 1 1/2 tsp salt
- 6–8 nori sheets (seaweed)
- 2 ripe avocados, sliced
- 1 medium cucumber, julienned (remove seeds)
- 1 medium carrot, julienned and lightly blanched or roasted
- 8–10 cooked shrimp (peeled) — roasted or boiled
- 8–10 kani (imitation crab) sticks or real crab meat, shredded
- 2 eggs + 1 tbsp sugar + pinch of salt (for tamagoyaki)
- 1 small sweet potato — roasted and sliced (seasonal option)
- Pickled daikon (danmuji) or quick-pickled radish (optional)
- Mayonnaise and Sriracha for spicy mayo
- Soy sauce, wasabi, and pickled ginger to serve
- Sesame seeds (white or black) and thinly sliced scallions for garnish
- Sesame oil (for kimbap-style rolls)
Equipment
- Rice cooker or heavy-bottomed pot with lid (rice cooker recommended)
- Bamboo sushi rolling mat (makisu)
- Sharp chef’s or sushi knife
- Large wooden or plastic bowl (hangiri or wide mixing bowl)
- Rice paddle (shamoji) or wooden spoon
- Small saucepan (for seasoning rice and making tamagoyaki)
- Non-stick frying pan (for tamagoyaki)
- Plastic wrap (to cover mat or keep rice moist)
- Cutting board
- Measuring cups and spoons
- Fine mesh sieve or colander (for rinsing rice)
- Optional helpful tools: kitchen thermometer (for rice), blender (for smoothly emulsified sauces), baking tray (for roasting sweet potato or toasting sesame seeds)
Notes
- If you don’t have short-grain sushi rice, labeled sushi rice is best — it’s sticky enough to hold rolls together.
- For a Korean twist, brush some sesame oil on rice and use pickled vegetables like in kimbap; this technique is similar to many dump-and-bake and make-ahead comfort dishes like effortless dump-and-bake dinners in spirit.
Step-by-Step Instructions (with tips)
Below are easy-to-follow directions for making sushi rice, preparing fillings, and rolling classic maki and inside-out rolls. Read through once, prep ingredients, and take your time — sushi is as much about the process as the result.
- Rinse and cook the rice
- Measure 3 cups of sushi rice and place in a fine mesh sieve. Rinse under cold water, swirling with your hand, until water runs mostly clear. This removes excess starch and prevents gummy rice.
- Cook in a rice cooker with 3 1/4 cups water (follow your cooker’s instructions). If using a pot, combine rice and water, bring to a gentle boil, then cover and simmer on low for 18 minutes; remove from heat and rest 10 minutes. Tip: Use a kitchen thermometer; rice is done when the center is around 70–75°C (160–167°F) and grains are tender.
- Season the rice
- While the rice cooks, warm 1/2 cup rice vinegar, 3 tbsp sugar, and 1 1/2 tsp salt in a small saucepan just until sugar dissolves; don’t boil.
- Transfer cooked rice to a wide bowl. Pour the vinegar mixture evenly over the rice and fold gently with a paddle or wooden spoon — cut and fold rather than stirring aggressively to keep grains intact.
- Fan the rice as you fold to cool it quickly and give it shine. Tip: If you love a bolder flavor, add a splash of mirin to the vinegar mixture.
- Prepare cooked fillings (roast vs boil)
- Shrimp: For a bright flavor, boil shrimp for 2–3 minutes until opaque, then cool in iced water. For deeper flavor, roast shrimp with a drizzle of sesame oil and a pinch of smoked paprika at 200°C/400°F for 6–8 minutes.
- Sweet potato: Roast slices on a baking tray with a bit of oil and salt at 200°C/400°F for 20–25 minutes until tender and caramelized.
- Tamagoyaki (rolled egg): Whisk 2 eggs with 1 tbsp sugar and a pinch of salt. Cook in a small non-stick pan over medium-low heat, rolling thin layers into a log. Slice to fit rolls. Tip: Blanch spinach quickly or sauté greens with sesame oil and garlic for a warm filling.
- Make spicy mayo
- Mix 3 tbsp mayonnaise with 1–2 tsp Sriracha (adjust to taste). For a silkier sauce, blend briefly in a small blender.
- Assemble a basic maki roll
- Lay bamboo mat on work surface and cover with plastic wrap if you prefer easier cleanup.
- Place nori shiny-side down on the mat. Wet your fingers with water to prevent sticking, scoop about 3/4 cup of rice, and spread a thin, even layer over nori leaving a 1-inch strip at the top edge.
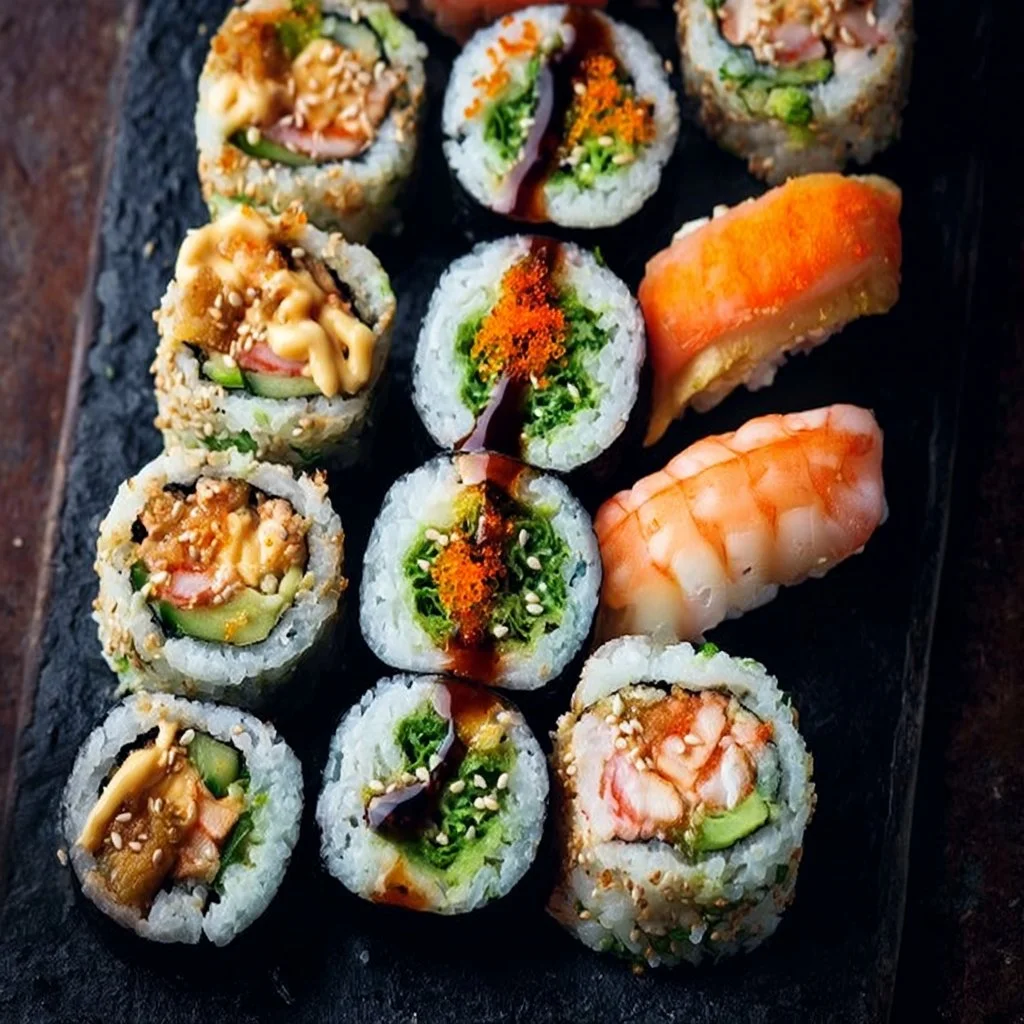
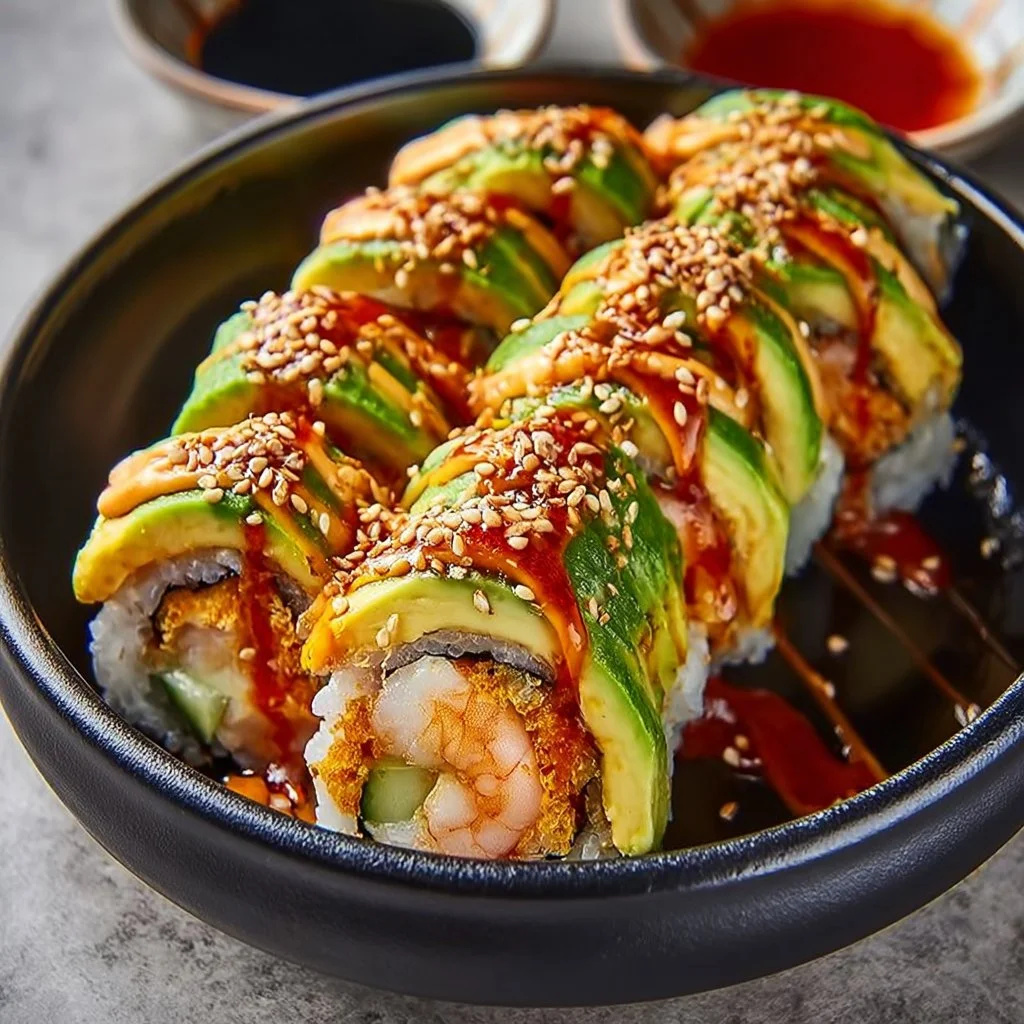
- Arrange fillings in a horizontal line about 1–2 inches from the bottom edge: cucumber, avocado, shredded kani or crab, and a strip of tamago.
- Lift the mat edge closest to you and roll away from you, pressing gently but firmly to shape a tight cylinder. Moisten the exposed edge of nori to seal. Tip: If your roll is loose, press gently with the mat and form again; avoid overfilling.
- Inside-out roll (uramaki) technique
- Place plastic wrap over the mat and flip your nori + rice assembly so rice is on the outside.
- Sprinkle sesame seeds on the rice, flip nori, then add fillings as above and roll. Tip: Use slightly less rice for inside-out rolls to make rolling manageable.
- Slice and serve
- Using a sharp, wet knife, slice each roll into 6–8 pieces. Wipe the knife between cuts for cleaner slices.
- Garnish with sesame seeds, thin scallions, or a drizzle of spicy mayo. Tip: For neat slices, press rolls gently and let them rest 2 minutes before slicing.
Variations and flavor suggestions
- Spicy Kani Roll: Mix shredded crab with spicy mayo and green onion.
- Autumn Harvest Roll: Roasted sweet potato, avocado, and spinach with a miso drizzle.
- Cozy Shrimp Roll: Tempura shrimp or roasted shrimp with cucumber and a tangy citrus mayo.
- Kimbap-style roll: Swap rice vinegar for a light brush of sesame oil and a sprinkle of toasted sesame seeds for a Korean-inspired roll similar to popular recipes like the comforting meatloaf techniques in how they emphasize bold, comforting flavors.
Storage, Freezing & Make-Ahead Tips
Storing homemade sushi properly keeps textures pleasant and prevents waste — but fresh sushi is best eaten the same day.
Short-term storage
- Refrigerate any leftovers in an airtight container for up to 24 hours. Keep soy sauce and wasabi separate until serving.
- Nori loses crispness quickly; store leftover rolls with a piece of damp paper towel in the container to keep rice moist but don’t expect crunchy seaweed.
Freezing
- Freezing fully assembled sushi is not recommended: rice becomes dry and mushy, and avocado turns brown. Instead, freeze cooked fillings separately (shrimp, roasted sweet potato, or cooked crab) in airtight freezer bags for up to 2 months.
- Thaw fillings overnight in the refrigerator and assemble fresh rolls when ready.
Make-ahead steps
- Cook rice earlier in the day and keep at room temperature covered with a damp cloth for several hours (not more than 6–8 hours) or refrigerate and re-season lightly before assembly.
- Prepare fillings (tamago, roasted vegetables, cooked proteins) up to 2–3 days ahead and refrigerate in separate containers.
- Toast sesame seeds and slice vegetables just before rolling to keep textures bright.
Portioning advice
- Plan 2–3 rolls for 3–4 people as a light meal; for a hearty dinner, make 3–4 rolls per person plus sides.
- If serving a party, set up a sushi rolling station where guests can build their own — it keeps rolls fresh and makes an interactive evening.
How to Use / Serve This Dish
Serving ideas and pairings bring warmth and seasonal cheer to a homemade sushi night.
Classic accompaniments
- Soy sauce, pickled ginger, and a small dab of wasabi are classic and welcome on the plate.
- A warm bowl of miso soup or a simple miso-glazed roasted vegetable pairs beautifully for a comforting combo.
Seasonal pairings
- In autumn and winter, serve sushi alongside roasted root vegetables or a miso-sesame roasted squash. For a contrast of temperature, pair warm braised greens or lightly sautéed mushrooms.
- Bright spring rolls with pickled radish and tender blanched asparagus feel fresh and lively.
Creative serving styles
- Sushi bowls (chirashi): Scatter sliced fillings and nori over a bowl of seasoned sushi rice for a deconstructed, cozy meal.
- Sushi hand rolls (temaki): Wrap nori cones around fillings for a fun, casual serving option — great for family nights.
- Fascinating roll names: Give your creations playful names to match their flavors — “Autumn Harvest Maki” (roasted sweet potato + spinach), “Cozy Crabcloud Roll” (spicy kani + avocado), and “Garden Kimbap” (sesame-oil brushed rice with pickled veg).
Pairings with drinks and desserts
- Green tea or genmaicha complements rice-flavored dishes. For a special evening, a chilled sake or light white wine is a lovely match.
- Follow sushi with a light fruit-based dessert or simple sweet like light strawberry desserts for a refreshing finish.
FAQ
Q: Can I use regular long-grain rice instead of sushi rice? A: You can, but it won’t have the same sticky texture that helps rolls hold together. If long-grain is your only option, try cooking it a bit stickier (slightly less water) and handle gently, but results will be more fragile.
Q: How long does homemade sushi keep in the fridge? A: Best eaten same day. Store leftovers in an airtight container for up to 24 hours. Avoid keeping avocado or raw-like fillings refrigerated more than a day due to texture changes.
Q: What are good vegetarian swaps? A: Replace seafood with roasted sweet potato, marinated tofu, shiitake mushrooms sautéed with soy and mirin, blanched spinach, pickled carrots, and avocado. Sesame oil and toasted sesame seeds add rich, savory notes.
Q: How do I keep avocado from browning? A: Toss slices in a little lemon or lime juice just before assembling. Also, assemble rolls shortly before serving and keep them chilled.
Conclusion
Making sushi at home is a warm, hands-on way to celebrate seasonal produce and comfort-food flavors — everything from roasted sweet potatoes and savory tamagoyaki to cozy, spicy kani rolls can be adapted for beginners. This guide encourages you to experiment with cooked fillings, flavorful sauces, and playful names that make home rolls feel special. If you’d like a spicy crab rolling tutorial to follow for a first project, try this helpful Kani Sushi (Spicy Crab Roll) recipe from Cooking With Ayeh; and if you’re curious about a sesame-oil brushed, Korean-style roll, this Kimbap | Korean sushi guide is a lovely inspiration. Ready your mat, call a friend, and make a night of it — then share your favorite roll name and photo with loved ones. Happy rolling!
Sushi at Home
Ingredients
Method
- Rinse the sushi rice under cold water in a fine mesh sieve until the water runs mostly clear to remove excess starch.
- Cook in a rice cooker with 3 1/4 cups of water. If using a pot, bring to a gentle boil, lower the heat, and let simmer covered for 18 minutes.
- Warm the rice vinegar, sugar, and salt in a small saucepan until sugar dissolves but do not boil.
- Fold the vinegar mixture into the cooked rice gently with a paddle before fanning to cool.
- Boil shrimp for 2-3 minutes until opaque or roast with sesame oil for deeper flavor.
- Roast sweet potato slices at 200°C/400°F for 20-25 minutes until tender.
- Prepare tamagoyaki by whisking eggs with sugar and salt, cooking in a non-stick pan rolling layers into a log.
- Mix mayonnaise and Sriracha to taste, blend if desired for smoothness.
- Lay nori on bamboo mat, spread sushi rice evenly, and arrange fillings in a line.
- Roll gently but firmly, sealing the edge with water.
- For inside-out rolls, flip the nori/rice assembly and add fillings before rolling.
- Slice rolls into 6-8 pieces with a sharp, wet knife.
- Garnish with sesame seeds and thinly sliced scallions, serve with condiments.