Pin by Brandy Cobb on Stuff that looks yummy in 2026 | Chocolate Easter Nests — an Easter dessert to make together
Introduction
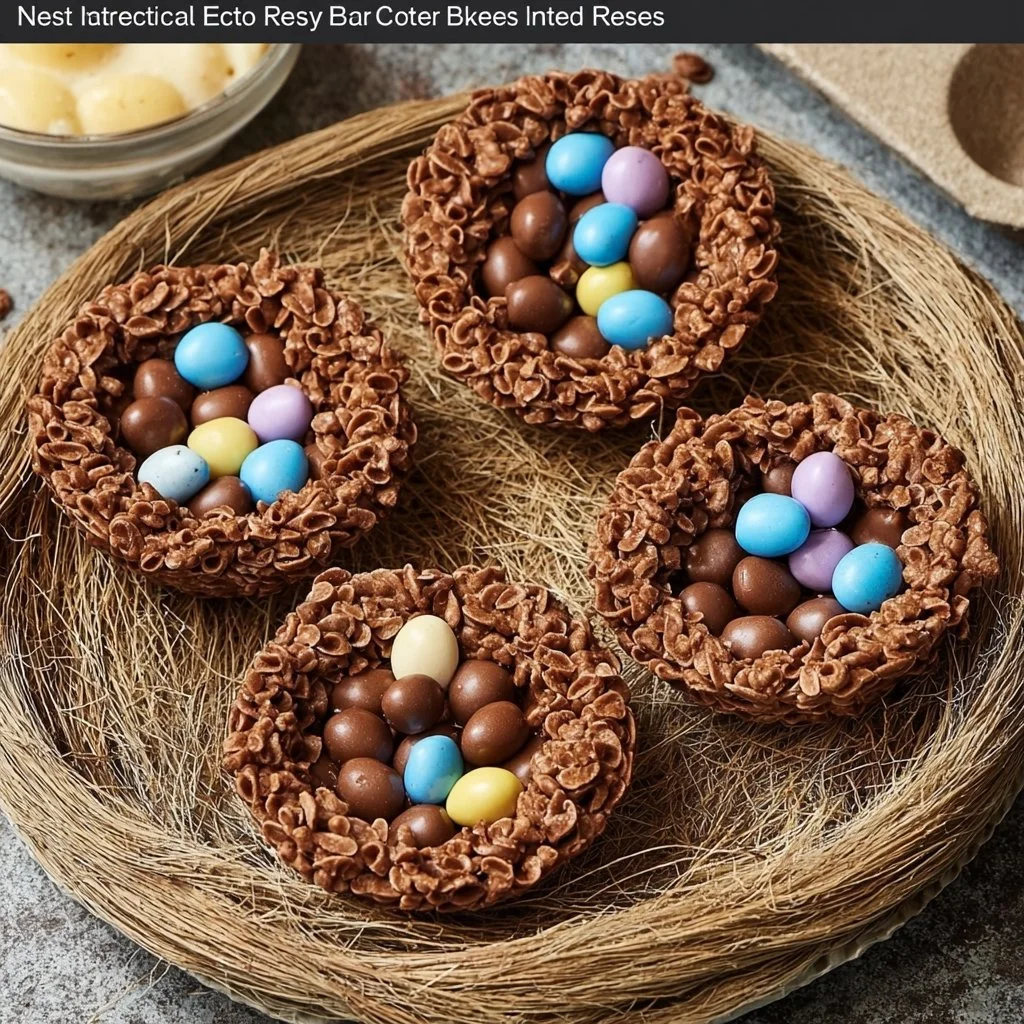
There’s something delightfully nostalgic about Chocolate Easter nests: crunchy little chocolate bowls cradling candy eggs that instantly transport you to spring mornings, family kitchens, and small, joyful rituals. This version inspired by “Pin by Brandy Cobb on Stuff that looks yummy in 2026 | Chocolate Easter nests, Easter dessert, Easter recipes” keeps things simple, seasonal, and utterly kid-friendly — the main stars are meltable chocolate (choose your favorite bar or chips) and crispy strands (shredded wheat, chow mein noodles, or even toasted coconut for a twist). If you love projects that feel homemade and look picture-perfect for a holiday table, this recipe is worth trying — it’s fast, adaptable, and endlessly crowd-pleasing. For another festive dessert idea to enjoy later this year, check out this strawberry dessert inspiration that pairs well with spring baking: strawberry dessert recipes and summer treats.
Ingredients & Equipment
Ingredients
- 12 oz (340 g) semisweet or milk chocolate chips (or chopped chocolate bars) — use higher-quality chocolate for a better flavor.
- 1 tbsp unsalted butter or coconut oil (optional, for shine and smoother melting)
- 6–8 cups shredded wheat (sugar-free) pieces, or 5–6 cups chow mein noodles — both create the classic “nest” texture.
- 1/2 tsp flaky sea salt (optional, to balance sweetness)
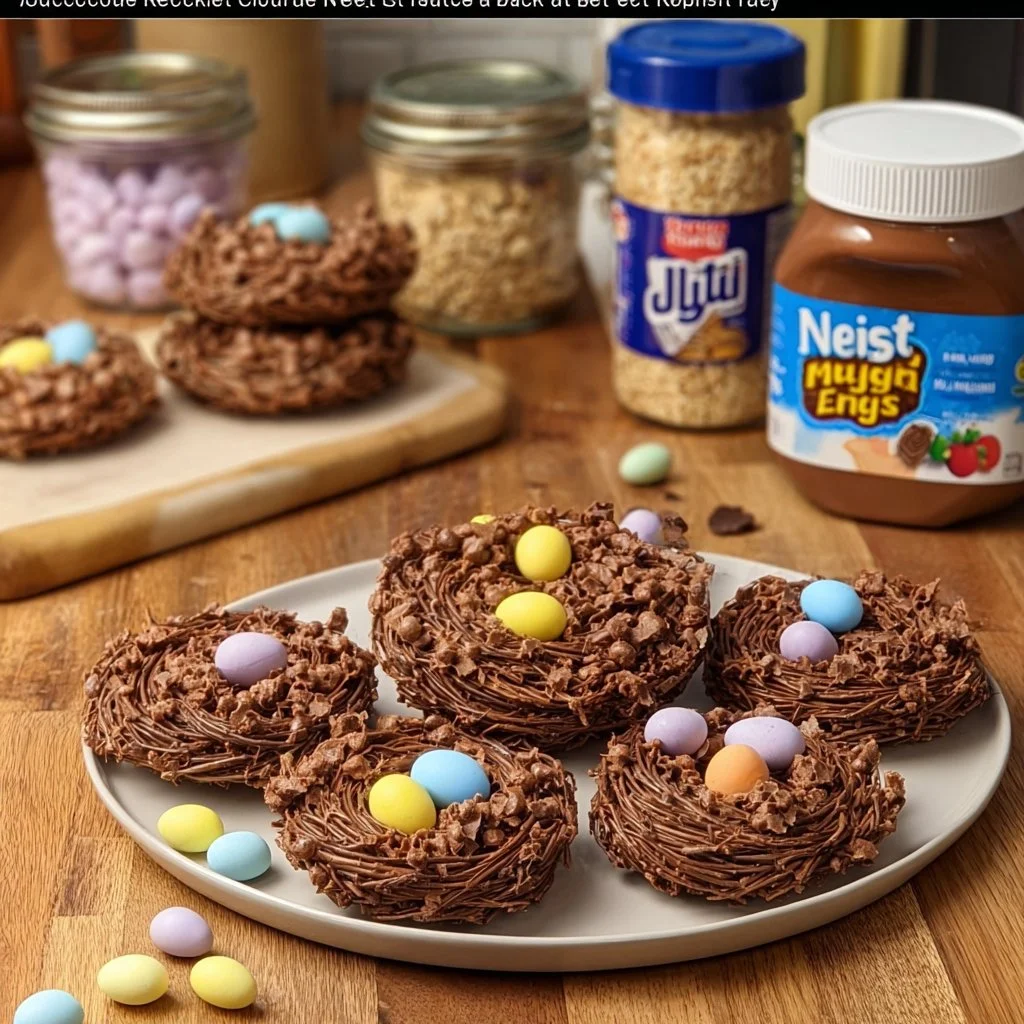
- 24–36 mini chocolate eggs (Cadbury Mini Eggs or candy-coated chocolate eggs)
- Optional mix-ins/toppers: toasted coconut flakes, chopped toasted almonds, a drizzle of white chocolate, edible glitter, or pastel sprinkles.
Helpful notes
- For a nutty twist, swap 1–2 tbsp of butter for natural peanut butter or almond butter and mix into the melted chocolate.
- If you prefer white chocolate nests, use high-quality white chocolate and consider adding 1 tsp neutral oil to keep it glossy.
Equipment
- Large microwave-safe bowl or double boiler (saucepan + heatproof bowl)
- Spatula or large spoon
- Muffin tin or baking sheet lined with parchment and cupcake liners (paper or silicone)
- Measuring cups and spoons
- Small saucepan and candy thermometer (optional, if tempering)
- Baking tray and cooling rack
- Small microplane or zester (if adding orange or lemon zest)
Helpful tools
- Silicone spatula for scraping melted chocolate
- Piping bag or small zip-top bag for drizzling white chocolate
- Kitchen scale (for precise chocolate amounts)
For more creative baking inspiration — from cakes to decorative ideas — you might like this collection of vintage and creative cake designs: creative birthday cake designs and vintage cakes.
Step-by-Step Instructions (with tips)
- Prep your workspace
- Line a baking sheet with parchment paper or place cupcake liners in a muffin tin.
- If using shredded wheat, squash the biscuits into bite-sized pieces inside a large bowl (use a rolling pin or your hands). If using chow mein noodles, just measure and set aside.
- Melt the chocolate (two easy methods)
- Microwave method (fastest): Place chocolate and butter (if using) in a microwave-safe bowl. Heat in 20–30 second bursts, stirring between each, until smooth and fully melted. Tip: stop when small lumps remain; residual heat will finish melting.
- Double boiler method (gentler): Set a heatproof bowl over a barely simmering saucepan of water (bowl shouldn’t touch the water). Stir chocolate until melted. This reduces risk of burning, especially for white chocolate.
- Tip: If you want glossy, snappy chocolate, tempering is an option. Gently melt and cool to specific temperatures with a thermometer. For home baking, the microwave or double boiler is perfectly fine.
- Combine chocolate and nest base
- Pour melted chocolate over the shredded wheat pieces or chow mein noodles. Fold gently with a spatula until everything is evenly coated. If the mixture seems dry, add an extra teaspoon of butter or a splash of neutral oil.
- Variation — peanut-butter nests: Stir in 1–2 tablespoons of smooth peanut butter for a rich, nutty flavor.
- Shape the nests
- Spoon clusters of the chocolate-coated cereal onto your lined baking sheet (or press into cupcake liners). Shape each cluster into a shallow cup using the back of the spoon, leaving a slight well in the center for the eggs.
- Tip: Use a small ice-cream scoop or two spoons for uniform sizes. For perfectly round nests, press the mixture into the muffin tin and then carefully lift them out after setting.
- Chill and set
- Place the tray or muffin tin in the refrigerator for 20–30 minutes until the chocolate is firm.
- Tip: For a quicker set, pop them in the freezer for 10–12 minutes. If you freeze, let them sit 5 minutes at room temperature before moving to avoid condensation.
- Decorate and finish
- Carefully press 3–4 mini chocolate eggs into the center of each nest.
- Optional: Drizzle melted white chocolate over the nest for contrast, or sprinkle toasted coconut, chopped nuts, or edible glitter.
- Tip: If you want a sandwich-style surprise, pipe a small dot of softened marshmallow or jam into the center before adding eggs.
- Flavor variations or allergy-friendly swaps
- Gluten-free: Use gluten-free crunchy rice cereal or crushed gluten-free cornflakes instead of shredded wheat.
- Vegan/dairy-free: Use dairy-free chocolate and coconut oil in place of butter.
- Extra crunch: Add a tablespoon of toasted sesame seeds or finely chopped pretzels to the chocolate mix for a sweet-salty counterpoint.
- Citrus note: Add 1 tsp of finely grated orange zest to the melted chocolate for a bright flavor.
For more pretty cake-decorating inspiration when planning your dessert table, see these birthday cake decorating ideas for visual guidance: birthday cake decorating and cake design ideas.
Storage, Freezing & Make-Ahead Tips
Storing
- Short-term: Keep nests in an airtight container at room temperature for up to 3–4 days. Avoid humid kitchens; moisture softens the cereal base.
- Refrigeration: Store in the fridge if your kitchen is warm; they’ll keep for up to 2 weeks, but chocolate may develop a dull surface bloom (still safe to eat).
Freezing
- Freeze for longer storage by placing nests in a single layer on a baking sheet to flash-freeze for 1 hour, then transfer to a freezer-safe container with parchment layers. They’ll keep for up to 2 months.
- Thawing: Move nests to the refrigerator for a few hours before bringing to room temperature to avoid condensation on the chocolate.
Make-ahead
- Build the nests up to a month ahead and freeze; add fresh candy eggs the day you serve to avoid any moisture transfer or sugar-grain discoloration.
- You can also make the chocolate-cereal clusters (without eggs) and keep them unadorned to use as topping for ice cream or cupcakes.
Portioning advice
- For parties, plan on 1–2 nests per person as a small dessert or snack; increase portions if these are the main sweet offering.
- Use mini cupcake liners for bite-sized nests that are easy to serve and transport.
How to Use / Serve This Dish
Serving ideas
- Easter dessert table: Arrange nests on a tiered platter with pastel cookies, hot cross buns, and simple lemon bars for variety.
- Party favors: Place 2–3 nests in a small cellophane bag tied with ribbon for charming take-home treats.
- Dessert bowl topper: Crumble a nest over vanilla pudding, mousse, or ice cream for crunchy texture and chocolate flavor.
- Brunch companion: Serve alongside coffee, hot chocolate, or a creamy chai latte — the sweetness of the nest pairs wonderfully with a slightly bitter brew.
Creative variations
- S’mores nests: Add mini marshmallows into the center and toast briefly (watch carefully) for a campfire twist.
- Salted caramel nests: Add a drizzle of salted caramel on top just before serving.
- Mini pavlova adornment: Place a tiny dollop of whipped cream and berries in the center of each nest for a spring fruit twist.
Presentation tips
- Use pastel paper liners and edible flowers for a pretty, seasonal look.
- For gifting, include a small label with ingredients and a “best eaten by” date.
FAQ
Q: Can I use chocolate bars instead of chocolate chips? A: Absolutely — chop your favorite chocolate bar into small pieces and melt using the microwave or double boiler method. Chocolate bars can actually taste better because they’re higher quality than many chips, but watch the melting closely to avoid scorching.
Q: How long will these nests stay crunchy? A: Stored at room temperature in an airtight container, nests stay crunchy for about 3–4 days. If you live in a humid climate, keep them refrigerated to prevent the cereal from softening, though refrigeration can sometimes dull the chocolate’s shine.
Q: What can I use instead of shredded wheat for a gluten-free option? A: For gluten-free nests, use crispy rice cereal, crushed gluten-free cornflakes, or even puffed quinoa. Make sure all packaged ingredients are certified gluten-free if necessary.
Q: My white chocolate seized — help! A: White chocolate is sensitive to heat and moisture and can seize into a grainy mass. To salvage it, add 1–2 teaspoons of neutral oil (vegetable or coconut) and stir gently off the heat until smooth. If it’s beyond saving, melt a bit of regular chocolate and mix to mellow the texture.
Conclusion
There’s a simple joy to making Chocolate Easter nests — they’re quick, adaptable, and perfect for celebrating spring with family and friends. This recipe keeps the process relaxed and open to creativity: swap cereals, play with chocolate types, and decorate for your aesthetic. If you’re looking for more seasonal baking inspiration to pair with these nests or to round out a dessert spread, consider a fruity cobbler for after-dinner sweetness or a nutty, layered cake for a special centerpiece. For a bright, fruit-forward option, see this Red Velvet-Berry Cobbler idea for a cheerful complement to your spring treats: Red Velvet-Berry Cobbler recipe. And if you’re inspired by layered, nut-sweet bakes for your holiday table, take a look at this lovely classic for texture and honeyed flavor: bee sting cake recipe on Smitten Kitchen.
Give these nests a try this Easter — they’re forgiving, fun to assemble, and a guaranteed smile-maker. If you make a batch, share a photo or note about your favorite variation — I’d love to hear how you dressed yours up this season!
Chocolate Easter Nests
Ingredients
Method
- Line a baking sheet with parchment paper or place cupcake liners in a muffin tin.
- If using shredded wheat, crush the biscuits into bite-sized pieces in a large bowl.
- If using chow mein noodles, measure and set aside.
- Microwave method: Place chocolate and butter in a microwave-safe bowl. Heat in 20–30 second bursts, stirring until smooth and fully melted.
- Double boiler method: Set a heatproof bowl over simmering water, stir chocolate until melted. This reduces burning risk.
- Pour melted chocolate over the cereal. Fold gently until evenly coated.
- If dry, add an extra teaspoon of butter or a splash of oil.
- Spoon clusters on the lined sheet, shaping each into a shallow cup.
- Refrigerate for 20–30 minutes until firm.
- Press 3–4 mini chocolate eggs into each nest.
- Optional: Drizzle white chocolate or add toppings.