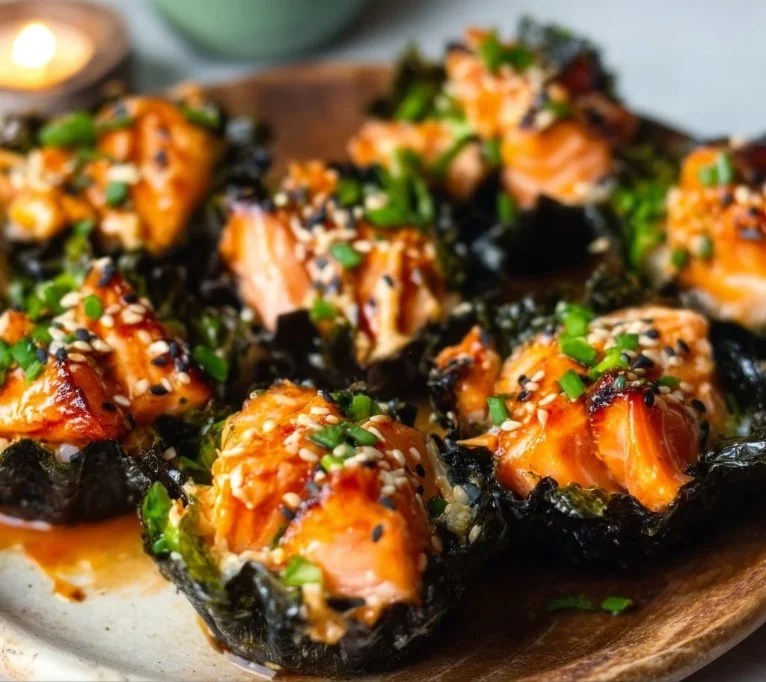
Easy Baked Salmon Sushi Cups (Viral Recipe), I know — the name sounds bold, but hear me out. “Have you ever wanted sushi without the fuss?” I often ask my friends that over a cup of tea, and their eyes light up. These baked salmon sushi cups answer that wish: all the cozy comfort of a sushi bake in perfectly portioned cups that feel both playful and impressive. This recipe leans on sushi rice, cubed salmon, Kewpie mayo, sriracha, and a sprinkle of furikake for crunch and umami. If you enjoyed other handheld sushi-inspired dishes like the spicy salmon sushi bake recipe, you’ll find these cups are equally satisfying and even easier to customize. They’re warm, slightly crispy around the edges, and perfect for weeknight dinners or casual gatherings when you want something comforting and a touch festive.
Why You’ll Love This Recipe
- Quick and easy to prepare — most of the hands-on time is simple assembly.
- Uses affordable, accessible ingredients you can find at most grocery stores.
- Works beautifully for year-round meals — especially cozy in cooler months or during casual dinner parties.
- Comforting and impressive — perfect for family dinners, potlucks, or when you want to show off a viral food trend with minimal effort.
What makes this version unique is the combination of baked, slightly caramelized salmon-topped cups and the crisp nori base formed in a muffin tin. Unlike a large sushi bake, these single-serve cups feel friendly and portable — kids love them, and they’re great for sharing. On a personal note, this recipe helped me rebuild confidence in the kitchen when I wanted to make something impressive without stress — it’s become my go-to when I want a crowd-pleaser that still feels homemade and heartwarming. If you liked other baked sushi approaches, check out this comforting spicy salmon sushi bake recipe for more inspo.
Ingredients Needed
For the best results, group ingredients by purpose. I’ve rephrased and clarified the original ingredients while keeping everything faithful to the source.
For the rice base
- 1 1/2 cups uncooked sushi rice — short-grain rice gives that sticky, classic sushi texture. Rinse until the water runs clear before cooking.
- 1 tablespoon rice vinegar — to season the rice.
- 2 teaspoons white granulated sugar — dissolves into the vinegar to create the slightly sweet sushi rice seasoning.
For the salmon filling
- 1 pound salmon, cut into small cubes — fresh or previously frozen and fully thawed. Remove skin if present and pat dry.
- 1 tablespoon light soy sauce — use low-sodium if you prefer.
- 1 tablespoon Kewpie mayonnaise — gives that rich, creamy Japanese mayo flavor; regular mayo can be used in a pinch.
- 1 tablespoon sriracha — adjust for heat; substitute with a milder chili sauce if preferred.
- 1 teaspoon toasted sesame oil — a little goes a long way to add nutty aroma.
For assembly and garnish
- 3 large nori sheets — cut into pieces to line muffin cups (see instructions).
- Furikake for garnish — a sprinkle adds crunch, sesame, and seaweed umami.
- 1 green onion, thinly sliced — for fresh, bright flavor.
- Cooking spray — or a little neutral oil to grease the muffin tin.
Notes and substitutions
- If you can’t find Kewpie, mix a teaspoon of rice vinegar into regular mayo for a closer flavor.
- Sushi rice is essential for texture; do not substitute long-grain rice.
- Choose wild-caught salmon if available for deeper flavor; farmed salmon also works fine.
- All ingredients are pork-free and alcohol-free, following dietary guidelines.
(And if you’re curious about variations that borrow from the baked-sushi family, take a peek at this spicy salmon sushi bake recipe to see another comforting take.)
Ingredients & Equipment Notes
Useful tools that make this easy and reliable:
- Rice cooker or a heavy-bottomed pot with a tight-fitting lid — for perfectly cooked sushi rice every time.
- Medium bowl — to mix the seasoned vinegar into the rice without mashing the grains.
- Muffin tin — creates the perfect cup shapes for individual servings.
- Sharp knife and cutting board — for quick, even salmon cubes and to slice nori cleanly.
- Baking sheet (optional) — for catching any drips or to make cleanup easier.
- Cooling rack — to let cups rest a bit before removing from the muffin tin.
Why these matter: a rice cooker yields consistent rice texture, a muffin tin forms neat cups, and a sharp knife preserves the delicate texture of the salmon. Having everything prepped and tools within reach keeps the bake moving smoothly.
Instructions – How to Make “Easy Baked Salmon Sushi Cups (Viral Recipe)”
- Preheat and prep
- Preheat your oven to 400°F (200°C). Lightly spray a standard 12-cup muffin tin with cooking spray or brush with a thin layer of oil so the nori and rice release easily after baking.
- Why this matters: a hot oven helps the salmon set and develop slight browning on top within the short bake time.
- Cook the sushi rice
- Rinse 1 1/2 cups sushi rice under cold water until the water runs clear. Cook according to package instructions — in a rice cooker this is usually a 1:1.1 to 1:1.2 rice-to-water ratio, but follow your brand’s directions.
- Visual cues: cooked sushi rice should be pearly, slightly sticky, and the grains tender but not mushy.
- Season the rice
- In a microwave-safe small bowl, combine 1 tablespoon rice vinegar and 2 teaspoons sugar. Microwave for about 30 seconds, or briefly warm on the stovetop, just until the sugar dissolves. Pour this mixture evenly over the hot cooked rice and gently fold with a rice paddle or wooden spoon until combined. Let the rice cool slightly — still warm but not hot — while you prep the salmon.
- Tip: Gently fold rather than stirring vigorously to keep the rice grains intact and fluffy, not mushy.
- Prepare the salmon mixture
- In a medium bowl, combine 1 pound cubed salmon, 1 tablespoon light soy sauce, 1 tablespoon Kewpie mayo, 1 tablespoon sriracha, and 1 teaspoon toasted sesame oil. Toss until the pieces are evenly coated.
- Why this matters: the mayo and sriracha bind the salmon and help it become creamy when baked, while the soy sauce seasons the fish. Keep the cubes bite-sized so they cook quickly and evenly.
- Cut and fit the nori
- Cut the 3 large nori sheets into 4 rectangles each — you’ll have 12 pieces total to line each muffin cup. The rectangles should be large enough to press into the muffin cups so the edges come up slightly.
- Assembly cue: the nori will soften against the warm rice and form the cup shape; if your kitchen is humid, work quickly so nori doesn’t get too floppy.
- Assemble the sushi cups
- Place each nori piece into the greased muffin cup. Spoon a heaping tablespoon of the seasoned sushi rice into the center of each nori square and press down gently with the back of the spoon so the rice forms a compact base. Repeat until each cup has a rice layer.
- Top each rice layer with a spoonful of the salmon mixture, spreading it so the salmon covers the rice evenly.
- Mini-tip: Wet your hands lightly when pressing rice to prevent sticking; press to an even thickness but don’t compress too hard — you still want some air pockets for a delicate bite.
- Bake until set
- Place the muffin tin in the preheated oven and bake at 400°F for about 15 minutes, or until the salmon is cooked through and the tops are slightly golden. The internal temperature of the salmon should reach 145°F (63°C) if you use an instant-read thermometer.
- Visual cues: the mayo-sriracha topping will bubble a little and the edges of the salmon may take on a light golden color.
- Rest and garnish
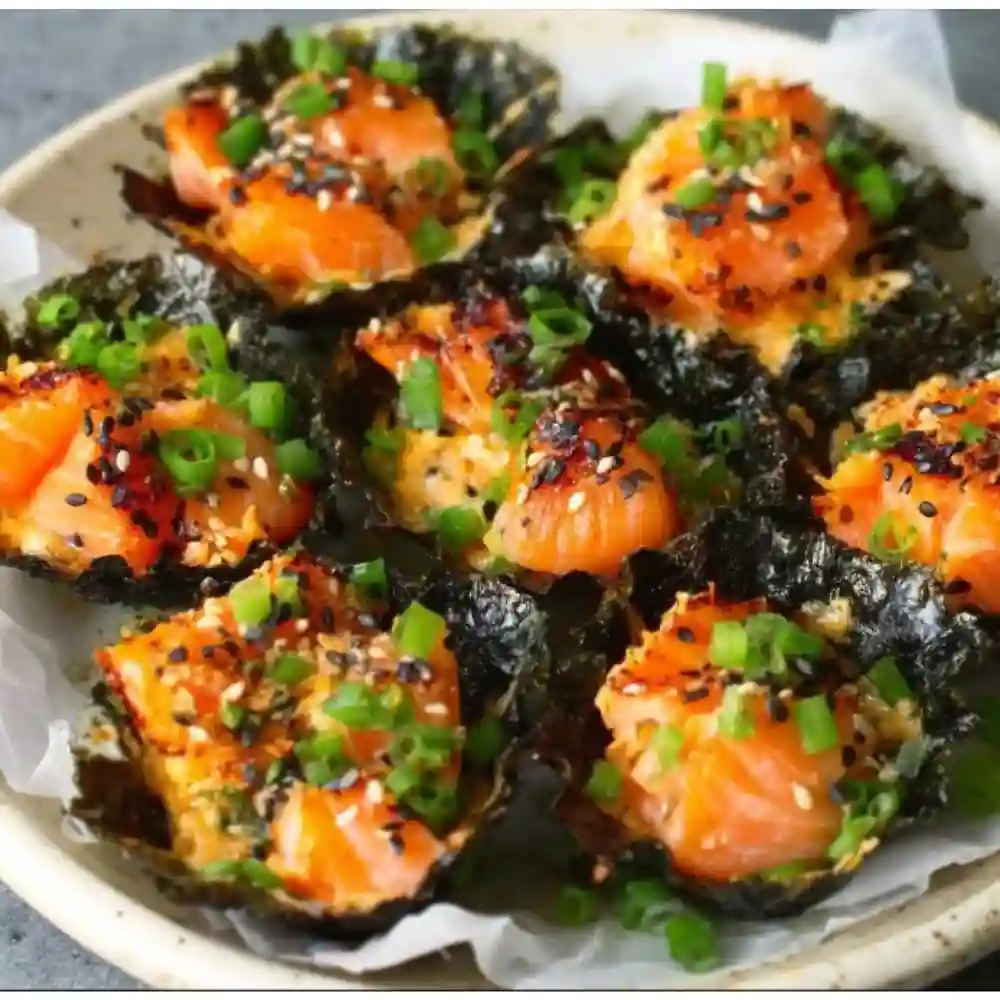
- Remove the muffin tin and let the cups cool for 3 to 5 minutes — this helps them set so they keep their shape when you remove them. Carefully lift the nori-edged cups from the tin.
- Drizzle additional sriracha or a quick spicy mayo (mix 2 tablespoons Kewpie mayo with 1 teaspoon sriracha) over each cup. Sprinkle furikake and scatter thinly sliced green onion for color and crunch.
- Pro tip: Serve warm rather than piping hot so the nori stays crisp and the filling is pleasant to bite into.
- Serve and enjoy
- Arrange cups on a platter and provide extra condiments like soy sauce for dipping, pickled ginger if you like, and extra furikake on the side.
- Variation note: If you prefer, top with a tiny piece of avocado or sesame seeds for extra texture.
Serving Suggestions & Storage Tips
Serving ideas and presentation
- Serve these sushi cups straight from the muffin tin to a pretty platter or on a bed of shredded lettuce. The contrast of warm salmon and slightly crisp nori is delightful.
- Pair the cups with simple sides: a crunchy cucumber salad, quick pickled vegetables, or steamed edamame seasoned with flaky sea salt.
- For a party, place the cups on small squares of parchment and provide cocktail picks for easy, no-fuss serving.
Pairings and accompaniments
- Drinks: Since alcohol is excluded, serve sparkling water with citrus, iced green tea, or a cold yuzu soda for a refreshing pairing.
- Sauces: Soy sauce or tamari for dipping, extra spicy mayo, or a drizzle of unagi-style sauce (if avoiding alcohol, ensure the sauce is alcohol-free) complement the flavors.
Creative serving variations
- Handheld version: Serve rice in larger nori wraps and pile the baked salmon mixture on top for an open-faced “sushi toast.”
- Family-style: Bake the components in a casserole dish for a communal sushi bake, then scoop out portions onto rice or lettuce.
- Vegan twist: Swap salmon for marinated baked tofu cubes mixed with the same mayo-sriracha blend for a plant-forward version.
Storage and reheating
- Refrigerator: Store leftovers in an airtight container for up to 3 days. Keep garnishes separate to preserve texture.
- Freezing: I don’t recommend freezing once assembled, as the nori will soften and the rice texture changes when thawed.
- Reheating: Warm gently in a 350°F oven for 8 to 10 minutes to revive the texture. Avoid microwaving if you want to keep some crispness in the nori — it can turn chewy quickly.
Best practices
- If making ahead for a party, bake and cool the cups, then reheat briefly in the oven right before serving and add fresh garnishes to keep everything bright.
Helpful Notes & Variations
Ingredient swaps and substitutions
- Mayonnaise: If you can’t find Kewpie, regular mayonnaise works; stir in 1/2 teaspoon rice vinegar to mimic the slightly tangy Kewpie profile.
- Heat level: Replace sriracha with chili paste or gochujang for a deeper flavor and adjust to taste.
- Soy sauce: Use gluten-free tamari for a gluten-free option.
- Rice alternative: This recipe relies on sushi rice; short-grain brown rice is a whole-grain alternative but will change the texture and cook time.
Dietary adaptations
- Gluten-free: Use tamari instead of regular soy sauce and confirm the furikake is gluten-free.
- Lower-sodium: Use low-sodium soy sauce and reduce added sugar in the rice seasoning.
- Dairy-free: This recipe is naturally dairy-free as written.
Flavor enhancements or add-ins
- Add finely diced cucumber or avocado on top after baking for extra freshness.
- Mix a teaspoon of toasted sesame seeds into the rice for added nuttiness.
- Fold in a little zested lime to the salmon mixture for a citrus lift.
Common mistakes to avoid
- Overpacking the rice: Compressing too much makes the texture dense; aim for just compacted enough to hold the shape.
- Poorly sized nori: If the nori pieces are too small, the rice will overflow; too large and they fold irregularly. Aim for roughly muffin-cup-sized rectangles that come up the sides about halfway.
- Skipping the rest: Letting cups cool for a few minutes helps them hold shape and prevents burning your fingers when unmolding.
Personal tip: I sometimes toast the furikake for 30 seconds in a dry skillet to bring out extra aroma — it’s subtle but lovely.
Conclusion
Easy Baked Salmon Sushi Cups (Viral Recipe) are a cozy, approachable way to enjoy all the flavors of a sushi bake in neat, single-serve portions. They bring together sticky sushi rice, tender baked salmon tossed in Kewpie mayo and sriracha, and the satisfying crunch of nori and furikake — a balance of textures and a flavor profile that hits salty, spicy, and umami notes all at once. This recipe is perfect when you want something that feels special but isn’t fussy — a warm crowd-pleaser for family dinners, potlucks, or a simple weeknight treat. If you try this at home, I’d love to hear how you adapted it — leave a comment and a star rating so others can find this comforting, viral-inspired dish. Share the love on Pinterest or social media and tag a friend who needs an easy, impressive dinner idea.
For more background on the viral inspiration behind these cups, I referenced a fun roundup of the trend at Viral TikTok Baked Salmon Sushi Cups – Kalejunkie, and another well-loved version can be found in this detailed write-up at Easy Baked Salmon Sushi Cups (Viral Recipe) – One Happy Bite.
Frequently Asked Questions
Answer:
I’m including this section to cover common concerns readers often have when making baked salmon sushi cups. If you have other questions, leave them in the comments and I’ll answer!
- Can I use frozen salmon?
- Yes. Thaw it fully in the refrigerator and pat dry before cubing. Excess moisture can make the mixture watery and affect baking, so ensure the salmon is dry to get a nice texture.
- How do I know when the salmon is cooked through?
- The best indicator is an internal temperature of 145°F (63°C) for fully cooked salmon. Visually, the chunks should be opaque throughout and slightly flaky at the edges.
- Can I make these spicy mayo-free?
- Absolutely. If you want a milder version, omit the sriracha from the salmon mix and serve a mild mayo or a drizzle of teriyaki-style sauce on top.
- Will the nori become soggy?
- Nori will soften somewhat against warm rice, but you’ll still have a pleasant textural contrast. To keep some crispness, serve shortly after baking and avoid long storage with garnishes on top.
- How do I reheat leftovers without losing texture?
- Reheat in a 350°F oven for 8-10 minutes. This keeps the salmon tender while warming the rice and helps the nori hold up better than a microwave.
- Are these allergen-friendly?
- This recipe contains fish and soy (soy sauce). For allergies, substitute the salmon with a non-fish protein like baked tofu and use a soy-free seasoning if needed.
If a specific question from this FAQ isn’t addressing your concern, please drop your exact question below — I’ll reply with tips tailored to your kitchen and preferences.
Baked Salmon Sushi Cups
Ingredients
Method
- Preheat your oven to 400°F (200°C). Lightly spray a standard 12-cup muffin tin with cooking spray or brush with a thin layer of oil.
- Rinse 1 1/2 cups sushi rice under cold water until the water runs clear. Cook according to package instructions.
- In a microwave-safe small bowl, combine 1 tablespoon rice vinegar and 2 teaspoons sugar. Microwave for about 30 seconds until the sugar dissolves. Pour this mixture over the hot cooked rice and gently fold until combined.
- In a medium bowl, combine cubed salmon, light soy sauce, Kewpie mayo, sriracha, and toasted sesame oil. Toss until evenly coated.
- Cut the nori sheets into 4 rectangles each to line each muffin cup.
- Place each nori piece into the greased muffin cup. Spoon a heaping tablespoon of seasoned sushi rice into the center and press down gently. Top with salmon mixture.
- Bake at 400°F for about 15 minutes until the salmon is cooked through and slightly golden.
- Remove the muffin tin and let the cups cool for 3 to 5 minutes. Carefully lift the cups from the tin and drizzle additional sriracha over each cup.
- Arrange on a platter with extra condiments and serve warm.