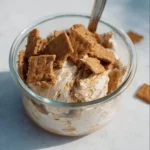
Banana Cream Pie Ninja Creami Protein Ice Cream is comfort in a bowl — and I mean that from the bottom of my spoon. “Try this!” I told my partner the first time I made it; he was skeptical about “protein” and “Ninja Creami” in the same sentence. One bite later, and he declared it “better than the real thing.” This recipe sings of ripe bananas, a hint of vanilla, a graham cracker crust, and a creamy, scoopable texture you’ll crave on warm nights or after workouts.
If you love homemade, no-churn protein desserts that feel indulgent but are simple to pull together, you’ll relate. For more inspiration on cozy from-scratch treats that pair well with this kind of comfort-food vibe, check out this Guinness chocolate cake with Irish buttercream — it’s a showstopper for special occasions and gives you that same warm, comforting energy.
Why You’ll Love This Banana Cream Pie Ninja Creami Protein Ice Cream
- Quick and easy to prepare — the blender does most of the work.
- Made with simple, accessible ingredients you likely already have.
- A perfect summer no-guilt treat after a workout or for a weekend family dessert.
- Comforting and nostalgic, with the satisfying crunch of graham crackers and creamy banana flavor.
What sets this version apart is the high-protein twist: it uses protein powder and Greek yogurt to boost nutrition without sacrificing that luscious, classic banana cream pie flavor. It’s the kind of recipe that builds confidence in the kitchen — you’ll feel proud serving a dessert that looks and tastes like you slaved over it, while it really came together in minutes. If you’re the sort who loves bold, flavorful, home-cooked meals, you might also enjoy the hearty, well-seasoned comfort of this Peruvian chicken and rice with green sauce — different vibe, same satisfying home-cooked feeling.
Ingredients Needed for Banana Cream Pie Ninja Creami Protein Ice Cream
For clarity, I’ve grouped everything so you can prep easily. Ingredients are rewritten from the provided list with small notes.
For the ice cream base:
- 2 very ripe bananas — the riper, the sweeter and more banana-forward the flavor; ripe bananas with brown spots are perfect.
- 1 cup vanilla or banana-flavored protein powder — choose your favorite whey or plant-based protein; vanilla is most versatile.
- 1/2 cup plain Greek yogurt — adds creaminess and tang; full-fat gives richer texture, but low-fat works too.
- 1 cup unsweetened almond milk or coconut milk — choose almond for a lighter profile or coconut for a slightly tropical richness.
- 1 tablespoon honey or pure maple syrup — optional, for added sweetness if your bananas aren’t super ripe.
- 1 teaspoon pure vanilla extract — enhances the banana and rounds the flavor.
For the crust and garnish:
- 1/2 cup crushed graham crackers — for that classic banana cream pie crunch; use gluten-free if needed.
- Optional: 1–2 teaspoons melted butter (plant-based or dairy) — to bind the crust if you like a firmer base.
Brief clarifying notes:
- Fresh vs. frozen bananas: Fresh, ripe bananas blend silky and give the best banana flavor; you can freeze sliced ripe bananas for future batches (see Variations).
- Protein powder: If using an unflavored protein powder, you may want to add a touch more honey or a sprinkle of stevia to taste.
- Sweetness: Taste the blended base before processing in the Ninja Creami and adjust with more honey/maple if needed.
For a quick read on site policies or recipe use, you can always review the terms of service linked on my site — practical for bloggers and recipe-sharers.
Ingredients & Equipment Notes
A few tools make this recipe more foolproof and deliver creamier results:
- Blender: A high-speed blender or a good countertop blender is essential for a smooth, lump-free base. It helps break down the bananas and protein powder fully.
- Ninja Creami: Designed for transforming frozen bases into scoopable ice cream. Follow the manufacturer’s processing settings for best texture.
- Freezer-safe container (or Ninja Creami pint containers): Use shallow, wide containers for faster freezing and easier processing.
- Small bowl and spoon: For mixing graham cracker crumbs and for layering crust.
- Measuring cups and spoons: Accurate measurements help protein powder texture and sweetness balance.
Why these matter: the blender ensures no gritty protein pockets, while the Ninja Creami’s churn-and-spin creates that scoopable, aerated finish that resembles traditional ice cream but is faster and healthier. If you don’t own a Creami, see the Helpful Notes section for a no-machine alternative.
Instructions – How to Make “Banana Cream Pie Ninja Creami Protein Ice Cream”
- Prepare your bananas. Peel and roughly chop 2 ripe bananas. If the bananas are very ripe and a little soft, they’ll blend extra creamy; if slightly underripe, the protein may mask that firmness.
- Combine the ice cream base. In a blender, add the chopped bananas, 1 cup protein powder (vanilla or banana flavor), 1/2 cup Greek yogurt, 1 cup almond or coconut milk, 1 tablespoon honey or maple syrup, and 1 teaspoon vanilla extract. Blend until completely smooth — you should see no streaks of banana or dry protein powder. The texture will be pourable, like a thick smoothie.
- Why this matters: Blending thoroughly prevents graininess and ensures the protein fully hydrates. If the mixture seems too thick to blend, add a splash more milk, 1 tablespoon at a time.
- Taste and adjust. Stop the blender and taste a small spoonful. If you want it sweeter, add a touch more honey/maple. If the banana flavor needs a boost, a small pinch of ground cinnamon can help without becoming a banana-cinnamon dessert.
- Portion into Ninja Creami containers. Pour the blended mixture into your Ninja Creami pint container(s), leaving a little headspace at the top (about 1/2 inch) for expansion when freezing. Smooth the top with a spatula.
- Visual cue: The base should fill most of the container and sit level; if there are bubbles, gently tap the container on the counter to pop them.
- Freeze the base solid. Place the container in the freezer and freeze until completely solid — at least 24 hours for best texture.
- Why this matters: The Ninja Creami works by shaving frozen blocks into creamy ice cream. If not fully frozen, the texture will be soft or slushy.
- Prepare the graham cracker crust. While the base freezes, mix 1/2 cup crushed graham crackers in a small bowl. If you prefer a firmer crust, add 1–2 teaspoons of melted butter and stir until crumbs are evenly moistened.
- Mini-tip: For a salty-sweet pop, mix in a pinch of flaky sea salt to the crumbs.
- Process in the Ninja Creami. When your base is fully frozen, remove the container from the freezer and follow the Ninja Creami manufacturer’s instructions to process into ice cream — usually the “Ice Cream” function is ideal.
- Visual cues: The finished product should be smooth and scoopable, with aeration and no large icy chunks. If it appears crumbly or powdery, run the “Re-spin” or add a tablespoon of milk and repack slightly before reprocessing.
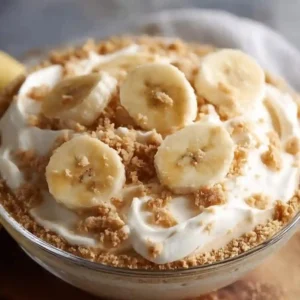
- Assemble with crust. Spoon a thin layer of the graham cracker crumbs into the bottom of your serving dishes. Layer the freshly processed banana cream pie protein ice cream on top of the crust.
- Why layering matters: The contrast of crunchy crumbs and creamy ice cream is what evokes banana cream pie.
- Firm up (optional). If you prefer a firmer texture and neater scoops, place assembled dishes in the freezer for about 30 minutes to set.
- Serve and enjoy. Add an extra sprinkle of crushed graham crackers on top or a few banana slices for garnish. Dig in and savor the creamy, high-protein treat.
Serving Suggestions & Storage Tips
Serving ideas:
- Classic presentation: Serve in small dessert bowls with a graham cracker crust and a few fresh banana slices on top.
- Sundae-style: Add a drizzle of warm salted caramel or a spoonful of natural peanut butter for a richer treat.
- Mini parfaits: Layer small jars with crust, processed ice cream, and a dollop of Greek yogurt whipped with a touch of honey.
Presentation tips:
- Use chilled bowls for slower melting.
- For a polished look, press the graham crumbs into the bottom of the dish with the back of a spoon to create a uniform crust layer.
- A light dusting of ground cinnamon or a few toasted nut pieces adds color and crunch.
Pairings and accompaniments:
- A hot cup of coffee or espresso balances the creaminess for an after-dinner pairing.
- Serve alongside a fruit salad for a lighter brunch option.
- A few squares of dark chocolate are a decadent contrast if you want a richer dessert.
Storage:
- Refrigerator: Store leftovers in an airtight container in the freezer — not the fridge. Once softened, this dessert is best kept frozen. In the fridge it will lose structure quickly.
- Freezer: Keep in an airtight container for up to 2–3 weeks for best texture; beyond that, ice crystals may form and flavor will decline. Press a piece of plastic wrap directly on the surface before sealing to reduce ice crystals.
- Make-ahead: Freeze the base pints for up to a month — process in the Ninja Creami when ready to serve.
Best reheating methods to preserve texture and flavor:
- This is best served frozen; if you need a softer scoop quickly, let it sit at room temperature for 3–5 minutes or microwave on defrost for 10–15 seconds, then stir before serving. Avoid prolonged microwaving to prevent melting.
Helpful Notes & Variations
Ingredient swaps and substitutions:
- Dairy-free: Use coconut-based Greek-style yogurt and full-fat coconut milk for a dairy-free version.
- Lower sugar: Use an unflavored protein powder and a sugar substitute such as erythritol or stevia, adjusting sweetness to taste.
- Gluten-free crust: Use gluten-free graham-style crumbs or finely crushed gluten-free cookies.
- Different protein powders: Plant-based proteins can be used, but texture may vary; pea protein tends to thicken more, so add a little extra milk.
Flavor enhancements and add-ins:
- Chocolate chips: Fold in 1/4 cup mini dark chocolate chips after processing for little pockets of chocolate.
- Nutty twist: Stir in 2 tablespoons of crushed toasted pecans or almonds for crunch.
- Boozy syrup (non-cook): Since alcohol is excluded, try a splash of coffee extract or extra vanilla instead of liqueur.
Common mistakes to avoid:
- Not blending thoroughly: Protein powder can clump; always blend until smooth.
- Freezing for too short a time: The base must be frozen solid for the Ninja Creami to work properly; rush-freezing causes uneven texture.
- Over-processing: If the mixture becomes too soft or starts to melt, stop the machine and re-freeze for 10–15 minutes before finishing.
No-Ninja Creami alternative:
- If you don’t own a Ninja Creami, you can pour the blended base into a shallow, freezer-safe pan and freeze, stirring vigorously every 30 minutes for 2–3 hours to break up ice crystals and mimic churned texture. The result won’t be identical, but it’s still delicious.
Conclusion
Banana Cream Pie Ninja Creami Protein Ice Cream marries nostalgia and nutrition: ripe bananas, vanilla protein, and tangy Greek yogurt transformed into a creamy, scoopable dessert that feels indulgent but is built for everyday life. It’s perfect for weekend treats, post-workout rewards, or any time you want something comforting yet mindful. Try the recipe, experiment with your favorite protein powder, and make it yours — then come back and tell me how it went.
For more variations and inspiration on Ninja Creami banana-style ice creams, check out this helpful roundup on Ninja Creami Banana Cream Pie Ice Cream – Food Banjo. If you’d like a step-by-step take focused on high-protein banana bases, I also recommend this detailed guide at Protein Banana Ice Cream | Ninja Creami – Lara Clevenger. And for another close take on the classic banana cream pie turned Ninja Creami dessert, see this version from Banana Cream Pie Ninja Creami Ice Cream – Love Grows Wild.
I’d love to hear: did you add chocolate chips or extra banana slices? Leave a comment, rating, and share your photos on Pinterest or social with friends — happy scooping!
Frequently Asked Questions
How can I make this Banana Cream Pie Ninja Creami Protein Ice Cream without a Ninja Creami?
You can still make a creamy frozen treat by pouring the blended base into a shallow, freezer-safe dish and freezing. Every 30–45 minutes, stir vigorously with a fork or whisk to break up ice crystals; repeat until mostly frozen and scoopable. The texture will be slightly icier but still delicious.
Can I use frozen bananas instead of fresh in the blender?
Yes. If using frozen bananas, let them thaw for a few minutes or add a splash more milk to help the blender process them smoothly. Frozen bananas will make the base extra thick; perfect if you like a dense, creamy texture.
What protein powder works best for smooth texture?
Vanilla whey or a high-quality plant blend tends to give the best balance of flavor and mouthfeel. Some single-source plant proteins (like pea) can be chalky; if you use those, add an extra tablespoon of liquid to help hydrate the powder fully.
How long can I store this protein ice cream in the freezer?
Store in an airtight container for up to 2–3 weeks for best texture. Press plastic wrap directly on the surface before sealing to minimize ice crystals. Flavor and texture decline after a few weeks.
My ice cream was grainy after processing — what went wrong?
Graininess often results from protein powder not being fully mixed into the base or from using a protein with a coarser texture. Ensure you blend thoroughly until smooth, and consider adding a splash more milk to improve mouthfeel before freezing.
Can I make this recipe sugar-free or lower in calories?
Yes. Use an unflavored or low-calorie protein powder and a no-calorie sweetener like stevia or erythritol instead of honey or maple syrup. Using low-fat Greek yogurt reduces calories but may slightly change the creaminess; consider 1–2 tablespoons of added milk or a small amount of avocado for richness.

Banana Cream Pie Ninja Creami Protein Ice Cream
Ingredients
Method
- Peel and roughly chop 2 ripe bananas.
- In a blender, combine the chopped bananas, protein powder, Greek yogurt, almond or coconut milk, honey or maple syrup, and vanilla extract. Blend until completely smooth.
- Taste the mixture and adjust sweetness with more honey or maple if desired.
- Pour the blended mixture into Ninja Creami pint container(s), leaving about 1/2 inch of headspace. Smooth the top.
- Freeze the base for at least 24 hours until completely solid.
- While the base freezes, mix crushed graham crackers in a small bowl. Add melted butter if desired for a firmer crust.
- Process the frozen base in the Ninja Creami according to manufacturer’s instructions.
- Spoon a thin layer of the graham cracker crust into serving dishes, then layer the processed banana ice cream on top.
- For neater scoops, freeze assembled dishes for about 30 minutes.
- Serve with a sprinkle of crushed graham crackers or banana slices on top.
- Enjoy your creamy, high-protein treat!