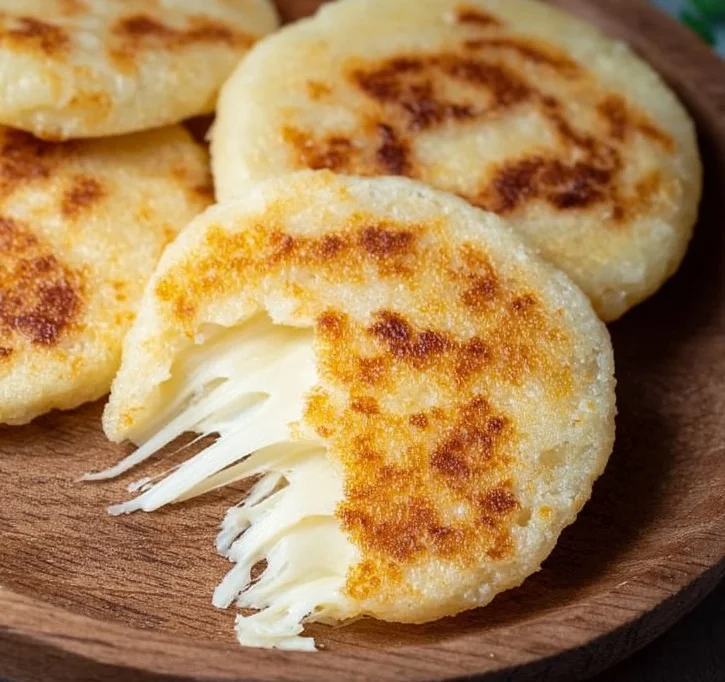
Arepas with Cheese are like a warm conversation at the kitchen table, and I can still hear my grandmother teasing me that the very first batch I made was “too perfect to share.” “Too perfect” became my favorite compliment, and it taught me the small rituals that make these pockets of corn and cheese sing: instant masarepa, a pinch of salt, creamy Cotija folded into the dough, melty mozzarella tucked inside, a touch of butter and warm water to bring it all together. I love to pair them with a bright salad or a side of roasted vegetables, and if you adore stuffed cheesy bites, you might also enjoy my Buffalo Chicken Bacon Mozzarella Bombs for Game Day Bliss which share that same indulgent, gooey spirit.
Why You’ll Love This Recipe
- Authentic comfort with simple pantry ingredients: pre-cooked masarepa, Cotija, mozzarella, butter, salt, warm water, and a little oil for cooking.
- Fast and forgiving: the dough feels like homemade play-dough, so even beginners can shape perfect arepas with minimal fuss.
- Versatile and satisfying: crisp golden exteriors encase oozy mozzarella, plus the Cotija mixed into the dough adds a salty, savory depth you will crave.
- Emotionally resonant: these arepas carry nostalgia and the warmth of shared meals, perfect for weekday dinners or leisurely weekend brunches.
- Crowd-pleasing and adaptable: make them plain, stuffed, baked, or griddled; serve them for breakfast, lunch, or an irresistible snack.
- Hands-on and rewarding: shaping and sealing the arepas invites family involvement, a small ritual that turns cooking into storytelling.
Ingredients Needed
- 2 cups pre-cooked white cornmeal (masarepa) — look for bags labeled masarepa or harina precocida for best texture.
- 1/2 teaspoon sea salt or Kosher salt — use fine sea salt for even distribution, or Kosher if that is what you have.
- 1/2 cup Cotija cheese, finely crumbled — Cotija gives a salty, crumbly note incorporated into the dough; if unavailable, a mild crumbly cheese works in a pinch.
- 1 tablespoon butter, softened — helps tenderize the dough and adds richness; room temperature makes mixing easier.
- 1 1/4 cup warm water, plus a tablespoon at a time if needed — warm, not hot; it brings the dough together and hydrates the cornmeal evenly.
- 2 cups shredded mozzarella cheese (about 8 ounces) — the melty heart of every stuffed arepa; shred it yourself for the best melt.
- Oil or butter for cooking — a neutral oil or extra butter for pan-frying; butter adds flavor while oil resists burning at medium-low heat.
Note: All ingredient amounts are tuned for eight stuffed arepas that are roughly 5 inches in diameter and about 1/2 inch thick once sealed.
Ingredients & Equipment Notes
- Masarepa vs. masa harina: masarepa (often labeled P.A.N. or Harina P.A.N.) is pre-cooked white cornmeal made specifically for arepas; do not substitute cornmeal labeled for polenta or masa harina without adjusting liquid.
- Cheese selection: Cotija folded into the dough gives a salty dimension; shredded mozzarella in the center provides the ooze. For variation, try a mild Oaxaca or a low-moisture mozzarella for slightly different melt and texture.
- Butter and oil: soften butter for easier mixing, and use a combination of butter and neutral oil for cooking to get both flavor and a higher smoke threshold.
- Tools: large mixing bowl, kitchen towel, measuring cups and spoons, a skillet or electric griddle, spatula, and a small bowl for crumbling cheese.
- Hands-on shaping: keep a small bowl of water nearby to dampen your palms for smoother shaping and sealing.
Instructions – How to Make “Arepas with Cheese”
-
Combine the dry and wet elements
Why it matters: Even mixing ensures each arepa has consistent flavor and texture.
Visual cues: The bowl should show the cornmeal and crumbled Cotija distributed evenly before water is added.
Mini tip: Crumble the Cotija with your fingers into small pieces so it integrates smoothly.- In a medium bowl combine 2 cups masarepa, 1/2 teaspoon salt, 1/2 cup finely crumbled Cotija cheese, and 1 tablespoon softened butter. Pour in 1 1/4 cup warm water gradually while stirring so the mixture begins to come together.
-
Knead until a smooth dough forms
Why it matters: Proper kneading hydrates the cornmeal evenly so the final arepas hold together without cracking.
Visual cues: The dough should look cohesive, matte but slightly glossy where the butter is mixed in.
Mini tip: Press and fold the dough with the heel of your hand for 2 to 3 minutes; this builds a uniform texture.- Knead the mixture until a smooth dough is formed. The dough should not be sticky but should have the consistency of homemade play-dough.
-
Rest the dough briefly
Why it matters: Resting allows the cornmeal to fully absorb moisture, which prevents cracking later.
Visual cues: The surface will look slightly firmer and the dough will hold its shape better after resting.
Mini tip: Cover with a clean kitchen towel to keep the dough warm and hydrated.- Cover the bowl with a kitchen towel and allow it to rest for 10 minutes.
-
Check and adjust the consistency
Why it matters: Too dry dough cracks when shaped; too wet dough becomes unmanageable and won’t seal properly.
Visual cues: When flattened, the dough should bend slightly without breaking or crumbling at the edges.
Mini tip: Add additional warm water one tablespoon at a time; it is easier to add than to correct if too wet.- Check the consistency of the dough by flattening a small amount between the palm of your hands. If the edges crack, the dough is too dry. Add additional water, one tablespoon at a time until the dough is pliable.
-
Portion the dough
Why it matters: Even portions cook uniformly and look professional when plated.
Visual cues: Each ball should be the same size and smooth on the surface.
Mini tip: Weighing portions creates perfect uniformity, but dividing into 8 even pieces by eye works well for home cooks.- With lightly wet hands, divide the dough into 8 even pieces. Roll each piece into a ball then pat each dough ball into a circle about 5 inches in diameter and roughly 1/4 inch thick.
-
Assemble with cheese
Why it matters: Proper sealing traps the shredded mozzarella so it melts into a gooey center without leaking.
Visual cues: The inner edge should meet cleanly; sealed seams should be smooth after pressing.
Mini tip: Leave a 1/2-inch border around the first circle to prevent cheese from escaping when you seal.- Working with one circle at a time, add a couple of tablespoons of shredded mozzarella in the center, leaving about a 1/2-inch border. Place a second dough circle on top and seal the edges. Press lightly between your palms smoothing the sealed edges to form a disk about 1/2 inch thick. Repeat for the remaining dough and cheese.
-
Prepare the cooking surface
Why it matters: Medium-low heat produces a golden crust without burning while giving the interior time to heat and melt the cheese.
Visual cues: The pan should shimmer with a thin layer of oil but not smoke.
Mini tip: If using butter, start with a warmed skillet then add the butter and spread it to coat the surface.- To cook on the stove top: heat the oil in a large skillet over medium-low heat. If using butter, heat the skillet and then add the butter, spreading it around to coat the skillet.
-
Alternatively, preheat an electric griddle
Why it matters: A griddle gives a larger flat surface and consistent heat for multiple arepas at once.
Visual cues: The griddle should read 325ºF before placing the arepas.
Mini tip: Add butter to the griddle and spread it so each arepa has contact with a lightly greased surface.- To cook in an electric griddle: heat the griddle to 325ºF. Add butter and spread it to coat the griddle’s surface.
-
Cook the arepas until golden
Why it matters: Slow cooking builds a crisp, golden shell while allowing the center to heat through to melty perfection.
Visual cues: After 4 to 5 minutes the bottom will develop a deep golden-brown color and a slight crust.
Mini tip: Move the arepas occasionally to avoid hot spots and to check doneness; a spatula scrape should reveal a golden color but not blackened spots.- Place the arepas on the skillet or griddle and cook, moving them around occasionally for about 4 to 5 minutes or until golden brown.
-
Flip and finish cooking
Why it matters: Even browning on both sides ensures a uniform crust and thorough melting of the cheese inside.
Visual cues: The second side will take a similar amount of time and will be equally golden and slightly crisp at the edges.
Mini tip: After flipping, gently press with the back of the spatula to ensure good contact with the pan but do not flatten them too much.- Flip and cook for about 4 to 5 minutes or until golden brown and crispy.
-
Rest briefly then serve
Why it matters: A short rest helps the cheeses settle so you do not lose all the ooze when you cut into them.
Visual cues: The arepa surface remains crisp while the interior is steaming and soft.
Mini tip: Serve warm with a pat of butter on top, or keep warm in a low oven if making a batch.- Remove from the skillet and serve warm, with additional butter on top if desired.
-
Troubleshoot common issues
Why it matters: Small adjustments save the recipe and keep you confident for next time.
Visual cues: If the arepa bursts open during cooking the seam was not sealed well or the cheese was placed too close to the edge.
Mini tip: If you see cheese leaking, ease the arepa off the pan and press the edges gently to reseal, then continue cooking more gently.- If you experience leaking or uneven cooking, reduce the heat slightly and reposition the arepas to a cooler part of the pan.

Serving Suggestions & Storage Tips
- Serving ideas:
- Classic: Serve an arepa warm with a dab of butter on top and a side of pickled red onions or sliced avocado for brightness.
- Brunch-style: Split and top with a soft fried egg and fresh herbs for an elevated breakfast sandwich.
- Light meal: Pair with a crisp salad of arugula, cherry tomatoes, and citrus vinaigrette to cut through the richness.
- Snack board: Slice into wedges and serve alongside roasted vegetables, fresh fruit, and an herby yogurt dip for sharing.
- Pairings:
- Fresh salads, grilled vegetables, or a bowl of black beans offer a balanced plate.
- Creamy plantains or a simple guasacaca-like avocado-chimichurri can be delicious dipping companions.
- For a lighter touch, a crisp, acidic slaw adds crunch and contrast to the melty center.
- Storage:
- Refrigerate: Place cooled arepas in an airtight container and store in the refrigerator for up to 3 days.
- Freeze: Wrap each cooled arepa individually in plastic wrap or parchment, then store in a freezer bag for up to 2 months. Label with the date.
- Tip for batch cooks: Cooked then frozen arepas reheat better than raw frozen dough, which can develop freezer burn or uneven texture.
- Reheating:
- Oven: Reheat in a 350ºF oven for 10 to 12 minutes from refrigerated, or 15 to 18 minutes from frozen, until hot and crisp.
- Skillet: Warm with a little oil or butter over medium-low heat, turning occasionally, about 4 to 6 minutes total, to restore the crisp exterior.
- Air fryer: From refrigerated, heat at 350ºF for 4 to 6 minutes; from frozen, 8 to 10 minutes, checking midway.
- Microwave: Use only if time is tight; microwave for 30 to 45 seconds to warm the interior, then crisp briefly in a hot skillet to restore texture.
- Serving after storage:
- If reheating results in a drier interior, split and warm then add a small spoonful of shredded mozzarella and briefly broil or pan-toast to refresh the gooey center.
While you are enjoying the textures and filling combinations, consider exploring other recipes that balance bold flavors and melty cheese in a handheld format, such as the tropical comfort of my Coconut Chicken Rice Bowl: A Tropical Twist in 20 Minutes which pairs nicely with bright, acidic sides.
Helpful Notes & Variations
- Substitutions:
- Cheese in the dough: If Cotija is unavailable, finely crumbled feta or quesillo can offer a similar salty tang, though texture and flavor will shift.
- Filling cheese: Try shredded Oaxaca, a low-moisture mozzarella, or a semi-firm melting cheese such as Monterrey Jack for a slightly different melt and flavor.
- Butter alternatives: If you prefer dairy-free, use a vegan butter or a mild vegetable oil in the dough for a similar tenderizing effect.
- Dietary adaptations:
- Gluten-free: This recipe is naturally gluten-free when using certified gluten-free masarepa; double-check your masarepa brand if you have celiac disease or gluten sensitivity.
- Vegetarian: The recipe as written is vegetarian-friendly; for vegan eats, substitute vegan butter and plant-based melting cheese alternatives, though texture and flavor will vary.
- Lower sodium: Reduce the added salt to 1/4 teaspoon and select a low-salt cheese or use less Cotija if you need to control sodium intake.
- Flavor add-ins:
- Herbs: Fold in a tablespoon of finely chopped cilantro, chives, or scallions to the dough for a fresh lift.
- Spices: Add a teaspoon of smoked paprika, a pinch of ground cumin, or a dash of black pepper for a subtle savory kick.
- Stuffing variations: Swap part of the mozzarella for caramelized onions, roasted poblano strips, sautéed mushrooms, or diced roasted sweet potatoes for seasonal twists.
- Common mistakes and fixes:
- Dough too dry: If you see cracks when flattening, gradually add warm water, one tablespoon at a time. Patience is key.
- Dough too wet or sticky: Add a tablespoon of masarepa at a time until it reaches play-dough consistency, then let it rest for 10 minutes.
- Seams opening while cooking: Ensure the seal is firm by smoothing the edge with damp hands and not overfilling the center with cheese.
- Burned exterior, uncooked interior: Lower the heat and allow the arepas to cook more slowly so the interior gets hot without outer scorching. Use a heavy skillet or griddle for even heat distribution.
- Make-ahead tips:
- Assemble arepas, wrap individually, and refrigerate for up to 24 hours before cooking to save time on busy days.
- Pre-shred mozzarella and keep it chilled for quick assembly; freshly shredded cheese melts the best due to its texture.
Conclusion
These arepas with cheese stand out because they transform a handful of simple, pantry-friendly ingredients into something deeply comforting, satisfying, and shareable. The magic lies in the contrast: a crisp, golden exterior giving way to a warm, gooey center, plus the salty lift of Cotija folded into the dough. Whether you are cooking for a weekday family dinner, making a brunch spread, or preparing a batch to freeze, this recipe is forgiving, adaptable, and endlessly rewarding. For a quick step-by-step take and more variations inspired by traditional arepas, I found a helpful take that complements this recipe in Arepas Con Queso (30 Min Recipe!) – Urban Farmie. If you want an alternative classic perspective and tips from another kitchen, check out Arepas con Queso – Simply Recipes. Try them this week, and come back to tell me which filling won over your family.
Frequently Asked Questions
Can I make this recipe ahead of time?
Yes, you can. Assemble the arepas completely, then wrap each one tightly in plastic wrap or parchment and refrigerate for up to 24 hours before cooking. This short make-ahead approach is great for weekday dinners or brunch prep. If you need longer storage, cook them fully, cool to room temperature, then freeze individually wrapped for up to two months. Cooking first and then freezing preserves the interior texture and makes reheating quicker.
How should I store leftovers and how long do they last?
Store cooled leftovers in an airtight container in the refrigerator for up to 3 days. For longer storage, wrap each arepa tightly and freeze in a single layer until firm, then transfer to a freezer bag for up to 2 months. Label the bag with the date. Proper wrapping prevents freezer burn and keeps the arepas ready for later reheating.
What is the best way to reheat or serve this recipe after storage?
For the best texture, reheat in a skillet over medium-low heat with a little butter or oil to revive the crisp exterior while warming the center. From refrigerated, 4 to 6 minutes should do the trick. For frozen arepas, allow them to thaw in the refrigerator overnight or reheat from frozen in a 350ºF oven for 15 to 18 minutes until heated through, or air fry at 350ºF for 8 to 10 minutes. If you must use a microwave, heat briefly and then crisp in a skillet.
Can I adjust or substitute ingredients to fit my preferences?
Absolutely. Swap Cotija for a crumbly feta or omit it if you prefer less salt. Use different melting cheeses in the center like Oaxaca, Monterrey Jack, or a low-moisture mozzarella. For dairy-free versions, try vegan butter and plant-based melting cheese alternatives, keeping in mind that flavor and melt will be different. You can also mix herbs or spices into the dough for added flavor.
Do you have tips to ensure the best texture and flavor every time?
Yes. Use pre-cooked masarepa labeled for arepas for the right texture; hydrate the dough gradually and rest it for at least 10 minutes; aim for a play-dough-like consistency so it does not crack but is not sticky; leave a 1/2-inch border when filling to prevent leaks; cook on medium-low heat to achieve golden color without burning; and let them rest briefly after cooking to avoid losing too much of the cheese when you cut into them. Small adjustments in water and heat are common, so trust the visual cues and feel of the dough as your guide.
Arepas with Cheese
Ingredients
Method
- In a medium bowl combine masarepa, salt, Cotija cheese, and softened butter. Pour in warm water gradually while stirring.
- Knead the mixture until a smooth dough is formed; it should not be sticky, resembling homemade play-dough.
- Cover the bowl with a kitchen towel and allow it to rest for 10 minutes.
- Check the dough consistency; if too dry, add additional warm water one tablespoon at a time.
- With wet hands, divide the dough into 8 even pieces, roll into balls, and pat into circles about 5 inches in diameter.
- Add a couple of tablespoons of shredded mozzarella in the center of one circle, leaving a 1/2-inch border. Place a second circle on top and seal the edges.
- Heat oil in a large skillet over medium-low heat or preheat an electric griddle to 325ºF.
- Cook the arepas for about 4 to 5 minutes until golden brown.
- Flip and cook the other side for another 4 to 5 minutes until golden brown and crispy.
- Remove from the skillet and serve warm, with additional butter on top if desired.