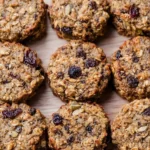
“Banana Oatmeal Bars,” I told my friend while we stood over a counter full of overripe fruit, “are my go-to when I want something cozy and wholesome in under an hour.” I once turned three sad-looking bananas into a pan of golden bars that vanished before the coffee was poured — and that moment sealed my love for this recipe. With mashed bananas, rolled oats, a spoonful of nut butter, warm cinnamon, maple syrup, vanilla, chocolate chips, and a pinch of salt, these bars are simple, adaptable, and endlessly comforting. If you like snacks that feel like a hug, stay with me — and try this idea after you check out a playful banana sushi treat I mentioned earlier: banana sushi recipe for kids.
Why You’ll Love This Recipe
- Familiar pantry staples: you probably already have the key players — ripe bananas and rolled oats — which makes these bars a no-fuss rescue for overripe fruit.
- Balanced sweetness and texture: maple syrup and chocolate chips add just enough indulgence while oats and nut butter give chew and staying power.
- Comfort with purpose: these bars feel like a cozy bake from childhood but are practical for lunchboxes, quick breakfasts, or an afternoon pick-me-up.
- Quick and forgiving: no special equipment or exact measuring anxiety needed; the recipe adapts if the bananas are slightly larger or smaller.
- Emotionally satisfying: they create the same warm, nostalgic connection as baking with family, which is why I find myself making them on gray afternoons or when guests pop by unexpectedly.
Ingredients Needed
- 1 1/2 cups mashed ripe bananas (about 3 medium bananas) – use very ripe bananas with brown spots for the best sweetness and moisture.
- 1/2 cup natural nut butter – any creamy peanut butter, almond butter, or another favorite nut butter will bind the bars and add richness.
- 2 cups rolled oats – old-fashioned rolled oats give structure and a pleasant chew; avoid instant oats if you want the best texture.
- 1 teaspoon ground cinnamon – warms the flavor without overpowering the bananas.
- 1 teaspoon pure vanilla extract – enhances the overall sweetness and depth of flavor.
- 3 tablespoons maple syrup – adds gentle sweetness and helps the bars hold together; you can adjust slightly if your bananas are very sweet.
- 1 cup chocolate chips – semi-sweet or dark chips balance the sweetness; feel free to use mini chips for even distribution.
- 1/2 teaspoon fine salt – brightens the flavors and balances sweetness; use less if your nut butter is very salty.
Ingredients & Equipment Notes (Optional)
- Pan size: this recipe is written for a 9×9 inch baking pan; lining it with parchment makes removal and clean-up much easier.
- Nut butter texture: choose a smooth nut butter for best blending; if your nut butter is thick, gently warm it so it mixes more easily.
- Oats choice: rolled oats will hold up in the pan and deliver the classic bar texture; steel-cut are not suitable.
- Equipment: bowl, spatula, measuring cups, fork or potato masher for bananas, parchment paper, and a 9×9 pan are all you need.
Instructions – How to Make “Banana Oatmeal Bars”
- Preheat the oven and prepare the pan.
- Why it matters: starting with the oven at 350 F ensures even baking from the first minute so the bars set properly.
- Visual cues: the oven display should read 350 F and the pan should be lined with parchment that hangs over the edges for an easy lift-out.
- Mini tip: press parchment into the corners so it adheres; dampening the paper slightly can help it lay flat.
- Mash the bananas until mostly smooth.
- Why it matters: mashed bananas act as the primary binder and sweetener, so aim for a mostly smooth texture with a few small lumps for character.
- Visual cues: the color will be a warm creamy yellow flecked with brown and the mixture will be pourable but slightly thick.
- Mini tip: use a fork or potato masher; if your bananas are very watery, drain a little liquid so the mixture does not become soggy.
- Stir in the nut butter, maple syrup, vanilla, and cinnamon.
- Why it matters: these wet ingredients blend to create a cohesive batter and introduce depth of flavor.
- Visual cues: the mixture should turn glossy and a bit darker as you incorporate the nut butter and syrup.
- Mini tip: if nut butter is stiff, microwave it for 10 to 15 seconds to loosen it for easier mixing.
- Add the rolled oats and salt, mixing until combined.
- Why it matters: oats give structure; mixing them until just combined keeps the bars tender rather than gummy.
- Visual cues: you should see individual oat flakes coated with the banana mixture and the batter will thicken noticeably.
- Mini tip: if the mixture seems dry, a teaspoon of extra maple syrup or a splash of plant milk will help; if too wet, add a tablespoon more oats.
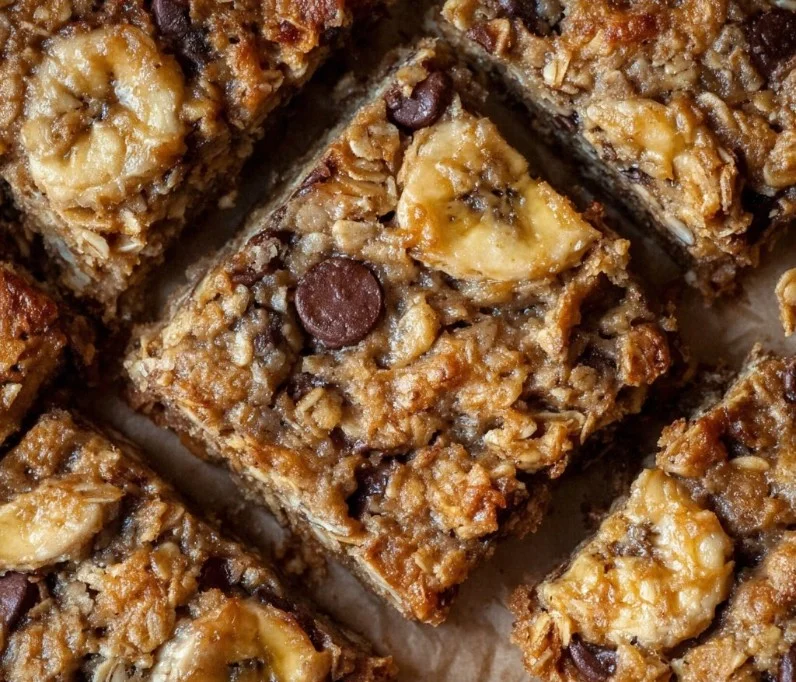
- Fold in one cup of chocolate chips.
- Why it matters: folding preserves the distribution so you get chocolate throughout the bars.
- Visual cues: the chips should be evenly dotted through the batter, not all sinking to the bottom.
- Mini tip: reserve a handful of chips to press on top before baking for a pretty finish.
- Transfer the mixture to the lined 9×9 baking pan and flatten into an even layer.
- Why it matters: an even thickness ensures consistent baking so edges and center finish together.
- Visual cues: the surface should be smooth and about the same depth across the pan; use an offset spatula or the back of a spoon to press it flat.
- Mini tip: wet your fingers or spatula slightly to prevent sticking while smoothing; top with remaining chocolate chips now if desired.
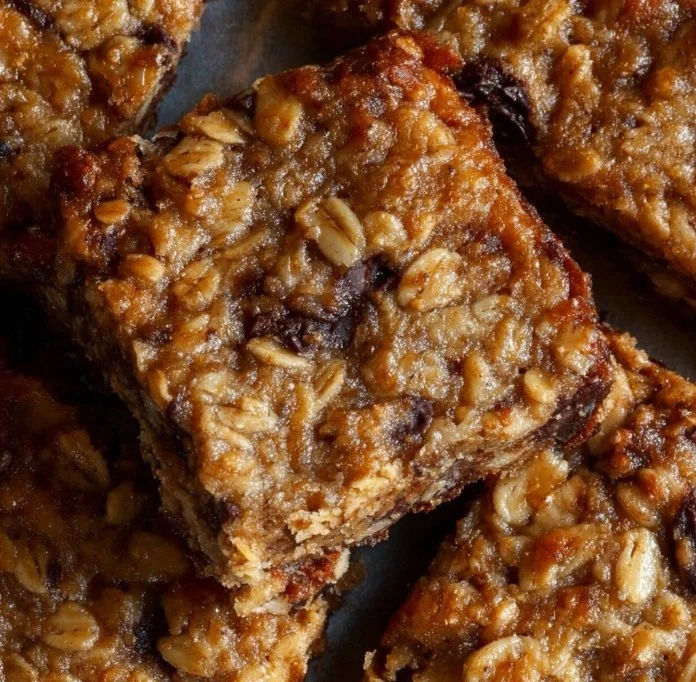
- Bake for 18 to 20 minutes or until the edges are golden and the bars appear set.
- Why it matters: the correct baking time ensures the bars are cooked through without drying out.
- Visual cues: look for golden-brown edges, a set center that is slightly springy, and chocolate chips softened but not burnt.
- Mini tip: if your oven runs hot, check at 16 minutes; a toothpick inserted near the center should come out mostly clean with a few moist crumbs.
- Cool completely in the pan before cutting.
- Why it matters: cooling lets the bars firm up and makes clean slices possible.
- Visual cues: the bars will pull away slightly from the parchment and be firm to touch; if they are too soft, cooling longer helps.
- Mini tip: lift the parchment from the pan and chill briefly in the refrigerator for firmer bars if you prefer neat squares.
- Slice and enjoy.
- Why it matters: correct slicing yields tidy bars for lunchboxes or platters.
- Visual cues: clean edges and even squares; wipe your knife between cuts for the best presentation.
- Mini tip: store extras in an airtight container and bring to room temperature or warm slightly before serving for best texture.
Serving Suggestions & Storage Tips
- Serving ideas:
- Serve warm with a smear of extra nut butter and a dusting of cinnamon for a cozy breakfast.
- Cut into smaller squares and arrange on a platter for brunch; they pair wonderfully with fresh fruit.
- Make a dessert-style snack by topping a bar with a scoop of vanilla or banana-flavored frozen dessert for an indulgent treat.
- Pairings:
- A cup of strong coffee or a creamy oat milk latte complements the oats and chocolate chips.
- Fresh berries or sliced apple add brightness and contrast to the dense, sweet bars.
- For an on-the-go protein boost, enjoy the bars with a yogurt cup or a handful of roasted nuts.
- Storage:
- Room temperature: keep bars in an airtight container for up to 2 days.
- Refrigerator: for longer storage, place bars in a sealed container and refrigerate for up to 5 days.
- Freezer: wrap bars individually in plastic wrap and store in a freezer-safe bag for up to 2 months; thaw at room temperature or warm gently.
- Reheating:
- Microwave: heat a single bar for 10 to 15 seconds to soften and release aromas; check texture and add a few more seconds if needed.
- Oven: for multiple bars, preheat oven to 300 F and warm on a baking sheet for 6 to 8 minutes to maintain a slightly crisp edge.
- Tip: a brief reheat brings out the banana and chocolate flavors and restores a freshly-baked feeling.
- Creative serving note:
- Turn these into a breakfast parfait by chopping a bar into cubes and layering with yogurt, granola, and fresh fruit for a textured, satisfying start to the day.
Helpful Notes & Variations
- Substitutions:
- Nut butter: swap peanut butter for almond or sunflower seed butter if nut allergies are a concern.
- Sweetener: you can use honey instead of maple syrup if you prefer, though flavor will shift slightly.
- Chocolate: swap chocolate chips for chopped dark chocolate or carob chips for a different flavor profile.
- Dietary adaptations:
- Vegan: this recipe is already vegan-friendly if your nut butter and chocolate chips are vegan. Confirm the chocolate chips are dairy-free.
- Gluten-free: use certified gluten-free rolled oats to make these bars safe for a gluten-free diet.
- Lower sugar: reduce maple syrup by a tablespoon or replace chocolate chips with chopped nuts or unsweetened coconut to lower added sugar.
- Flavor add-ins:
- Nuts: chopped pecans or walnuts add crunch and toasty flavor.
- Dried fruit: raisins, chopped dried apricots, or cherries add chew and natural sweetness.
- Spices: a pinch of nutmeg or a teaspoon of cardamom complements banana and cinnamon beautifully.
- Citrus: add a teaspoon of orange zest for a bright, unexpected lift.
- Texture tips:
- For chewier bars: use a mix of rolled oats and a small portion of quick oats.
- For cakier bars: add a tablespoon of plant-based milk to slightly loosen the batter before baking.
- For crunchier top: sprinkle a teaspoon of rolled oats or crushed nuts on top before baking.
- Common mistakes and fixes:
- Bars too wet after baking: cool completely; if still soft, chill in the fridge to help them set. For next time, use slightly less banana or add a tablespoon more oats.
- Bars dry or crumbly: reduce bake time slightly or add a splash more maple syrup or nut butter to the batter.
- Uneven baking: ensure the mixture is pressed into an even layer in the pan and that your oven rack is centered.
- Inspiration and ideas:
- If you enjoy playful banana treats, try pairing these bars with a frozen banana dessert or a crunchy banana chip snack. For a fun twist, try the air fryer banana chips idea as a crunchy side for a brunch board.
Conclusion
These Banana Oatmeal Bars stand out because they are equal parts approachable and rewarding: the ingredient list is short, the method is forgiving, and the result is a warm, homey bar that feels both nostalgic and fresh. Whether you want a simple breakfast, a lunchbox snack, or a thoughtful treat to share, this recipe delivers comfort and flavor with minimal fuss. For more inspiration and similar recipes that celebrate bananas and simple baking, check this trusted take on Banana Oatmeal Bars from Carmy and a different minimalist version with four ingredients at The Roasted Root: Carmy’s Banana Oatmeal Bars and 4-Ingredient Banana Oatmeal Bars from The Roasted Root. If you try this recipe, let me know how you personalize it — and if you loved the texture, share a photo or tag a friend who needs an easy, delicious bar in their life.
Frequently Asked Questions
Can I make this recipe ahead of time?
Yes. These bars are a great make-ahead option. Bake, cool completely, and store in an airtight container. For the best texture, you can prepare them up to 5 days in the refrigerator or freeze for longer storage. Make-ahead prep is perfect for busy mornings or meal prep sessions.
How should I store leftovers and how long do they last?
Store leftovers in an airtight container. At room temperature they keep well for about 2 days; refrigerated, they stay fresh for up to 5 days. If you want to keep them longer, wrap bars individually and freeze for up to 2 months.
What is the best way to reheat or serve this recipe after storage?
For a quick warm-up, microwave a bar for 10 to 20 seconds until soft and fragrant. For crispier edges, warm multiple bars in a 300 F oven for 6 to 8 minutes. Serve slightly warm with nut butter, fresh fruit, or a dollop of yogurt.
Can I adjust or substitute ingredients to fit my preferences?
Absolutely. Swap nut butter for seed butter if you have allergies, use gluten-free oats to make them gluten-free, or change chocolate chips for chopped nuts or dried fruit. Maple syrup can be adjusted for sweetness, and spices can be tinkered with to suit your taste.
Do you have tips to ensure the best texture and flavor every time?
Yes. Use very ripe bananas for natural sweetness and moisture. Do not overpack your oats when measuring; gently spoon into the cup. Press the batter into an even layer in the pan so it bakes uniformly. Cool completely before cutting to get clean slices, and reserve a few chocolate chips to press on top before baking so they look attractive when finished.
Enjoy baking these cozy Banana Oatmeal Bars and making the recipe your own.
Banana Oatmeal Bars
Ingredients
Method
- Preheat the oven to 350°F (175°C) and prepare a 9x9 inch baking pan by lining it with parchment paper.
- Mash the bananas in a bowl until mostly smooth, leaving a few small lumps for texture.
- Stir in the nut butter, maple syrup, vanilla extract, and ground cinnamon until well combined.
- Add the rolled oats and salt, mixing until just incorporated.
- Fold in the chocolate chips, distributing them evenly throughout the mixture.
- Transfer the mixture to the lined baking pan, flattening it into an even layer.
- Bake for 18 to 20 minutes or until the edges are golden and the center is set.
- Cool completely in the pan before cutting into bars.
- Slice the bars into squares and serve. They can be enjoyed warm or stored for later.