Bite-sized Pancake Mini Muffins, hey you, come closer. I can almost hear your morning routine calling for something warm, nostalgic, and tiny enough to pop into your mouth between sips of coffee. I made these on a rainy Saturday because I wanted pancakes without the pans, and the result was pure comfort in miniature. They are soft and tender from buttermilk, lightly sweet with a hint of vanilla, and boosted by a bit of melted butter for richness. If you love the idea of portable pancake bites that feel like a hug, you are in the right place. While you read, imagine the smell of warm baked batter and the satisfaction of sharing a tray with family or friends. If you like bigger, casserole-style pancake breakfasts, you might also enjoy this Blueberry Buttermilk Pancake Casserole as a companion brunch idea.
Why You’ll Love This Recipe
- Quick and easy to prepare
- Simple, accessible ingredients you likely already have
- Perfect for cozy weekends, brunches, or school lunches
- Comforting, satisfying, and impressive without fuss
What makes this version unique is the crossover of pancake flavor and mini muffin convenience. These are not just tiny pancakes; they are baked for consistent texture and effortless portion control. The buttermilk keeps them tender and slightly tangy, the baking soda and powder give just enough lift, and the melted butter and vanilla create that familiar, warm pancake aroma. Emotionally, these feel like a gentle invitation to slow down and savor small moments, and they build confidence in the kitchen because the steps are forgiving and the batter is easy to work with.
Quick Note on Ingredients
Before we dive in, a quick heads up about the main players. Using real buttermilk is ideal for tang and tenderness, but a quick swap of yogurt plus milk can work too. Butter should be melted but not scalding hot. If you love lemony sweets, consider pairing these bites with a small lemon glaze or checking out our dessert twist like Mini Lemon Cakes with Lavender Glaze for inspiration.
Ingredients Needed
I have rewritten these to keep things fresh and clear. This batch makes about 36 mini muffins depending on your tin.
Dry ingredients
- 1 cup plain all-purpose flour, spooned and leveled
- 2 tablespoons granulated sugar, for gentle sweetness
- 1 teaspoon baking powder, to give lift and lightness
- 1/2 teaspoon baking soda, for extra tender crumb when combined with buttermilk
- 1/4 teaspoon fine salt, to balance flavor
Wet ingredients
- 1 cup buttermilk, well shaken; if you do not have buttermilk, make a substitute by stirring 1 tablespoon lemon juice or white vinegar into 1 cup milk and letting it sit 5 minutes
- 1 large egg, at room temperature for best emulsification
- 2 tablespoons unsalted butter, melted and cooled slightly; plant-based margarine can be used for a dairy-free option
- 1 teaspoon pure vanilla extract, for warm flavor notes
Notes on specifics and substitutions
- Flour: For a slightly heartier bite, swap up to 1/4 cup of the all-purpose flour for whole wheat pastry flour.
- Sugar: Reduce to 1 tablespoon for a less sweet muffin, or swap for maple syrup in the wet mix for a different depth of sweetness.
- Buttermilk alternatives: Plain yogurt thinned with milk at a 3:1 ratio works well. Avoid using heavy cream without thinning as the texture will change.
- Egg alternatives: For a single-egg swap in vegan or allergy-friendly baking, try a commercial egg replacer following package directions or a flax egg (1 tablespoon ground flaxseed plus 3 tablespoons water, chilled until gelled) though texture will be slightly different.
Ingredients & Equipment Notes
- Mini muffin tin: A 24- or 36-cup mini muffin pan is ideal. Nonstick pans aid release. If using silicone, reduce baking time slightly.
- Measuring tools: Accurate measuring cups and spoons matter for consistent results. Level the flour with a knife for the best texture.
- Whisk and mixing bowls: Use separate bowls for dry and wet ingredients to avoid overmixing.
- Small cookie scoop or tablespoon: A scoop keeps batter portions even so all muffins bake uniformly.
- Cooling rack: Let the muffins cool briefly in the tin, then transfer to a rack to avoid sogginess.
These tools are not complicated, but each one helps the final bite be just right. The mini muffin tin in particular ensures the characteristic domed top and quick, even baking that make these treats so delightful.
Instructions – How to Make “Bite-sized Pancake Mini Muffins”
- Preheat your oven to 350°F (175°C) and prepare your mini muffin tin. Grease the cups lightly with butter or oil, or use a nonstick spray. Why this matters: greasing prevents sticking and helps the tiny muffins release easily. Visual cue: the oven should be fully up to temperature before the batter goes in so the muffins rise evenly.
- Whisk together the dry ingredients. In a medium bowl combine the flour, sugar, baking powder, baking soda, and salt. Why this matters: mixing these first ensures leaveners are evenly distributed so each bite has the same lift. Visual cue: the mixture should be uniform in color with no visible clumps of baking soda or powder.
- Combine the wet ingredients in a separate bowl. In another bowl whisk the buttermilk, egg, melted butter, and vanilla until smooth. Why this matters: mixing wet ingredients separately helps them emulsify so the final batter is smooth and not overworked when combined. Visual cue: the wet mix will look creamy and homogeneous, with little to no separation.
- Fold the wet into the dry just until combined. Pour the wet mixture into the dry mixture and stir gently until you no longer see streaks of flour. Do not overmix. Why this matters: overmixing develops gluten and makes the muffins tougher. Visual cue: the batter should be slightly lumpy and thick enough to mound on a spoon but pour slowly. Mini tip: scrape the sides and bottom of the bowl so no dry pockets remain.
- Portion the batter into the prepared mini muffin cups about two thirds full. Use a small cookie scoop or a tablespoon to keep sizes even. Why this matters: filling to about two thirds gives the muffins room to dome without spilling. Visual cue: each cup should look nearly full with a small margin at the top. Mini tip: if you want uniform domes, gently tap the filled pan on the counter once to remove air bubbles.
- Bake for about 10 to 12 minutes, or until a toothpick inserted into the center comes out clean or with a few moist crumbs. Why this matters: mini muffins bake quickly and will dry out if left too long. Visual cue: tops should be lightly golden, and the edges should pull slightly away from the pan. Mini tip: check at 9 minutes if your oven runs hot; small pans can vary.
- Cool briefly before removing. Let the muffins rest in the pan for a few minutes, then turn them out onto a wire rack to cool a bit more. Serve warm for the best texture. Why this matters: immediate release prevents steam from making the bottoms soggy, while a short rest avoids burns and helps structure. Visual cue: the underside should be lightly golden, and the crumb will be tender when torn open.
Mini tips throughout
- For extra browning, brush the tops lightly with melted butter immediately after baking.
- To check doneness without a toothpick, press a muffin gently; it should spring back slightly.
- Add a touch of cinnamon or citrus zest to the batter for a flavor twist.
Serving Suggestions & Storage Tips
Serve ideas and presentation
- Serve warm with a small pat of butter and a drizzle of maple syrup for a classic experience.
- Create a pancake muffin board for brunch: arrange the bites with fresh fruit, yogurt, mini jars of jam, and small bowls of nuts.
- Make them into a portable snack by stacking a pair on a wooden skewer with berries between each bite.
Pairings
- Pair with fresh berries or a simple berry compote to cut through the richness.
- These are lovely alongside scrambled eggs or a simple frittata for a full breakfast spread.
- For savory contrast, try with tiny stuffed mini peppers or savory bites like these Easy Cheese and Everything Bagel Stuffed Mini Peppers.
Creative variations
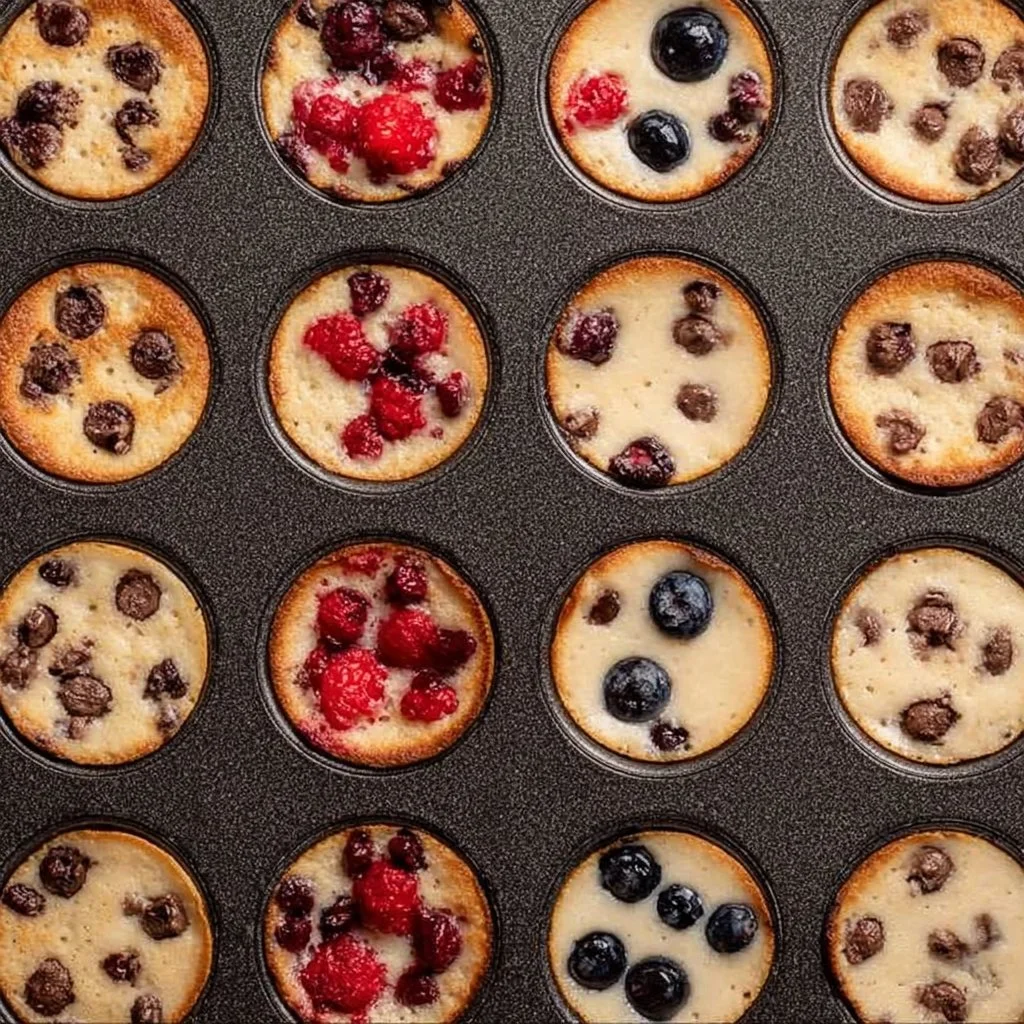
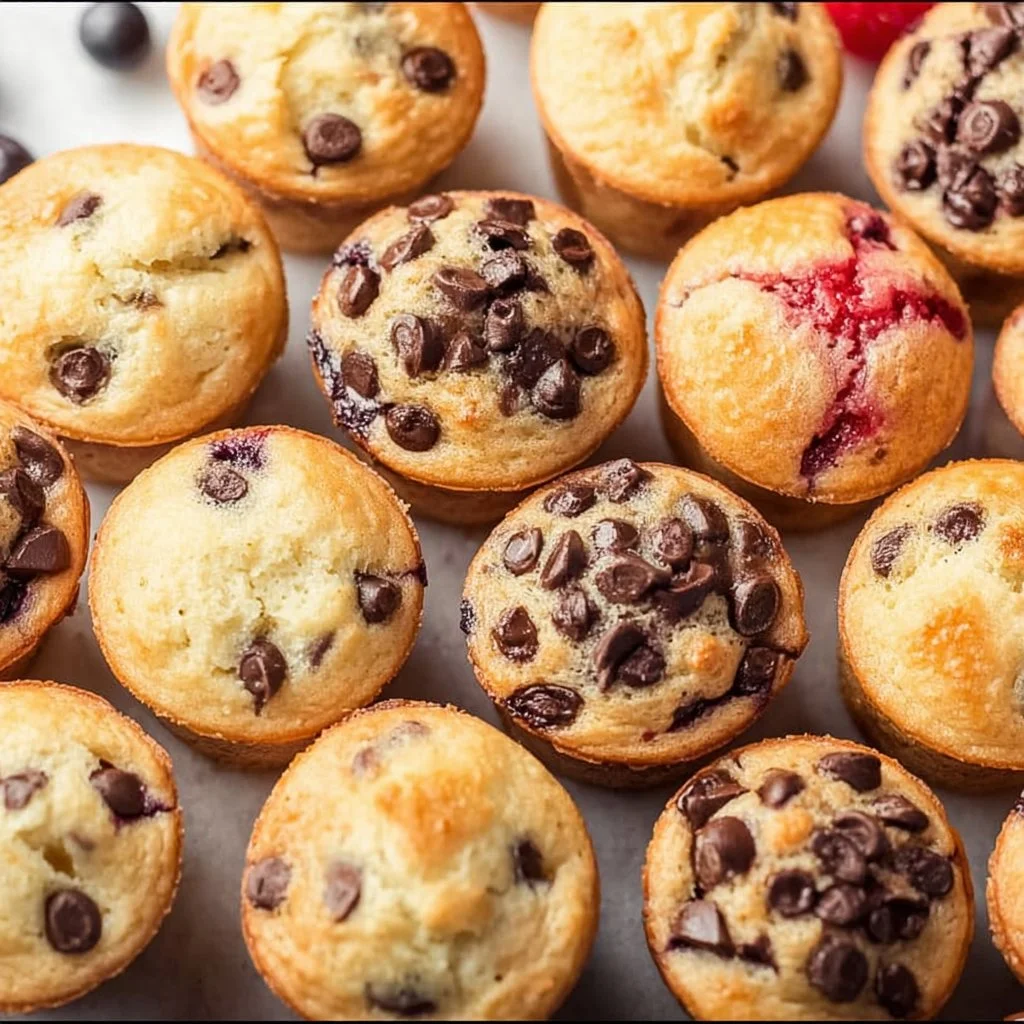
- Chocolate chip pancake muffins: fold in a tablespoon or two of mini chocolate chips to the batter for chocolatey pockets.
- Blueberry or diced apple folded in gently gives a fruity lift without adding too much moisture.
- Lemon glaze: whisk powdered sugar with lemon juice and drizzle when cooled for a bright finish.
Storage
- Room temperature: Store cooled muffins in an airtight container for up to 2 days.
- Refrigerator: Keep in an airtight container for up to 5 days, though they are best when reheated.
- Freezer: Flash-freeze on a tray until solid, then transfer to a freezer bag for up to 1 month.
Best reheating methods
- To reheat from room temperature: microwave one or two bites for 12 to 20 seconds until warm.
- From frozen: thaw slightly, then warm in a 325°F oven for 6 to 10 minutes or air fry at 300°F for 3 to 4 minutes for restored crisp edges.
- For a toaster oven: wrap in foil and warm at 325°F for 6 minutes.
Helpful Notes & Variations
Ingredient substitutions and dietary adaptations
- Dairy-free: use a dairy-free milk thinned with a teaspoon of lemon juice in place of buttermilk, and replace butter with melted non-dairy spread or coconut oil.
- Lower sugar: cut the sugar to 1 tablespoon or swap half for a liquid sweetener in the wet mix, keeping in mind the texture may shift.
- Gluten-free: try a 1-to-1 gluten-free baking flour blend that contains xanthan gum for structure. The crumb may be slightly different but still enjoyable.
Flavor add-ins
- Cinnamon or pumpkin pie spice blends for autumnal flavors.
- Fresh or frozen blueberries, raspberries, or tiny diced peaches folded in gently.
- A small swirl of nut butter or jam in the center for a surprise filling.
Common mistakes and how to avoid them
- Overmixing: mix only until just combined. Lumps are okay.
- Overfilling cups: stick to two thirds full to avoid spills and messy edges.
- Incorrect oven temp: use an oven thermometer if you doubt your oven. Too hot will brown the exterior before the inside sets; too cool will produce dense bites.
Experience-based tips
- Chill the batter briefly if your kitchen is very warm to slow down leavening action and keep the texture light.
- For perfectly domed tops, fill the cups evenly and give the filled pan a gentle shake before baking.
- If you love savory-sweet combos, serve the muffin bites with tiny portions of savory mini sandwiches like these Mini Grilled Cheese Hawaiian Rolls for a brunch spread that covers all bases.
Conclusion
These Bite-sized Pancake Mini Muffins stand out because they capture everything you love about pancakes in a fuss-free, biteable format that is perfect for brunch, snack time, or leftover magic in lunchboxes. They are quick to whip up, forgiving to make, and endlessly adaptable so you can add berries, chocolate, or citrus as the mood strikes. If you want inspiration for different methods or assembly ideas, check a few related recipes that played a part in shaping variations for these mini muffins: the original pancake mini muffin concepts on Pancake Mini Muffins – Build Your Bite offer another helpful take, Mini Pancake Muffins (Ready in 30 Minutes!) – Cooking Classy shows speedy techniques and fun serving suggestions, and a mix-based shortcut is discussed in Mini Pancake Muffins: Delicious Breakfast Bites Using Mix. Try the recipe, leave a comment and star rating below to tell me how yours turned out, and save or share on Pinterest so someone else can discover these tiny, comforting bites.
Frequently Asked Questions
Can I make this recipe ahead of time?
Yes. You can bake the mini muffins a day ahead and store them in an airtight container for up to 2 days at room temperature. For longer make-ahead plans, freeze them and reheat as needed. When serving for an event, baking the day before and warming briefly in the oven keeps them fresh and stress-free.
How should I store leftovers and how long do they last?
Leftovers keep well in an airtight container at room temperature for 1 to 2 days. In the refrigerator, they will remain good for up to 5 days. For longer storage, freeze the cooled muffins in a single layer on a baking sheet, then transfer to a labeled freezer bag for up to 1 month.
What is the best way to reheat or serve this recipe after storage?
Microwave on a low power for a short burst for a quick warm up, or re-crisp edges in a 325°F oven for 6 to 10 minutes from room temperature. From frozen, warm in a low oven or air fryer until completely heated through. A light pat of butter or a quick drizzle of maple syrup after reheating brings back the fresh-baked experience.
Can I adjust or substitute ingredients to fit my preferences?
Absolutely. You can swap the buttermilk with thinned yogurt or a milk-plus-acid substitution, use dairy-free butter and plant-based milk for dairy-free options, and try a gluten-free flour blend if you need to avoid gluten. Reducing sugar, adding spices, or folding in fruit or chocolate are simple ways to make the recipe your own.
Do you have tips to ensure the best texture and flavor every time?
Yes. Measure dry ingredients accurately, avoid overmixing the batter, and preheat your oven so the muffins rise properly. Use room temperature egg and slightly cooled melted butter for the best emulsion. If baking in silicone pans, watch the time closely as they can bake faster. For a moister bite, do not overbake; remove the muffins when a toothpick shows a few moist crumbs.
Bite-sized Pancake Mini Muffins
Ingredients
Method
- Preheat your oven to 350°F (175°C) and prepare your mini muffin tin by greasing the cups lightly with butter or oil, or use nonstick spray.
- Whisk together the dry ingredients in a medium bowl: flour, sugar, baking powder, baking soda, and salt.
- In another bowl, combine the wet ingredients: whisk the buttermilk, egg, melted butter, and vanilla until smooth.
- Fold the wet mixture into the dry ingredients just until combined, being careful not to overmix.
- Portion the batter into the prepared mini muffin cups about two thirds full.
- Bake for about 10 to 12 minutes, or until a toothpick inserted into the center comes out clean.
- Cool briefly before removing the muffins from the tin and transfer them to a wire rack to cool completely.