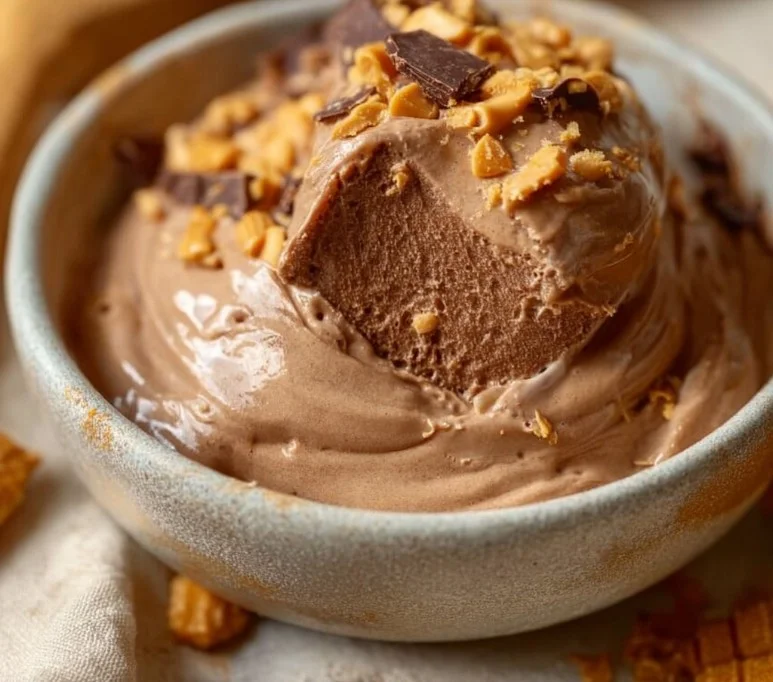
Chocolate Peanut Butter Ninja Creami — I still remember the first spoonful I tasted and how the chocolate hit just right, followed by that comforting whisper of peanut butter. “You made this?” you ask, and I grin because yes — and so can you. This recipe blends simple pantry staples like heavy cream, whole milk, cocoa, and peanut butter powder into a churned-into-perfection frozen dessert using the Ninja Creami. It’s the kind of treat that feels like a warm hug on a chilly evening or a playful finish to a summer barbecue. If you enjoy decadent, from-scratch desserts like my Guinness chocolate cake with Irish buttercream, you’ll love how approachable and satisfying this recipe is.
Why You’ll Love This Chocolate Peanut Butter Ninja Creami
- Quick and easy to prepare — minimal hands-on time, big payoff.
- Made with simple, accessible ingredients you probably already have.
- Perfect for warm afternoons, cozy movie nights, or a weekend treat.
- Comforting and nostalgic — tastes like childhood peanut-butter-and-chocolate memories but grown-up and smooth.
- Impresses guests with a gourmet texture courtesy of the Ninja Creami.
What makes this version unique: using peanut butter powder gives you the nutty flavor without the heaviness of scoopable peanut butter, while the cocoa powder blends into a silkier frozen base. The result is an ice-cream-like texture with bold chocolate-peanut butter flavor that’s less greasy and more scoopable than many at-home versions. Emotionally, it’s the kind of recipe that makes you feel confident in the kitchen — simple steps, reliable results, and a dessert that invites conversation and second helpings. If you like layered dessert experiences, you might enjoy the creamy contrasts in my Biscoff cookie butter cake as well.
Ingredients Needed for Chocolate Peanut Butter Ninja Creami
For the base
- 2 cups heavy cream — use cold, fresh heavy cream for the richest texture. You can substitute half-and-half for a slightly lighter result, but the creaminess will be reduced.
- 1 cup whole milk — whole milk adds body; don’t use skim if you want true creaminess.
- 3/4 cup granulated sugar — balances the cocoa and peanut butter notes. You can use cane sugar or coconut sugar (see variations).
For the flavor
- 1/2 cup unsweetened cocoa powder — sifted if lumpy; choose Dutch-processed for a deeper chocolate flavor or natural cocoa for brighter cocoa notes.
- 1/2 cup peanut butter powder — such as PB2; this gives authentic peanut flavor without excess oil. If you only have regular peanut butter, see swap notes below.
- 1 teaspoon vanilla extract — quality vanilla enhances the overall profile.
- Pinch of fine salt — a small amount brings out chocolate and peanut butter flavors.
Quick clarifying notes:
- Heavy cream and whole milk should be cold; chilling the mixture helps it freeze more uniformly.
- Peanut butter powder is different from peanut butter — it’s roasted peanut solids with reduced oil. If you prefer a slightly richer peanut flavor, you can add a tablespoon of creamy peanut butter when blending (see variations).
- Cocoa powder should be unsweetened; adjust sugar if you use sweetened cocoa blend.
Ingredients & Equipment Notes
Useful tools
- Ninja Creami and its pint/container — the recipe is designed around the Ninja Creami’s freezing and churning method for an ultra-smooth texture.
- Large mixing bowl and whisk — to combine the base completely.
- Fine-mesh sieve — useful if your cocoa or peanut powder has lumps.
- Measuring cups and spoons — accuracy matters for freezing texture.
- Airtight container with lid — for storing leftovers.
How they help
- The Ninja Creami is designed to aerate and shave ice crystals, delivering the creamy mouthfeel you want in no-churn ice cream.
- A fine-mesh sieve keeps your base lump-free, preventing gritty spots in your finished treat.
- Cold tools and chilled pint container reduce the time needed in the Creami to reach a silky consistency.
Instructions – How to Make Chocolate Peanut Butter Ninja Creami
- Combine the dairy and dry ingredients.
- In a large mixing bowl, whisk together 2 cups cold heavy cream and 1 cup cold whole milk until slightly unified.
- Add 3/4 cup granulated sugar, 1/2 cup unsweetened cocoa powder, and 1/2 cup peanut butter powder to the dairy. Whisk briskly to incorporate.
- Why this step matters: whisking hydrates the cocoa and peanut powder into the liquid, preventing dry pockets and ensuring even flavor distribution.
- Visual cues: the mixture should be smooth, glossy, and evenly colored medium brown — no streaks of dry powder.
- Add vanilla and salt; taste and adjust.
- Stir in 1 teaspoon vanilla extract and a small pinch of fine salt.
- Give it a quick taste (it will be sweeter when frozen) and adjust sugar or cocoa if you prefer more chocolate intensity.
- Mini-tip: if your cocoa tastes slightly flat, a touch more salt can sharpen the chocolate flavor without being detectable as “salty.”
- Pour and level the Creami pint.
- Pour the blended mixture into the Ninja Creami pint container, leaving the recommended headspace as per your Creami manual (usually a small gap at the top to allow expansion).
- Tap the pint gently on the counter to release any air bubbles and level the surface.
- Why this step matters: a smooth surface and proper headspace ensure even freezing and better churned texture.
- Freeze the mixture for at least 24 hours.
- Place the sealed pint upright in the coldest part of your freezer and freeze for a minimum of 24 hours.
- Pre-freezing time matters: the Creami relies on a fully frozen base to shave ice and create that creamy consistency. Shorter freezing can make the machine struggle and produce a grainy texture.
- Pro tip: for best results, freeze for 24 to 36 hours. If you need to prep ahead, the pint can sit frozen for up to two weeks without appreciable quality loss.
- Process in the Ninja Creami.
- Remove the frozen pint from the freezer and remove the lid. Place the pint into the Ninja Creami outer bowl and attach the blade assembly.
- Process the pint according to the manufacturer’s instructions using the “Ice Cream” setting (or the closest recommended program).
- If your first spin results in a crumbly or powdery texture, use the “Re-spin” option once or add a tablespoon of milk and re-spin to achieve a creamier consistency.
- Texture check: a properly processed Chocolate Peanut Butter Ninja Creami will be scoopable, smooth, and slightly aerated — like churned ice cream.
- Serve or store.
- Serve immediately for soft-serve style scoops or refreeze the pint for firmer scoops.
- For presentation, garnish with a dusting of cocoa, a drizzle of melted chocolate (cooled a bit), crushed peanuts, or a sprinkle of extra peanut butter powder.
- Why immediate serving matters: the Creami yields an incredibly fresh, soft texture right after processing. Refreezing firms the base but can slightly reduce airy lightness.
Serving Suggestions & Storage Tips
Serving ideas and presentation
- Classic scoops: Serve in chilled bowls with a swirl of warmed chocolate sauce and a sprinkle of crushed roasted peanuts.
- Sandwich it: Spread a thin layer between two chocolate cookies for a decadent ice-cream sandwich.
- Sundae bar: Offer toppings like chopped banana, mini dark chocolate chips, hot fudge, chopped roasted peanuts, and crushed pretzels.
- Grown-up twist: Top with a ribbon of salted caramel (no alcohol) and flaky sea salt for a salted-chocolate-peanut experience.
Pairings and accompaniments
- Fresh fruit: Sliced strawberries or ripe banana balance the richness.
- Coffee: A strong espresso or cold brew pairs beautifully with the chocolate notes.
- Baked goods: Pair with brownies, cookies, or slices from an easy chocolate loaf for a textural contrast — if you love pairing treats, try this with a smoky s’mores-inspired dessert like my s’mores chocolate cake.
Storage and make-ahead tips
- Refrigerator storage: This dessert is meant for freezing. Avoid storing scoops in the fridge as they will melt quickly.
- Freezing: Return the pint to the freezer and cover with the Creami lid. Stored in an airtight state, it will keep for up to 2 weeks at optimal texture and flavor.
- Make-ahead: The base can be mixed and frozen in the pint well ahead of time — freeze up to two weeks before churning.
- Re-freezing and texture: If you refreeze after scooping, the texture will firm up and may lose some of its immediate creaminess. A quick 5–10 minute softening at room temperature before serving helps.
Best reheating methods to preserve texture and flavor
- Softening prior to scooping: Let the pint sit at room temperature for 5–10 minutes to make scooping easier and preserve the airy mouthfeel.
- Avoid microwave reheating of scoops — it will melt unevenly. If you want a warm-cold contrast, drizzle warm sauce over cold scoops just before serving.
Helpful Notes & Variations
Ingredient swaps and substitutions
- Peanut butter powder swap: If you don’t have peanut butter powder, use 2 to 3 tablespoons of creamy peanut butter blended into the base. Reduce heavy cream by 1–2 tablespoons to balance added oil.
- Sugar alternatives: Use 3/4 cup coconut sugar or 1/2 cup maple syrup (reduce liquids slightly) — note that liquid sweeteners can affect freezing firmness.
- Dairy-free option: Replace heavy cream and whole milk with a full-fat coconut milk (canned) and a plant-based cream alternative. The mouthfeel will be slightly different, and coconut will impart its own flavor.
Dietary adaptations
- Lower sugar: Reduce sugar to 1/2 cup and add a teaspoon of powdered erythritol or monk fruit sweetener if desired; keep in mind texture and sweetness will shift.
- Protein boost: Add a scoop of unflavored or chocolate whey or plant-based protein powder (blend well) — this can slightly change texture but increases satiety.
Flavor enhancements or add-ins
- Chocolate chips: Fold in mini dark chocolate chips after processing for crunchy pockets.
- Swirl: Melt 1/4 cup dark chocolate and swirl in just before serving for visual appeal.
- Crunch: Fold in 1/3 cup chopped roasted peanuts or salted peanuts after the first spin for texture contrast.
Common mistakes to avoid
- Under-freezing the pint: Skipping the full 24-hour freeze leads to grainy texture and poor processing.
- Overloading the pint: Fill only to recommended level; too much liquid expands and can cause the Creami to struggle.
- Not mixing powders thoroughly: If peanut or cocoa powders aren’t fully hydrated, you’ll get pockets of dry flavor — whisk well and strain if necessary.
Conclusion
This Chocolate Peanut Butter Ninja Creami is a comforting, deliciously simple way to enjoy a homemade chocolate-peanut frozen treat that feels luxurious without fuss. It blends pantry-friendly ingredients into a silky, scoopable dessert using the Ninja Creami’s unique process — perfect for family nights, warm-weather entertaining, or a quiet solo indulgence. Try the recipe, then personalize it: add chocolate chips, swirl in warm ganache, or fold in chopped roasted peanuts for crunch. If you enjoyed making this, you might like to compare techniques and flavors on other recipe pages like Chocolate Peanut Butter Ninja Creami – Food Banjo, check out a high-protein spin at Ninja Creami Chocolate Peanut Butter Ice Cream | high protein, or see a tested version from the maker at Chocolate Peanut Butter Cup Ice Cream – Ninja Test Kitchen. I’d love to hear how yours turned out — leave a comment, give a star rating, and share a photo on Pinterest or Instagram so I can see your creations.
Frequently Asked Questions
Q: Can I use regular peanut butter instead of peanut butter powder?
A: Yes. If substituting regular peanut butter, use 2 to 3 tablespoons in place of the 1/2 cup peanut butter powder and reduce heavy cream by about 1 to 2 tablespoons to account for the added oil. Stir or blend well to ensure even distribution. Note that regular peanut butter will make the finished texture slightly denser and richer.
Q: How long should I freeze the pint before processing in the Ninja Creami?
A: Freeze the pint upright for at least 24 hours; 24–36 hours is ideal. This ensures the mixture is solid enough for the Creami to shave and aerate. Shorter freezing times can lead to crumbly or icy results.
Q: My finished Creami was crumbly. What should I do?
A: If the first spin results in a crumbly or powdery texture, use the “Re-spin” option once. If it’s still dry, add 1 tablespoon of whole milk or heavy cream and re-spin to help bind the ice crystals into a creamier texture. Ensuring a full 24-hour freeze helps prevent this issue.
Q: Can I make this recipe dairy-free or lower in sugar?
A: Yes. For a dairy-free version, use full-fat canned coconut milk and a plant-based cream alternative; expect a hint of coconut flavor. To lower sugar, reduce the granulated sugar to 1/2 cup or replace part with a zero-calorie sweetener, but be aware that sugar contributes to texture and scoopability in frozen desserts.
Enjoy making this Chocolate Peanut Butter Ninja Creami — it’s a simple recipe with generous, cozy flavor that’s perfect for sharing or savoring solo. If you try any of the suggested variations, come back and tell me which one became your favorite!

Chocolate Peanut Butter Ninja Creami
Ingredients
Method
- In a large mixing bowl, whisk together the heavy cream and whole milk until slightly unified.
- Add sugar, cocoa powder, and peanut butter powder. Whisk briskly to incorporate until smooth and glossy.
- Stir in vanilla extract and a pinch of fine salt. Taste and adjust sweetness or cocoa as needed.
- Pour the mixture into the Ninja Creami pint container, leveling the surface and leaving recommended headspace.
- Tap the pint gently on the counter to remove any air bubbles.
- Place the sealed pint in the coldest part of your freezer for a minimum of 24 hours.
- Remove the pint from the freezer and lid. Process in the Ninja Creami using the 'Ice Cream' setting.
- If the texture is crumbly, use the 'Re-spin' option or add a tablespoon of milk, then re-spin.
- Serve immediately for soft-serve texture or refreeze for firmer scoops.
- Garnish with cocoa, melted chocolate, crushed peanuts, or peanut butter powder if desired.