Crispy Dill Pickle Parmesan Chicken is one of those happy accidents that turns a pantry staple—jarred dill pickles—into the star of a comforting dinner. “Wait, you brine chicken in pickle juice?” you might ask. Yes, and before you scoff, let me tell you: that tangy soak gives the chicken a subtle pickle-kissed juiciness that pairs beautifully with a golden Parmesan-crisp crust. When I first made this for friends, one of them nudged me and said, “Is this from a restaurant?” I laughed and admitted it was a sink-to-table, kitchen-hug sort of riff. The main ingredients you’ll notice right away are boneless chicken breasts, dill pickle juice, shredded Parmesan, and seasoned breadcrumbs—simple staples that create something deeply satisfying and a little playful. If you’re curious about other bold chicken recipes, check out my take on Greek chicken bowls for another weeknight favorite.
Why You’ll Love This Crispy Dill Pickle Parmesan Chicken Recipe
- Quick, easy, and great for busy weeknights or relaxed weekend dinners.
- Uses simple, accessible pantry ingredients you probably already have.
- Tangy pickle-brine keeps the chicken juicy while the Parmesan-breadcrumb crust delivers irresistible crunch.
- Comforting and impressive—perfect for family meals or casual dinner guests.
What makes this version stand out? Instead of heavy marinades or complicated spice mixes, this recipe uses a short pickle-juice brine (30 minutes to 2 hours) to tenderize and flavor the chicken naturally. The Parmesan folded into the breadcrumb coating gives each bite a nutty, salty lift that plays beautifully against the bright dill tang. Emotionally, this recipe hits that cozy, nostalgic spot—crispy exterior, tender inside, and an unexpected zing that sparks conversation at the table. It’s the sort of dish that builds confidence in the kitchen because the results are reliably delicious every time.
Ingredients Needed for Crispy Dill Pickle Parmesan Chicken
Here’s everything you’ll need, grouped for clarity. I’ve rephrased the items slightly and added short notes where helpful.
For the chicken and brine:
- 4 boneless, skinless chicken breasts — trimmed and patted dry before breading. If very thick, slice horizontally to make even cutlets.
- 1 cup dill pickle juice — straight from your favorite jar of dill pickles; helps tenderize and flavor the meat. (Use only fresh refrigerated pickle juice, not expired.)
For the breading and seasoning:
- 1 cup seasoned breadcrumbs — plain or Italian-style both work; if you like extra texture, use panko.
- 1/2 cup finely grated Parmesan cheese — freshly grated gives the best flavor and melt.
- 1/2 cup all-purpose flour — for the first dredge to help the egg and crumbs adhere.
- 2 large eggs, whisked — room temperature eggs help the coating stick smoothly.
- 1 teaspoon garlic powder — for savory depth.
- 1 teaspoon onion powder — warm, aromatic backbone.
- 1/2 teaspoon paprika — for color and a hint of smokiness.
- Salt and freshly ground black pepper, to taste — don’t be shy with seasoning.
- Cooking oil, for frying — a neutral oil with a high smoke point (such as vegetable or canola) for shallow frying.
Notes and quick substitutions:
- If you prefer a lighter crisp, use panko breadcrumbs only or a 50/50 mix of panko and seasoned crumbs.
- For lower sodium, choose low-salt Parmesan and taste the breadcrumb mixture before coating.
- If your chicken breasts are very thick, butterflying or pounding them to an even thickness helps them cook evenly.
Ingredients & Equipment Notes (Optional)
Useful tools that make this recipe easier and give better results:
- Large shallow dishes or pie plates — perfect for setting up a three-step breading station (flour, egg, breadcrumbs).
- Zip-top bag or shallow dish — for marinating chicken in pickle juice.
- Heavy skillet (cast iron or stainless steel) — holds and distributes heat evenly for a reliable fritter-like crust.
- Instant-read thermometer — helps you hit the perfect 165°F internal temperature without overcooking.
- Wire rack and baking sheet — for draining and resting the cooked chicken so the crust stays crisp.
- Tongs and slotted spatula — safer and neater for flipping and removing chicken from hot oil.
Why these tools help:
- An even-thickness chicken cooks uniformly, so no dry edges.
- A wire rack prevents sogginess from pooling oil — your crust stays crisp while resting.
- An instant-read thermometer removes guesswork and keeps the chicken juicy.
Instructions – How to Make Crispy Dill Pickle Parmesan Chicken
- Prepare the pickle brine and chicken.
- Place the trimmed chicken breasts into a shallow dish or a resealable plastic bag. Pour 1 cup of dill pickle juice over the chicken so each piece is at least partially submerged. Seal or cover, and refrigerate for 30 minutes to 2 hours.
- Why this matters: The acetic acid and salt in the pickle juice lightly brine the chicken, improving moisture and imparting a subtle tang without long marinating times. Aim for at least 30 minutes—any longer than 2 hours can begin changing texture on very thin pieces.
- Set up your breading station.
- In three separate shallow dishes: mix the flour with 1/2 teaspoon garlic powder, 1/2 teaspoon onion powder, 1/4 teaspoon paprika, and a pinch of salt and pepper; whisk the 2 large eggs until smooth in the second dish; stir together 1 cup seasoned breadcrumbs with 1/2 cup grated Parmesan and the remaining garlic/onion powders and paprika in the third dish.
- Why this matters: The flour first dredge helps the egg stick; the egg creates an adhesive base for the Parmesan-breadcrumb blend, ensuring a uniform, crunchy crust.
- Remove the chicken from the brine and pat dry.
- Take the chicken out of the fridge, drain off excess pickle juice, and gently pat each breast dry with paper towels. Drying is essential so the flour can adhere properly and you don’t get clammy breading.
- Visual cue: The surface should look matte, not wet or glossy.
- Dredge and bread the chicken.
- One piece at a time: coat the chicken in the seasoned flour, shaking off excess; dip into the whisked eggs; then press firmly into the Parmesan-breadcrumb mix so the coating sticks evenly. Shake gently to remove loose crumbs. If you prefer a thicker crust, repeat the egg and breadcrumb step for a double coating.
- Mini-tip: Pressing makes a better bond between cheese and crumbs—don’t be timid about pressing the crumb mixture into the meat.
- Heat the oil for frying.
- Pour about 1/2 inch of neutral oil into a large skillet. Heat the oil over medium-high heat until shimmering and around 350°F if you have a thermometer. If you don’t have one, a small breadcrumb should sizzle immediately but not burn on contact.
- Why this matters: Proper oil temperature prevents the crust from soaking up oil and keeps it crisp. Too cool and the breading becomes greasy; too hot and the crust will brown before the interior cooks.
- Fry the chicken until golden and cooked through.
- Working in batches if needed, carefully place the breaded chicken into the hot oil. Fry for about 5–7 minutes per side, adjusting time for thickness, until both sides are deeply golden and the internal temperature reads 165°F.
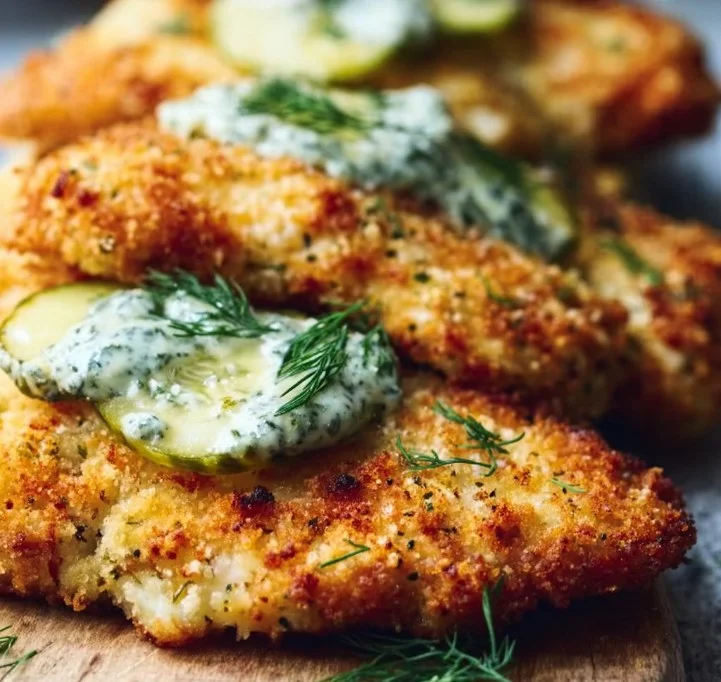
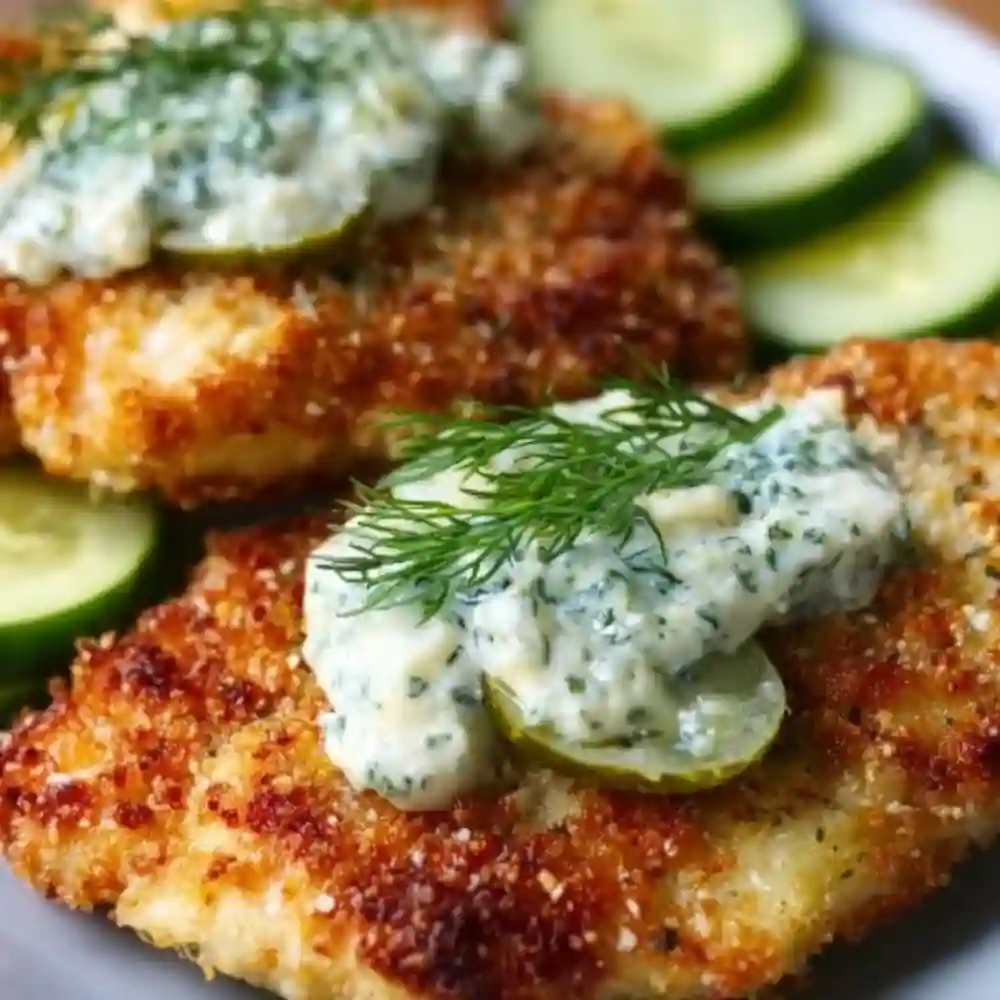
- Visual cue: A deep, even golden-brown crust signals the Maillard reaction—flavor city. The chicken should feel firm but springy to the touch.
- Drain and rest on a wire rack.
- Transfer cooked pieces to a wire rack set over a baking sheet so excess oil drains away. Let the chicken rest for a few minutes before serving; this short pause helps the juices redistribute and lets the crust set so it stays crisp when cut.
- Why this matters: Resting keeps the interior juicy and prevents the crust from becoming steam-softened on the plate.
- Serve hot and enjoy.
- Plate with your chosen sides (see serving suggestions below) and enjoy the crunchy, tangy contrast in every bite.
Serving Suggestions & Storage Tips for Crispy Dill Pickle Parmesan Chicken
Serving ideas and presentation:
- Serve the chicken whole with lemon wedges and a little extra grated Parmesan for brightness. A sprinkle of chopped fresh parsley or chives adds color and fresh flavor.
- For a comfort-meal spin, slice the chicken and layer it over mashed potatoes, mac and cheese, or creamy polenta.
- Make a sandwich: place a crisp chicken cutlet on a toasted brioche or sturdy roll with shredded lettuce, tomato, and a smear of mayo or a quick dill-yogurt sauce.
- Serve family-style with sides like roasted green beans, a crunchy slaw, or classic potato wedges.
Pairings and accompaniments:
- Cool, creamy coleslaw or a dill-yogurt sauce (Greek yogurt + chopped dill + lemon zest) complements the tang of the chicken.
- Bright, acidic sides (simple cucumber salad, pickled red onions) echo the pickle note without overwhelming the dish.
- A buttery corn on the cob or roasted asparagus offers seasonal balance.
Storage and make-ahead:
- Refrigerator: Store leftover cooked chicken in an airtight container for up to 3–4 days. Let pieces cool to room temperature before sealing to avoid sogginess.
- Freezing: You can freeze fully cooked chicken in a single layer on a sheet pan, then transfer to a freezer bag for up to 2 months. Reheat directly from frozen using a method below for best texture.
- Make-ahead: Brine the chicken up to 2 hours ahead, bread it, and refrigerate uncovered on a rack for up to 1 hour before frying. This can help the coating adhere. Alternatively, fully cook and reheat later.
Best reheating methods to preserve texture:
- Oven: Preheat to 375°F and reheat on a wire rack over a baking sheet for 12–15 minutes until warmed through; this helps recrisp the crust.
- Air fryer: Reheat at 350°F for about 6–8 minutes, flipping once—great for restoring crunch.
- Avoid microwaving if you want to keep the crust crisp; it will steam and soften. If microwaving is necessary, do a short burst and then finish in a hot skillet for a minute per side.
For more plated chicken inspiration and bowls that work well as a weeknight swap, see this flavorful Peruvian chicken and rice with green sauce.
Helpful Notes & Variations for Crispy Dill Pickle Parmesan Chicken
Ingredient swaps and substitutions:
- Chicken thighs: Boneless, skinless thighs can be used instead of breasts—reduce frying time slightly as thighs are more forgiving and remain juicy.
- Breadcrumbs: Swap seasoned breadcrumbs for panko or gluten-free breadcrumbs as needed. If using plain panko, add extra Parmesan or a pinch of salt.
- Cheese: For a different flavor profile, try Asiago or pecorino instead of Parmesan—both are salty and nutty.
Dietary adaptations:
- Gluten-free: Use gluten-free all-purpose flour and gluten-free breadcrumbs; the technique remains the same.
- Lighter bake option: See the baking variation below if you prefer less oil.
Flavor enhancements or add-ins:
- Add 1 teaspoon Dijon mustard to the whisked eggs for a subtle tang in the coating.
- Mix a tablespoon of chopped fresh dill into the breadcrumb-Parmesan mix for echoing herb flavor.
- For a bit of heat, include 1/4-1/2 teaspoon cayenne or a sprinkle of crushed red pepper into the flour dredge.
Common mistakes to avoid:
- Skipping the pat-dry step after brining will prevent the flour from adhering and can lead to a soggy crust.
- Overcrowding the pan drops the oil temperature; fry in batches so each piece fries evenly and crisps up.
- Not testing oil temperature—if the oil is too cool the chicken will soak up oil; too hot and the breading will burn before the center cooks.
Baked variation (if you prefer not to fry):
- Preheat oven to 425°F. Place breaded chicken on a parchment-lined baking sheet and lightly spray the tops with oil. Bake for 18–25 minutes (depending on thickness), flipping halfway through, until the coating is golden and the internal temperature reaches 165°F. This gives a lighter crust—still tasty, though slightly less blistered than frying.
Conclusion
Crispy Dill Pickle Parmesan Chicken is a joyful, slightly unexpected take on breaded chicken that’s crunchy, tangy, and utterly comforting. The simple pickle-juice brine brightens the chicken while the Parmesan-breadcrumb crust delivers that golden, savory crunch everyone loves. If you’re after an easy weeknight showstopper or a nostalgic dish that sparks conversation, this one’s a winner—reliable, fast, and endlessly adaptable.
If you want to explore similar recipes for crispy, saucy, or meal-prep-friendly chicken, you might enjoy this roundup of Dill Pickle Parmesan Chicken that inspired many home cooks, this quick and cheesy take on Dill Pickle Parmesan Chicken: Crispy, Cheesy & Quick Dinner for another perspective, and a practical Dill Pickle Chicken Recipe | Great for Meal Prep! with useful tips for planning ahead. I’d love to hear how your batch turned out—drop a comment below, leave a star rating, and if you loved the crunch, share it on Pinterest or social so others can try this tangy twist on an old favorite.
Frequently Asked Questions
Can I use chicken thighs instead of breasts?
Yes—boneless, skinless chicken thighs work well. They tend to stay juicier and are more forgiving if slightly overcooked. Reduce frying time by a minute or two per side if they’re smaller; use an instant-read thermometer and target 165°F internal temperature.
How long should I marinate the chicken in pickle juice?
Thirty minutes to two hours is ideal. Thirty minutes gives a mild pickle flavor and tenderizes slightly; two hours provides a more noticeable tang. Avoid marinating overnight, especially for thin cutlets, as the acid can begin to change the texture too much.
Can I bake the chicken instead of frying to make it healthier?
Absolutely. Preheat your oven to 425°F, place the breaded cutlets on a rack over a baking sheet, lightly spray with oil, and bake 18–25 minutes (flipping halfway) until golden and cooked through. The crust will be crisp, though the browning won’t be quite the same as frying.
How can I keep the coating crispy when reheating leftovers?
Use an oven or air fryer to reheat: 375°F in the oven on a wire rack (12–15 minutes) or 350°F in the air fryer (6–8 minutes). These methods restore crispness without overcooking the meat. Avoid microwaving if you want to maintain crunch.
Is it safe to reuse the pickle brine after marinating?
No—don’t reuse brine that’s been in contact with raw chicken. It should be discarded. If you want more pickle flavor, reserve fresh pickle juice before brining and use it to flavor sauces or dressings.
Crispy Dill Pickle Parmesan Chicken
Ingredients
Method
- Place the trimmed chicken breasts into a shallow dish or resealable plastic bag. Pour dill pickle juice over the chicken so each piece is partially submerged. Seal and refrigerate for 30 minutes to 2 hours.
- In three shallow dishes: mix flour with garlic powder, onion powder, paprika, and a pinch of salt and pepper; whisk eggs in the second dish; stir breadcrumbs with Parmesan and remaining garlic/onion powders and paprika in the third dish.
- Take chicken out of the fridge, drain excess pickle juice, and pat each breast dry with paper towels.
- Coat each chicken piece in seasoned flour, shake off excess; dip into eggs; press into the Parmesan-breadcrumb mix to coat evenly.
- Heat oil in a large skillet over medium-high heat until shimmering.
- Carefully place breaded chicken into hot oil and fry for about 5–7 minutes per side, until golden and internal temperature reaches 165°F.
- Transfer cooked chicken pieces to a wire rack over a baking sheet to drain excess oil. Let rest for a few minutes.
- Plate with your chosen sides and enjoy the crunchy, tangy contrast.