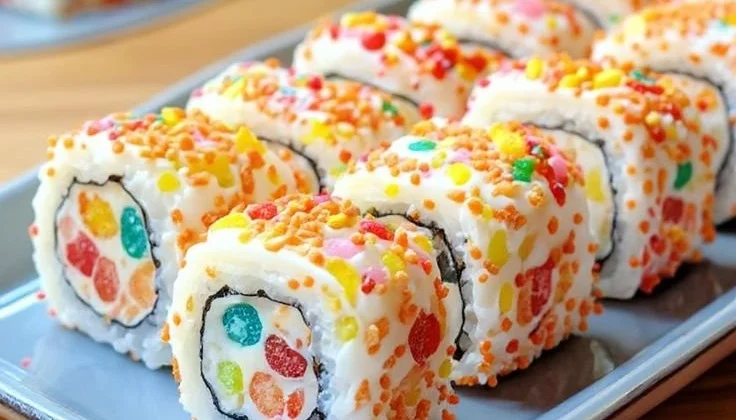
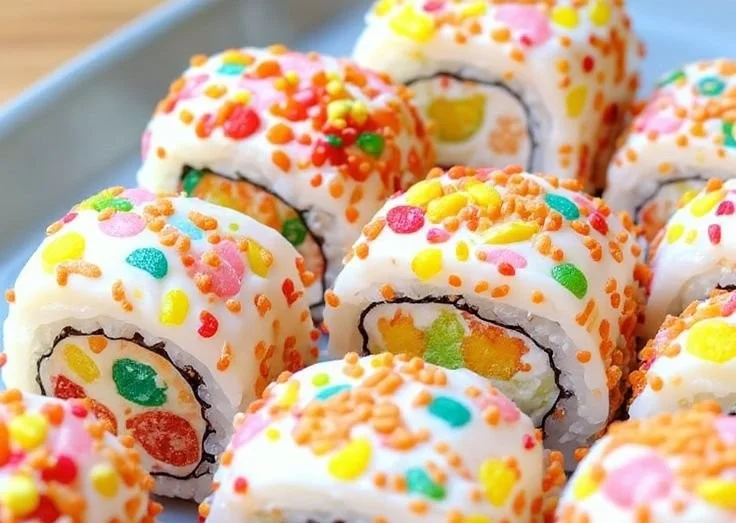
There’s something instantly joyful about rolling bright, crunchy cereal into playful, bite-sized pieces — which is exactly why Fruity Pebbles Sushi belongs on your seasonal recipe list. This whimsical treat takes familiar pantry favorites and turns them into a colorful, shared activity for kids and adults alike. Using simple ingredients like sushi rice, marshmallows, and Fruity Pebbles, you get a fun contrast of sticky, chewy, and crisp textures that feel both nostalgic and new. If you love playful twists on desserts or want an easy project for a rainy afternoon, this is a recipe that pairs well with other cereal-based ideas like a homemade Fruity Pebbles cookies recipe for a full, festive spread.
Ingredients & Equipment
Ingredients
- 1 cup sushi rice
- 1 1/4 cups water
- 1 tablespoon rice vinegar
- 2 tablespoons sugar
- 1/2 teaspoon salt
- 4 large marshmallows
- 1/2 cup Fruity Pebbles cereal
- 1/4 cup gummy candies (optional)
- Nori sheets (optional, for rolling)
Notes:
- Sushi rice creates the right sticky base and compact texture for rolling; short-grain rice or labeled sushi rice is best.
- Marshmallows act as the “fill” binder and add chewiness. If you prefer less sweetness, reduce to 3 marshmallows and increase rice slightly.
- Fruity Pebbles are the seasonal, colorful star. Substitute similarly crunchy, brightly flavored cereals if desired.
- Gummy candies are optional but add a playful chew and visual whimsy — consider gummy bears, worms, or fruit slices.
Equipment
- Medium saucepan with tight-fitting lid (or rice cooker)
- Small bowl for seasoning rice vinegar mixture
- Wooden spoon or rice paddle
- Sushi mat or a clean, flat surface and a sheet of plastic wrap
- Sharp knife for slicing rolls
- Baking tray lined with parchment (for toasting cereal if you try that variation)
- Blender or food processor (optional, if you want a finer cereal coating)
- Candy thermometer (optional, helpful if you experiment with melting marshmallows to a specific temperature)
Helpful tools like a rice cooker make the rice foolproof, but a heavy-bottomed pot works great too. A sushi mat gives tight rolls; if you don’t have one, folded parchment under plastic wrap makes an excellent DIY solution.
Step-by-Step Instructions (with tips)
- Rinse the sushi rice under cold water until the water runs clear. Combine the rinsed rice with 1 1/4 cups water in a pot and bring to a boil. Reduce heat to low, cover, and simmer for 15–20 minutes until the rice is cooked and all the water is absorbed. Tip: If you have a rice cooker, use the white rice setting for perfect results every time. For a slightly creamier texture, let the rice rest off the heat for 10 minutes before seasoning.
- In a small bowl, mix 1 tablespoon rice vinegar, 2 tablespoons sugar, and 1/2 teaspoon salt until dissolved. Stir this mixture gently into the cooked rice — use a slicing motion rather than stirring vigorously to keep the grains somewhat intact. Allow the rice to cool to room temperature. Tip: Spread the rice in a shallow pan to speed cooling; fan gently if you’d like the glossy traditional finish.
- Once the rice is cool, lay a sheet of plastic wrap on a sushi mat or a clean surface. If you’re using nori sheets, place the nori shiny-side down on the plastic before adding rice. Pro tip: Lightly wet your hands to prevent sticking when handling sushi rice.
- Spread a thin, even layer of the sushi rice (about 1/3–1/2 inch thick) over the plastic wrap or nori, leaving a 1-inch edge uncovered at the far end to seal the roll. Keep the layer thin so the roll stays crisp and easy to bite. Tip: Don’t overfill — less is more for tidy slices.
- Place the fillings (4 large marshmallows slightly flattened, 1/2 cup Fruity Pebbles cereal, and 1/4 cup gummy candies if using) in a line across the rice, about 1–1.5 inches from the near edge. If marshmallows are difficult to line up, soften them in the microwave for 5–8 seconds so they’re easier to press into a log. Variation: For a roasted flavor, briefly toast the Fruity Pebbles on a baking tray in a 325°F oven for 3–5 minutes before adding them to the roll.
- Carefully roll the sushi using the mat or plastic wrap, pressing gently to form a tight roll. If using nori, the sheet will help keep everything together. If you want a crunchy outer layer, press the roll into extra Fruity Pebbles that have been slightly crushed in a bowl. Tip: If the roll resists sealing, dampen the exposed rice edge with a little water or a few drops of rice vinegar mixture to create “glue.”
- Slice the roll into bite-sized pieces with a very sharp, lightly wet knife. Wipe the blade between cuts for clean edges. Serve immediately as a fun, colorful treat. Flavor suggestion: a drizzle of white chocolate or a dusting of powdered sugar can add extra sweetness and a festive sheen.
Variations and kitchen tips
- Roasting vs boiling rice: While sushi rice should be cooked via absorption (boil then simmer) or a rice cooker for the correct stickiness, you can try a short oven-steaming method in a tightly covered pot if you prefer hands-off cooking. Avoid pilaf-style methods that leave drier rice.
- Cereal coating: For a smoother finish, pulse Fruity Pebbles in a blender for 1–2 seconds to create a fine crumb to press onto the exterior. This creates a colorful crust without big pieces falling off.
- Gluten-free option: Verify that all mix-ins and gummies are labeled gluten-free. The core ingredients (rice, marshmallows, Fruity Pebbles original) can be used in many gluten-free diets if packaging confirms.
- Temperature tip: Keep your work area cool; marshmallows soften quickly in warm kitchens and can create overly sticky rolls if they melt too much.
Storage, Freezing & Make-Ahead Tips
Short-term storage
- Store leftover Fruity Pebbles Sushi in an airtight container in the refrigerator for up to 24 hours. Because the cereal will absorb moisture from the rice, these treat-sushi pieces are best enjoyed the same day. If you must refrigerate, separate layers with parchment to protect the cereal coating and preserve crunch as much as possible.
Freezing
- Freezing is not recommended for preserving texture. The water content in sushi rice and marshmallows causes the cereal layer to go soggy and gummy upon thawing. If you need to freeze, consider freezing unrolled rice balls or parbaked components separately, but expect the cereal texture to change.
Make-ahead strategies
- Prep the rice ahead of time: Cook and season sushi rice up to 6 hours in advance and keep covered at room temperature (or in the fridge if your kitchen is warm). Assemble rolls just before serving so the Fruity Pebbles remain crisp.
- Pre-crush cereal: If you plan to coat rolls with crushed Fruity Pebbles, pulse them in a blender and store the crumbs in an airtight jar for up to a week to save assembly time.
- Marshmallow handling: If you want to streamline assembly for a crowd, flatten marshmallows slightly with a greased rolling pin and keep them spaced on parchment until ready to assemble.
Portioning advice
- Each roll typically yields 6–8 bite-sized pieces depending on thickness. For parties, plan for 2–3 pieces per person as a novelty dessert, more if they’re the main sweet offering. For family snack time, a single roll often serves 3–4 children.
One recipe alternative: if you enjoy playful sushi reinterpretations, you might like a family-friendly fruit version like a banana sushi recipe that uses fruit and nut butter for a healthier twist.
How to Use / Serve This Dish
Serving ideas
- Party platter: Arrange Fruity Pebbles Sushi on a bright platter with small bowls of extra cereal, melted white chocolate for dipping, and colorful sprinkles for a DIY topping station. Guests can drizzle or dip each piece for added fun.
- Kid-friendly snack: Pair bites with a small glass of milk or a yogurt dip to balance sweetness and add protein. This is a great activity for weekend brunches or rainy day baking.
- Dessert roll-ups: Serve slices alongside fresh fruit, a scoop of vanilla ice cream, or a dollop of whipped cream for contrast. The ice cream’s creaminess pairs well with the crunchy cereal exterior.
Creative variations
- Cinnamon Toast Crunch swap: Replace Fruity Pebbles with another crunchy cereal like Cinnamon Toast Crunch for a warm spice twist.
- Tropical roll: Replace marshmallows with a thin strip of sweetened cream cheese and use coconut flakes and crushed dried mango instead of Fruity Pebbles for a tropical-inspired sushi roll.
- Savory-sweet play: For grown-up gatherings, try a tiny smear of cream cheese and a sliver of smoked salmon with a crushed, lightly sweet cereal rim for a playful contrast — think of it as a dessert-sushi crossover riff on popular savory rolls. If you like baked sushi cups, techniques from an easy baked salmon version are handy for shaping rice-based treats; here’s a helpful resource on how that style works in a different recipe context: baked salmon sushi cups.
Presentation tips
- Use contrasting serving pieces like dark slate or a white plate to make the colors pop. Sprinkle a few extra Fruity Pebbles around the platter for visual appeal.
- For photos or social sharing, slice rolls with a very clean knife and arrange pieces in a tight row to showcase the colorful cross-section.
FAQ
Q: Can I substitute the sushi rice with regular long-grain rice?
A: Short-grain sushi rice is recommended because it becomes sticky and cohesive when cooked and seasoned. Long-grain rice tends to be drier and won’t hold together well for rolling. If you only have long-grain rice, try adding a touch more water and a small amount of sticky binder (like a teaspoon of cornstarch dissolved in water) — but results will differ.
Q: How long will Fruity Pebbles Sushi keep before it gets soggy?
A: For best texture, serve within a few hours of making. Refrigeration can help slow moisture transfer for up to 24 hours, but cereal crispness will degrade. Assemble close to serving time for the freshest bite.
Q: What can I use instead of marshmallows if someone is allergic?
A: You can use a soft spread such as cream cheese sweetened with a little honey or maple syrup to mimic stickiness and sweetness. Nut butter (if no nut allergies) is another option; however, it will change the flavor profile considerably. Be mindful of allergies and label creations for guests.
Q: Are there gluten-free and vegan options?
A: Gluten-free: check packaging — most cereals, marshmallows, and add-ins need verification for gluten-free labeling. Fruity Pebbles have had gluten-free versions — always check the box. Vegan: traditional marshmallows contain gelatin, so use vegan marshmallows; also confirm the cereal is vegan-friendly (some flavors are). Use vegan substitutes like coconut cream or a nut/seed butter to replace dairy if needed.
Conclusion
Fruity Pebbles Sushi is a bright, comforting, and slightly silly recipe that invites play in the kitchen while delivering surprisingly satisfying textures — sticky rice, gooey marshmallow, and a crunchy, colorful cereal finish. It’s ideal for seasonal gatherings, kids’ parties, or as a creative baking afternoon with friends. If you’re curious about other novelty breakfast-sushi ideas, check out this kid-friendly breakfast sushi idea for more inspiration. And if you enjoy festival-style mashups and trends, this comparison piece on a Fruity Pebbles corn dog at CNE is a fun read about how creative cereal uses are showing up in unexpected places: Fruity Pebbles corn dog comparison at CNE 2025.
Ready to make a colorful statement at your next gathering? Roll up your sleeves, gather your ingredients, and share a photo of your Fruity Pebbles Sushi — I can’t wait to see how you personalize this playful, seasonal treat.
Fruity Pebbles Sushi
Ingredients
Method
- Rinse the sushi rice under cold water until the water runs clear. Combine the rinsed rice with 1 1/4 cups water in a pot and bring to a boil.
- Reduce heat to low, cover, and simmer for 15-20 minutes until the rice is cooked and all the water is absorbed.
- In a small bowl, mix 1 tablespoon rice vinegar, 2 tablespoons sugar, and 1/2 teaspoon salt until dissolved. Stir this mixture gently into the cooked rice.
- Allow the rice to cool to room temperature.
- Lay a sheet of plastic wrap on a sushi mat or a clean surface. If using nori, place it shiny-side down on the plastic wrap.
- Spread a thin, even layer of sushi rice over the plastic wrap or nori, leaving a 1-inch edge uncovered.
- Place fillings (4 flattened marshmallows, 1/2 cup Fruity Pebbles, and 1/4 cup gummy candies if using) in a line across the rice.
- Carefully roll the sushi using the mat or plastic wrap, pressing gently to form a tight roll.
- Slice the roll into bite-sized pieces with a very sharp, lightly wet knife.
- Serve immediately as a fun, colorful treat.