Honey Butter Chicken Recipe — hey friend, pull up a chair. I remember the first time I browned those juicy chicken pieces and slowly coaxed a glossy honey-butter glaze until it clung to every nook and cranny. It felt like wrapping a warm blanket around a weeknight. This version leans on tender boneless chicken thighs, a whisper of garlic, sticky-sweet honey, and a silky butter finish that makes forkfuls sing. If you want a reliable, cozy dish with simple pantry ingredients, you are in the right place — and if you love quick, comforting dinners, you might also enjoy this quick butter chicken recipe for another easy weeknight option.
Why You’ll Love This Recipe
- Quick and easy to prepare – weeknight-friendly with minimal fuss
- Simple, accessible ingredients you likely have on hand
- Perfect for cozy autumn nights, chilly evenings, or anytime you need comfort on a plate
- Comforting, satisfying, and impressive enough to serve guests
What makes this version unique is the focus on a crisp, golden sear on bite-sized chicken thighs combined with a small-but-mighty honey-butter pan sauce that finishes in minutes. I love that it balances sweet and savory without being cloying, thanks to a touch of rice vinegar and soy sauce for depth. This recipe gives you confidence in the kitchen by using straightforward techniques that consistently yield a tender interior and a slightly crisp exterior. The result feels both homey and a little special.
Ingredient Snapshot
Ingredients Needed
Below I have rephrased and clarified the ingredient list from the original source so you can shop and prep with ease. Measurements are included and I note fresh versus pantry items and simple swaps.
Chicken
- 1 pound boneless, skinless chicken thighs, trimmed and cut into roughly 2-inch bite-sized pieces (fresh is best; if frozen, fully thaw and pat dry)
Coating and seasoning
- 1 tablespoon cornstarch (for a light crisp)
- 1 tablespoon all-purpose flour — Bob’s 1-to-1 gluten-free flour works as a direct substitute if you need gluten-free
- 1/2 teaspoon fine salt
- 1/2 teaspoon ground black pepper
- 1/2 teaspoon garlic powder
Aromatic
- 3 cloves garlic, thinly sliced (fresh garlic gives the best aroma; pre-minced jarred garlic will work in a pinch)
Cooking fat
- 1 tablespoon avocado oil (or any high-heat neutral oil such as canola or grapeseed)
Sauce components
- 1/4 cup honey (use mild-flavored honey for a subtle sweetness; robust varieties make the sauce bolder)
- 4 tablespoons cold unsalted butter (cut into cubes so it melts evenly)
- 1 tablespoon soy sauce or tamari (use tamari for gluten-free)
- 1 tablespoon rice vinegar (helps brighten and balance the honey)
Garnish
- Finely chopped fresh parsley for color and freshness
Notes on ingredients and substitutions
- Chicken thighs are recommended for tenderness and flavor. If you prefer breast meat, reduce searing time slightly and watch for doneness to avoid drying out.
- Cornstarch plus flour creates a light crust; using only cornstarch will give a slightly different texture. For gluten-free, swap the flour for the Bob’s 1-to-1 flour as noted.
- Use cold butter when adding to the pan. This helps emulsify the sauce and prevents it from splitting.
- Soy sauce adds umami and salt; reduce to 1/2 tablespoon if you are watching sodium. Tamari is the swap for gluten-free.
- Rice vinegar balances sweetness; you may sub with a mild apple cider vinegar in a pinch, but start with half the amount and adjust to taste.
Ingredients & Equipment Notes (Optional)
- Heavy skillet or nonstick pan: A 10-12 inch skillet gives enough surface area to sear chicken without crowding. A heavy-bottomed pan distributes heat evenly so pieces brown properly.
- Tongs or a spatula: For turning chicken and tossing in the sauce.
- Sharp knife and cutting board: For cutting thighs into uniform pieces so they cook evenly.
- Measuring spoons/cups and a small bowl: For mixing the dry coating and assembling the sauce.
- Instant-read thermometer (optional): To check chicken internal temperature; 165°F (74°C) is the safe target for poultry.
- Why these tools matter: Proper searing and heat control are the heart of a great honey butter glaze. A roomy skillet, dry chicken, and a single layer of pieces ensure caramelization rather than steaming.
Instructions – How to Make “Honey Butter Chicken Recipe”
Below are clear, step-by-step instructions based on the original method but rewritten with additional context, visual cues, and mini tips so you feel confident at each stage.
- Prep the chicken
- Trim any excess fat from the boneless thighs and cut them into roughly 2-inch bite-sized pieces so they cook evenly. Pat the pieces very dry with paper towels. Moisture is the enemy of a crisp sear.
- In a large mixing bowl, whisk together 1 tablespoon cornstarch, 1 tablespoon flour (or a gluten-free 1-to-1 substitute), 1/2 teaspoon salt, 1/2 teaspoon black pepper, and 1/2 teaspoon garlic powder. This mixture seasons and gives the chicken a delicate crust.
- Toss the chicken pieces in the dry mix until each piece is lightly and evenly coated. They should feel slightly chalky but not caked with flour.
Why this matters: Dry, evenly coated chicken browns faster and steams less, creating a satisfying contrast between a tender interior and a crisp exterior.
- Heat the pan and oil
- Place a large skillet over medium heat and add 1 tablespoon avocado oil. Allow the pan to come to temperature; the oil should shimmer but not smoke.
- A hot pan is essential for immediate searing and creating that golden exterior.
Visual cue: When you drop a tiny bit of water into the pan it should dance and evaporate quickly.
- Cook the chicken in a single layer
- Add the coated chicken pieces to the skillet in a single layer, leaving a little space between pieces. Crowding the pan will trap steam and prevent browning.
- Cook for about 8 minutes on the first side until the underside is deeply golden and slightly crisp. Then turn each piece and cook for an additional 8 minutes on the second side. The total time may vary with piece size and pan heat; aim for a golden-brown exterior and an internal temperature of 165°F (74°C).
Mini tip: If your pan is crowded, cook the chicken in two batches to maintain the sear. Keep the first batch on a warm plate while you cook the second.
Visual cue: You are looking for a rich, caramelized color. If the chicken is pale or releasing a lot of moisture, the pan isn’t hot enough.
- Remove chicken and set aside
- When the chicken is cooked through and golden, transfer the pieces to a plate and tent loosely with foil to keep warm. Do not wipe the pan clean; those browned bits are flavor gold.
Why it matters: The browned fond at the bottom of the pan will flavor the sauce.
- Add the garlic and build aroma
- Lower the heat to medium-low. Add the thinly sliced 3 garlic cloves to the same pan. Sauté for about 1 minute, stirring constantly, until fragrant and slightly golden but not burnt. Burnt garlic tastes bitter, so watch it closely.
Visual cue: Garlic should become aromatic and take on a pale golden hue.
- Make the honey butter sauce
- Reduce the heat to low. Add the 4 tablespoons of cold unsalted butter to the pan in small cubes. Then stir in 1/4 cup honey, 1 tablespoon soy sauce or tamari, and 1 tablespoon rice vinegar. Stir or swirl the pan until the butter melts and the ingredients combine into a glossy sauce. If the sauce is too thin, simmer gently for 1 to 2 minutes to reduce and slightly thicken.
Why a step matters: Adding cold butter to lower heat helps emulsify the sauce so it becomes silky and clings to the chicken, rather than separating.
Mini tip: If you want a thicker glaze, mix an extra 1/2 teaspoon cornstarch with 1 tablespoon cold water and stir it into the sauce while it’s simmering. Go slow and add only a bit at a time.
- Toss chicken in the sauce to finish
- Return the chicken to the pan and toss in the sauce until every piece is generously coated and the sauce has reduced to a shiny glaze. Heat through for 1 to 2 minutes so the flavors meld and the sauce tightens just enough to cling to the chicken.
Visual cue: The honey butter sauce should be glossy and coat the back of a spoon. It should not be watery.
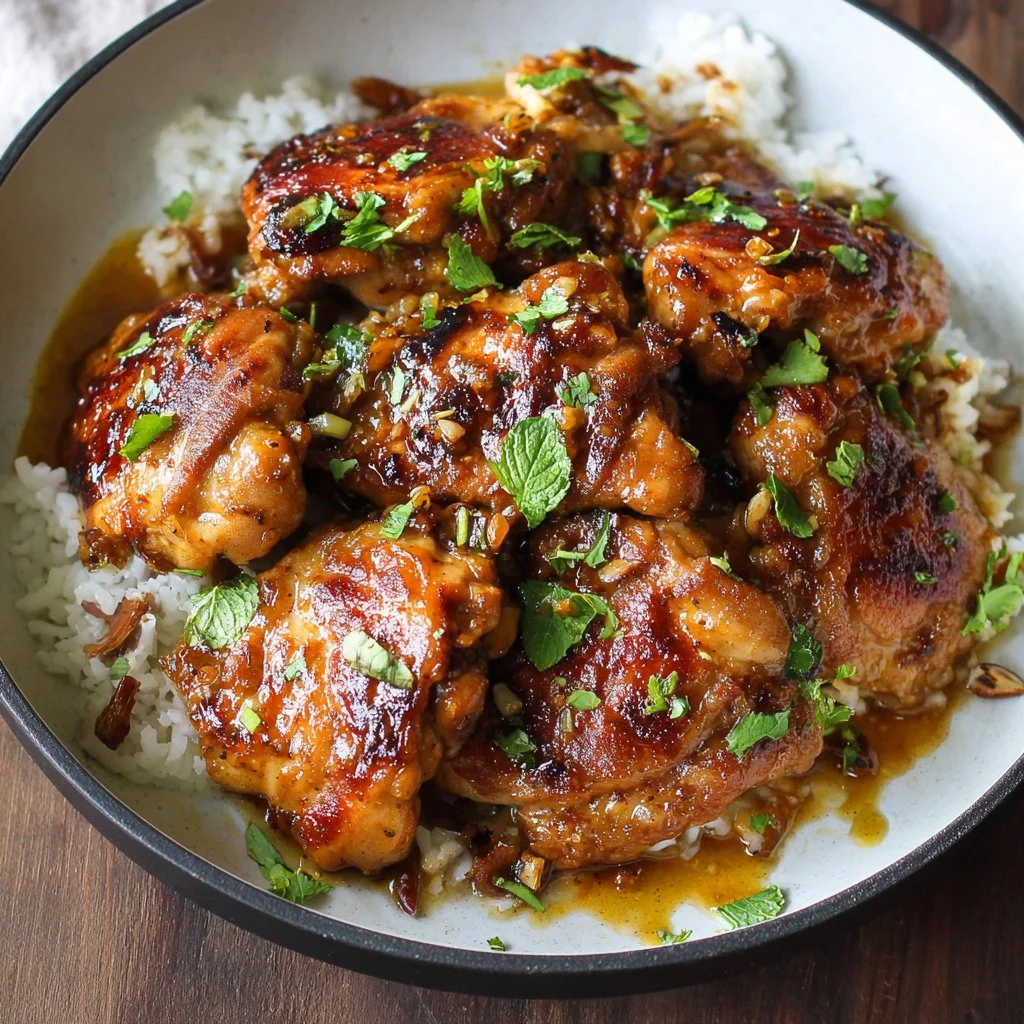
- Garnish and serve hot
- Sprinkle with finely chopped fresh parsley for brightness and color. Serve immediately with your choice of sides.
Mini tip: Serve on warmed plates to keep the glaze glossy longer.
Serving Suggestions & Storage Tips
Serving ideas
- Serve over steamed white or brown rice to soak up the honey butter sauce. For a protein-forward plate, pair with buttery mashed potatoes.
- For a lighter meal, plate over a bed of mixed greens or roasted vegetables like broccoli, brussels sprouts, or carrots. The sweet sauce plays beautifully against slightly bitter or charred vegetables.
- Place the chicken over tender jasmine rice and add a sprinkle of sesame seeds and sliced scallions for an Asian-inspired finish.
Presentation tips
- Spoon extra sauce over the chicken at the last minute so each serving gleams.
- Add a wedge of lemon or lime on the side if you like a bright citrus note that cuts through sweetness.
- For a family-style presentation, keep the skillet on the table and let everyone help themselves.
Pairings
- Simple starches like rice, buttered noodles, or creamy polenta complement the savory-sweet profile.
- A crisp, acidic salad cuts through richness — think cucumber ribbons, radish, and a light vinaigrette.
- If you like layered meals, try serving with this tangy rice-and-avocado stack for an extra textural contrast tangy honey lime chicken avocado rice stack.
Creative variations
- Add a pinch of red pepper flakes to the sauce for a sweet-heat version.
- Finish with toasted sesame seeds and a drizzle of toasted sesame oil for a nutty note.
- Stir in a tablespoon of Dijon mustard for a tangy-sweet mustard-honey twist.
Storage
- Refrigerate: Place cooled chicken and sauce in an airtight container and store in the refrigerator for up to 3 to 4 days.
- Freeze: For longer storage, freeze in a freezer-safe container for up to 2 months. Thaw overnight in the fridge before reheating.
Best reheating methods
- Stovetop: Gently reheat in a skillet over low heat with a splash of water or chicken broth to loosen the sauce. Stir often to prevent sticking and ensure the glaze re-emulsifies.
- Oven: Place in a baking dish, cover with foil, and warm at 325°F (160°C) until heated through. Add a little liquid if needed.
- Microwave: Use low power and heat in short bursts, stirring between intervals. This method is fastest but may soften the exterior crispness.
Helpful Notes & Variations
Ingredient substitutions
- Chicken breasts: Use with caution. Reduce searing time and check for doneness to avoid drying. Consider cutting into slightly larger pieces to stay moist.
- Butter alternatives: For a dairy-free version, use a vegan butter substitute, but note the final flavor will change. Ensure the substitute is solid and cold for best emulsification.
- Honey alternatives: Maple syrup can be a substitute, but the flavor will be earthier. Use the same amount and adjust vinegar to taste.
Dietary adaptations
- Gluten-free: Replace the tablespoon of flour with a gluten-free 1-to-1 flour as noted earlier and use tamari instead of soy sauce.
- Lower-sugar: Reduce honey to 2 tablespoons and increase rice vinegar by 1 teaspoon to maintain balance. Add a pinch of sweetener substitute if desired.
Flavor add-ins
- Citrus zest: Add a teaspoon of orange or lemon zest to the sauce for a lively brightness.
- Fresh herbs: Stir in chopped cilantro or chives at the end for variation.
- Heat: Add 1/2 teaspoon red pepper flakes or a dash of chili garlic sauce to the pan with the garlic for a spicier glaze.
Common mistakes and how to avoid them
- Crowding the pan: Cook in batches. Crowding causes steaming and prevents browning.
- Burnt garlic: Add garlic after chicken is removed and keep heat moderate. Garlic becomes bitter when overcooked.
- Sauce splitting: Add cold butter slowly over lower heat to emulsify. If the sauce looks oily, lower the heat and whisk in a small splash of warm water to bring it back together.
Experience-based tips
- Pat the chicken dry before coating for a golden crust.
- Measure honey with a wet measuring cup and scrape the cup with a spatula for an accurate 1/4 cup.
- Let the finished chicken rest for a minute off the heat before plating to allow juices to settle and the sauce to set.
If you have a sweet tooth for desserts after a savory meal, try pairing this dish with a simple frozen treat that echoes the honey theme — here is a fun, unexpected pairing you can explore later 5-ingredient honey protein ice cream.
Conclusion
Honey butter chicken has a magical way of turning ordinary ingredients into something memorable. The contrast between the golden crisp on the outside and juicy, tender meat inside, all wrapped in a glossy, balanced honey butter glaze, is what makes this dish a family favorite for weeknights and special dinners alike. If you want more ideas or variations, you can compare different takes on the theme with the original inspirations and video guides found at Honey Butter Chicken | Don’t Go Bacon My Heart, Honey Butter Chicken Recipes with Video ⋆ Real Housemoms, and a concise video demonstration at Honey Butter Chicken Thighs (VIDEO) – CJ Eats Recipes. Give it a try tonight, then come back and tell me how it went — leave a comment and a star rating if you loved it, and share a photo on Pinterest or social to spread the cozy vibes.
- Frequently Asked Questions
Can I make this recipe ahead of time?
Yes. You can fully cook the chicken and sauce and refrigerate in an airtight container for up to 3 to 4 days. Reheat gently so the sauce does not break. For best texture, reheat on the stovetop over low heat with a splash of water or broth and toss gently to refresh the glaze.
How should I store leftovers and how long do they last?
Store cooled leftovers in an airtight container in the refrigerator for 3 to 4 days. If freezing, place in a freezer-safe container and use within 2 months for best quality. Thaw frozen portions overnight in the refrigerator before reheating.
What is the best way to reheat or serve this recipe after storage?
The stovetop is the best method. Reheat gently in a skillet over low heat with a splash of water or broth to loosen the sauce, stirring frequently. Covering the pan briefly can help retain moisture. The oven at 325°F (160°C) covered with foil also works well for evenly reheating larger portions.
Can I adjust or substitute ingredients to fit my preferences?
Absolutely. Use tamari for gluten-free, reduce honey for lower sugar, swap chicken thighs for breasts with careful timing, or use a dairy-free butter alternative for a vegan-adapted sauce. Remember to adjust acidity and seasoning if you make swaps so the flavor balance stays harmonious.
Do you have tips to ensure the best texture and flavor every time?
Yes. Pat chicken dry before coating and do not overcrowd your pan so pieces sear rather than steam. Use cold butter and low heat to finish the sauce to keep it emulsified and glossy. Cook in batches if needed and hold cooked pieces loosely tented while finishing the sauce. Taste and adjust salt and acidity at the end for perfect balance.
Enjoy making this Honey Butter Chicken Recipe — it’s a comforting classic with just the right amount of shine and heart.

Honey Butter Chicken
Ingredients
Method
- Trim any excess fat from the boneless thighs and cut them into roughly 2-inch bite-sized pieces so they cook evenly. Pat the pieces very dry with paper towels.
- In a large mixing bowl, whisk together cornstarch, flour, salt, black pepper, and garlic powder. Toss the chicken pieces in the dry mix until each piece is lightly and evenly coated.
- Place a large skillet over medium heat and add avocado oil. Allow the pan to come to temperature.
- Add the coated chicken pieces to the skillet in a single layer. Cook for about 8 minutes on the first side until deeply golden, then turn each piece and cook for an additional 8 minutes.
- When the chicken is cooked through and golden, transfer the pieces to a plate and tent loosely with foil to keep warm.
- Lower the heat to medium-low, then add the thinly sliced garlic to the same pan. Sauté for about 1 minute until fragrant and slightly golden.
- Reduce heat to low. Add cold unsalted butter cubes to the pan, then stir in honey, soy sauce, and rice vinegar. Stir until the butter melts and the ingredients combine into a glossy sauce.
- Return the chicken to the pan and toss in the sauce until every piece is generously coated. Heat through for 1 to 2 minutes.
- Sprinkle with finely chopped fresh parsley for brightness and color. Serve immediately.