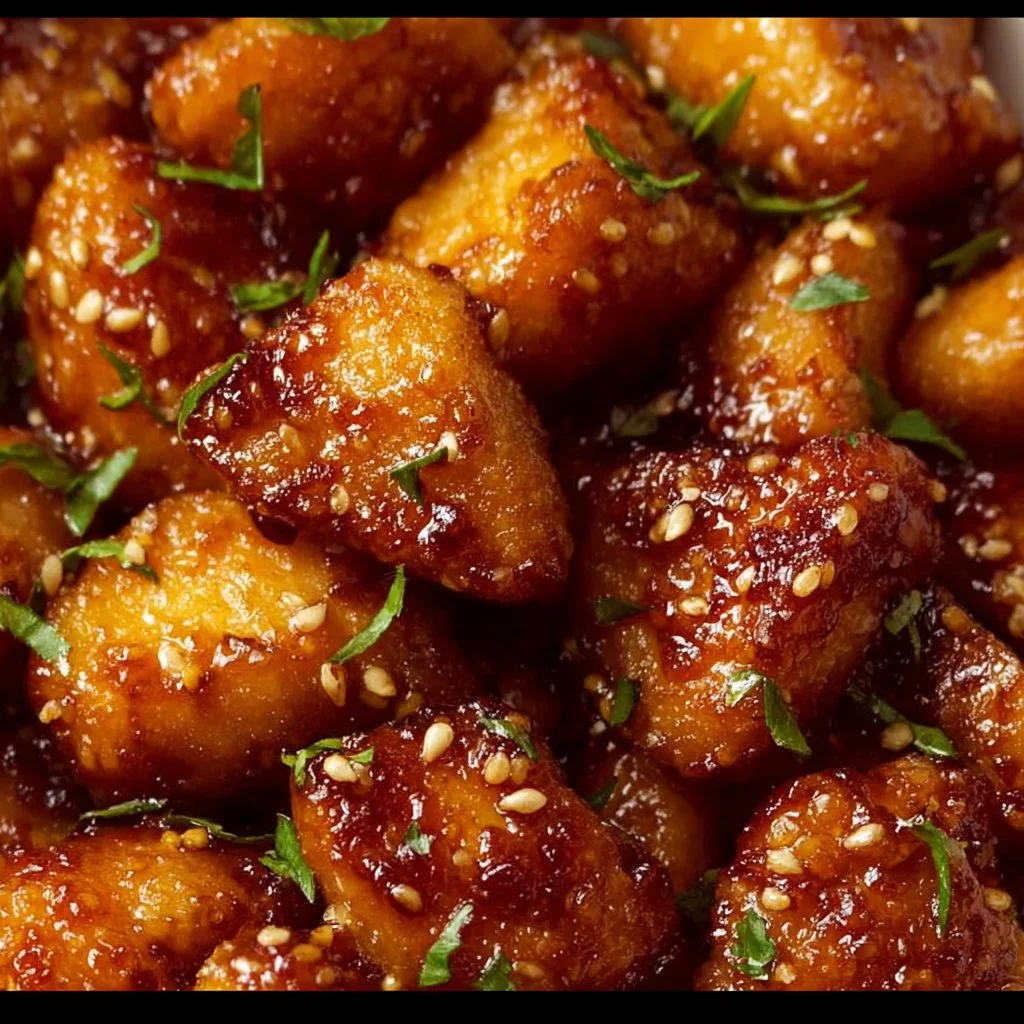
There’s something instantly comforting about sticky-sweet sauce clinging to tender, golden-browned chicken — enter Honey Garlic Chicken Bites, a seasonal favorite that feels like a warm kitchen hug. Whether you pick this recipe for cozy autumn evenings, a breezy spring dinner, or a quick weeknight treat, the star ingredients — boneless chicken, honey, and garlic — are pantry-friendly and crowd-pleasing. If you’re short on time but crave big flavor, this recipe pairs perfectly with simple sides and can be adapted for air fryer fans or oven-bakers; for a quicker take you might like the 20-minute honey garlic chicken that keeps the same crowd-pleasing vibe.
Ingredients & Equipment
Ingredients
- 1 1/2 lbs boneless (skinless) chicken (breasts or thighs, cut into bite-sized pieces)
- 1/2 cup all-purpose flour
- 1 teaspoon garlic powder
- 1 teaspoon paprika
- Salt and black pepper (to taste)
- 1 large egg (beaten)
- 2 tablespoons olive oil
- 1/4 cup honey
- 3 tablespoons low-sodium soy sauce
- 3 cloves fresh garlic (minced)
- 1 tablespoon rice vinegar (or apple cider vinegar)
- 1/2 teaspoon ground ginger (optional)
- 1/2 teaspoon red pepper flakes (optional)
- 1 tablespoon cornstarch (optional, for thickening)
- 1 tablespoon cold water (if using cornstarch slurry)
Brief notes
- Use boneless, skinless thighs for juicier, more forgiving bites; breasts are lean and cook faster.
- Low-sodium soy sauce helps control saltiness, especially with honey amplifying sweetness.
- Cornstarch slurry is optional but helpful if you prefer a glossy, clingy sauce.
Helpful tools
- Large skillet (preferably nonstick or cast iron)
- Shallow bowls for dredging and egg wash
- Tongs or a spatula
- Paper towels and a plate for draining
- Measuring cups/spoons
- Optional: air fryer or rimmed baking tray and wire rack (for oven-baked version)
- Optional: instant-read thermometer to check chicken (165°F / 74°C)
- Optional: small whisk or fork for sauce
Step-by-Step Instructions (with tips)
Prepare the Chicken
- Cut chicken into 1-inch cubes for even cooking.
- In a shallow bowl, mix the flour, garlic powder, paprika, salt, and black pepper. Taste the dry mix carefully (without licking your fingers) to ensure balanced seasoning.
- Beat the egg in a separate bowl.
- Dip each chicken piece into the beaten egg, then dredge in the flour mixture so each cube is coated. Let coated pieces rest for 2 minutes — this brief rest helps the flour adhere and leads to a crispier crust when frying.
Tip: If you like a thicker crust, double dredge by dipping again into egg and then flour. For a lighter version, skip the flour and simply toss chicken in a little cornstarch.
Cook the Chicken
- Heat 2 tablespoons olive oil in a large skillet over medium-high heat. When the oil shimmers, add chicken pieces in a single layer; do not crowd the pan.
- Fry chicken pieces in batches, about 3–4 minutes per side, until golden brown and cooked through (internal temp 165°F / 74°C). Don’t rush — a golden crust locks in juices.
- Transfer cooked pieces to a paper towel-lined plate to drain while you make the sauce.
Tip: Use a splatter screen to keep the stovetop tidy. If your skillet is small, fewer pieces per batch gives a better crust.
Make the Sauce
- In the same skillet (leave a tablespoon of fat from the chicken for flavor), add 1/4 cup honey, 3 tablespoons low-sodium soy sauce, minced garlic, 1 tablespoon rice vinegar, 1/2 teaspoon ground ginger (if using), and 1/2 teaspoon red pepper flakes (optional).
- Stir to combine and bring to a gentle simmer over medium heat so the raw garlic cooks but doesn’t burn. The honey will thin out and mingle with the soy sauce to create a glossy glaze.
- (Optional) Mix 1 tablespoon cornstarch with 1 tablespoon cold water to form a slurry. Whisk the slurry into the simmering sauce and cook 2–3 minutes until it thickens to your liking.
Tip: If the sauce becomes too thick, add a splash of water or chicken stock to loosen it. If it’s too thin, continue simmering a little longer or add a touch more cornstarch slurry.
Combine & Serve
- Add cooked chicken back to the skillet. Toss gently until every piece is coated with the honey garlic glaze.
- Cook together for another 1–2 minutes to let flavors marry and the sauce cling to the chicken.
- Garnish with sliced green onions and a sprinkle of sesame seeds if desired.
Variations
- Oven-baked: Toss coated chicken on a wire rack over a rimmed baking tray and bake at 425°F (220°C) for 12–15 minutes, turning once. Finish by tossing baked pieces in the honey garlic sauce in a hot skillet.
- Air fryer method: For a crisp, less-oily bite, cook the dredged chicken in an air fryer at 400°F (200°C) for 8–10 minutes, shaking halfway; then toss in sauce. For a dedicated air fryer guide, see the air fryer boneless chicken bites example.
- Spicy twist: Increase red pepper flakes or add a few teaspoons of sriracha for heat; a spicy-thigh version is fantastic and inspired by this spicy honey garlic chicken thighs take.
- Gluten-free: Swap all-purpose flour for rice flour or a gluten-free blend; use tamari instead of soy sauce.
Always remember: letting the sauce reduce a bit concentrates flavor, and tossing chicken directly in the glaze just before serving keeps crispness while ensuring saucy goodness.
Storage, Freezing & Make-Ahead Tips
Storing leftovers
- Refrigerate cooled leftovers in an airtight container for up to 3–4 days. For best texture, keep sauce separate if you plan to re-crisp the chicken before serving.
- Reheat in a skillet over medium heat, adding a splash of water to loosen the sauce and prevent burning. An oven reheating on a wire rack at 350°F (175°C) for 8–10 minutes helps restore crispness.
Freezing
- For freezing, lay cooked chicken bites in a single layer on a parchment-lined sheet and freeze until solid (2 hours); transfer to a freezer bag or container and store for up to 3 months. Freeze sauce separately in a small airtight container or freezer bag.
- To reheat from frozen, thaw overnight in the refrigerator. Reheat chicken on a baking sheet at 375°F (190°C) for 10–12 minutes, then toss in warmed sauce.
Make-ahead
- Prep the chicken (cutting and dredging) and keep it covered in the fridge for up to 24 hours, then fry and finish with sauce the day you serve.
- Make the sauce up to 2 days ahead; store in the refrigerator and reheat gently on the stove, whisking before combining with freshly cooked chicken.
Portioning advice
- This recipe yields about 3–4 servings as a main with sides. For meal prep, divide into single-serving containers with rice and veggies for grab-and-go lunches.
How to Use / Serve This Dish
Pairings
- Rice: Steamed jasmine or brown rice is a classic, soaking up the honey garlic sauce.
- Noodles: Toss over lo mein or simple garlic noodles for a comforting bowl.
- Vegetables: Serve with steamed broccoli, sautéed snap peas, roasted Brussels sprouts, or a crunchy cabbage slaw. For an air-fryer combo pairing, try the air fryer chicken bites and broccoli idea to keep things speedy and healthy.
- Salads: Add these bites on top of a warm grain salad (farro or quinoa) for a seasonal lunch.
Creative serving ideas
- Lettuce wraps: Spoon honey garlic chicken into butter lettuce leaves, top with sliced scallions and carrots for a lighter handheld option.
- Slider-style: Serve on small rolls with pickled cucumbers and a smear of mayo for party-friendly bites.
- Skewers: Thread the cooked pieces onto skewers with pineapple chunks and red peppers for a festive appetizer.
Flavor suggestions
- Add fresh lime juice at the end for brightness.
- Finish with freshly grated ginger or a splash of sesame oil for extra depth.
- Toasted sesame seeds or chopped cilantro brighten both presentation and profile.
FAQ
Q: Can I use frozen chicken for this recipe?
A: Yes — thaw frozen chicken completely in the refrigerator before cutting and dredging. Working with fully thawed chicken ensures even cooking and better crust formation.
Q: How long will leftovers keep, and is it safe to freeze?
A: Leftovers last 3–4 days in the refrigerator. You can freeze cooked chicken (up to 3 months) best when flash-frozen and stored in an airtight container; freeze sauce separately if possible.
Q: What can I substitute for honey or soy sauce?
A: For honey swaps, maple syrup or agave work in a pinch though sweetness and flavor will shift slightly. For soy sauce alternatives, use tamari (gluten-free) or coconut aminos (lower sodium, slightly sweeter).
Q: How do I prevent the garlic from burning in the sauce?
A: Add minced garlic once the pan is at medium heat rather than high and stir constantly as it warms. If the pan gets too hot, lower the heat; garlic burns quickly and turns bitter.
Conclusion
There’s a reason Honey Garlic Chicken Bites show up again and again on cozy-weeknight menus: they’re simple, adaptable, and deliver that irresistible balance of sweet, savory, and just a touch of heat. Whether you’re frying, baking, or using an air fryer, this recipe can be tweaked to match seasonal vegetables, family preferences, or pantry staples. For inspiration on a quick, five-ingredient version, check out Honey Garlic Chicken Bites Recipe (Just 5 Ingredients) – The Kitchn, and for another delicious variation see Honey Garlic Chicken Bites – Gimme Delicious Food. Try this at home, share photos with friends, and savor the small, saucy moments — they’re what great home cooking is all about.

Honey Garlic Chicken Bites
Ingredients
Method
- Cut chicken into 1-inch cubes for even cooking.
- In a shallow bowl, mix the flour, garlic powder, paprika, salt, and black pepper.
- Beat the egg in a separate bowl.
- Dip each chicken piece into the beaten egg, then dredge in the flour mixture.
- Let coated pieces rest for 2 minutes.
- Heat olive oil in a large skillet over medium-high heat.
- Add chicken pieces in a single layer; fry for about 3–4 minutes per side.
- Transfer cooked pieces to a paper towel-lined plate to drain.
- In the same skillet, add honey, soy sauce, minced garlic, rice vinegar, ginger, and red pepper flakes.
- Stir to combine and bring to a gentle simmer.
- Optionally, mix cornstarch and cold water to form a slurry. Whisk into the sauce to thicken.
- Add cooked chicken back to the skillet and toss to coat with the sauce.
- Cook together for another 1–2 minutes.
- Garnish with sliced green onions and sesame seeds if desired.