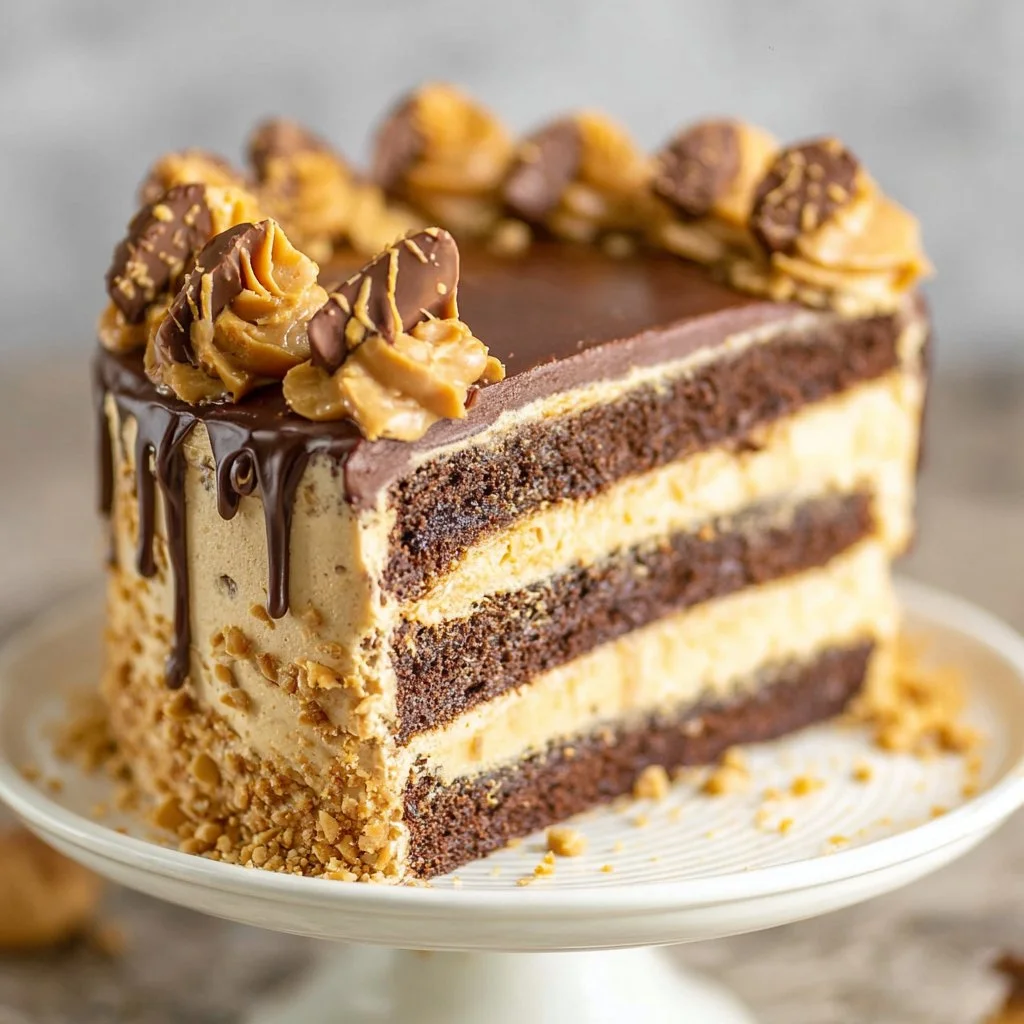
Peanut Butter Chocolate Layer Cake — I know, just saying the name feels like a warm hug, right? If you and I were standing in my kitchen, you would see me wipe my hands on a towel and grin, because this cake is my go-to when I want something that tastes indulgent but is comfortingly familiar. This recipe blends rich cocoa layers with a smooth, peanut butter buttercream and pockets of chopped Reeses for texture and nostalgia. It’s the kind of dessert that says celebration, cuddle-up-on-the-couch, and bring-to-the-potluck all at once. If you like chocolate and peanut butter in surprising combinations, you might also love my chocolate peanut butter ninja creami — it captures the same cozy flavor duo in a different way.
Why You’ll Love This Recipe
- Quick and easy to prepare – the batter comes together with pantry staples and minimal fuss
- Simple, accessible ingredients – nothing exotic or hard to find
- Perfect for birthdays, Sunday baking sessions, or chilly autumn and winter gatherings
- Comforting, satisfying, and impressive enough to bring out when you want a showstopper
What makes this version special is the balance: deep, moist chocolate layers made from simple ingredients, matched with a peanut butter buttercream that is silky but not overly sweet. I’ve tested the ratios so you get full peanut butter flavor without losing the cake’s light crumb. I promise this version will give you confidence in the kitchen because the method is forgiving, and the sensory cues – aroma of chocolate, the sheen of the frosting, the crumb when you slice it – will guide you every step.
Rich Layers & Silky Frosting
Ingredients Needed
Below I’ve rewritten and grouped the original ingredient list so it reads clearly for home bakers. I also added clarifying notes and common substitutions.
For the chocolate cake layers:
- 1 3/4 cups (228 g) all-purpose flour – spoon and level for accuracy; can swap 1:1 gluten-free flour for a gluten-free version (see Variations).
- 2 cups (414 g) granulated sugar – regular white sugar gives the best texture.
- 3/4 cup (85 g) natural unsweetened cocoa powder – Dutch-process will change rise and color; stick with unsweetened natural cocoa for best results.
- 2 1/4 teaspoons baking soda – the leavener that makes these layers tender and tall.
- 1/2 teaspoon baking powder – gives a gentle lift.
- 1 teaspoon fine salt – balances sweetness.
- 1 cup (240 ml) milk – whole milk recommended; use 2% in a pinch. For dairy-free, try unsweetened oat or soy milk.
- 1/2 cup (120 ml) neutral vegetable oil – keeps the crumb moist; you can use melted coconut oil but expect a subtle coconut note.
- 1 1/2 teaspoons vanilla extract – real vanilla adds warmth.
- 2 large eggs – room temperature helps the batter emulsify.
- 1 cup (240 ml) hot water – added at the end to bloom the cocoa and loosen the batter for a moist crumb.
For the peanut butter buttercream:
- 2 cups (448 g) unsalted butter, softened to room temperature – this is the base; ensure it is soft but not melty for proper creaming.
- 1 1/4 cups (350 g) creamy peanut butter – use a good quality, stirred natural peanut butter or a commercial smooth peanut butter; crunchy will add texture if you prefer.
- 9 cups (1035 g) powdered sugar – sifted if clumpy; this amount yields a sturdy, pipeable frosting.
- 6 to 7 tablespoons (90-105 ml) water or milk – add gradually to reach spreading consistency; use milk for extra richness or water if keeping sugar balance firm.
- Pinch of fine salt – taste and adjust depending on how salty your peanut butter is.
For the chocolate ganache drip and accents:
- 6 oz (about 1 cup) semi-sweet chocolate chips – you can use chopped baking chocolate for a purer melt.
- 1/2 cup (120 ml) heavy whipping cream – heats the chocolate into a glossy ganache.
Add-ins and decorations:
- 6 Reeses, chopped – fold into the frosting or scatter between layers for peanut butter candy bits.
- 8 Reeses, halved – for decorating the cake top or sides.
- Crumbled Reeses – optional final sprinkle for texture and nostalgia.
Notes and substitutions summary:
- Milk: for dairy-free, use unsweetened oat or soy milk in the cake and water or a plant-based cream alternative in the ganache.
- Butter: swap with vegan butter for a dairy-free frosting, but note the flavor difference.
- Peanut butter: natural stirred peanut butter will yield a more pronounced nutty flavor; commercial smooth has a sweeter profile.
- Powdered sugar: adjust salt and liquid if your powdered sugar is moist or clumpy.
Ingredients & Equipment Notes (Optional)
A few tools make this bake easier and more consistent:
- Two 8 or 9-inch round cake pans – use matching sizes for even layers. Line with parchment rounds for clean removal.
- Electric mixer or stand mixer – helpful when creaming butter and for a smooth buttercream quicker than by hand.
- Rubber spatula – for scraping bowls and folding ingredients.
- Offset spatula and bench scraper – makes frosting and smoothing the sides neat and professional-looking.
- Cooling racks – letting layers cool completely prevents melting the frosting.
- Instant-read thermometer – useful for checking the ganache warmth (aim for around 105-115 F when combining).
If you want inspiration for frostings and frost-smoothing tricks, check out a different textured peanut butter cake approach like this Biscoff cookie butter cake – some techniques translate well.
Instructions – How to Make “Peanut Butter Chocolate Layer Cake”
Follow these steps for reliable results. I include why each step matters, visual cues, and little tips to help you troubleshoot.
- Preheat and prepare pans
- Preheat your oven to 350 F (177 C). Grease two 8 or 9-inch round pans and line the bottoms with parchment rounds. Lightly grease parchment.
- Why it matters: even heat and a non-stick surface prevent the layers from sticking and produce an even rise.
- Visual cue: oven should be fully preheated before batter goes in.
- Mix the dry ingredients
- In a large bowl whisk together the flour, granulated sugar, cocoa powder, baking soda, baking powder, and salt until evenly combined.
- Why it matters: evenly distributed leaveners and cocoa lead to a uniform crumb and consistent flavor throughout.
- Mini tip: sift the cocoa if it’s lumpy for a smoother batter.
- Combine the wet ingredients
- In a separate bowl whisk together the milk, oil, vanilla, and eggs until combined. Pour the wet mix into the dry mix and stir until just incorporated.
- Why it matters: over-mixing once the flour is added can create a dense cake. Aim for a homogenous batter with no visible streaks of flour.
- Add the hot water
- Carefully whisk in the hot water until the batter is smooth. The batter will be thin – that is normal.
- Why it matters: hot water blooms the cocoa, deepening chocolate flavor and producing a moist crumb.
- Visual cue: batter becomes glossy and pours easily. Thin batter leads to a tender cake.
- Bake the cake layers
- Divide batter evenly between prepared pans. Bake for 25-30 minutes, rotating halfway through if your oven runs hot. Check doneness with a toothpick or by gently pressing the center – it should spring back.
- Why it matters: even baking gives uniform crumb and height. Avoid overbaking to keep the layers moist.
- Mini tip: if the tops brown too quickly, tent them with foil.
- Cool completely
- Let the layers cool in pans for 10 minutes, then invert onto cooling racks to cool completely before frosting.
- Why it matters: frosting warm cakes leads to sliding and melting. Patience here prevents a messy finish.
- Make the peanut butter buttercream
- In a stand mixer fitted with a paddle or using an electric hand mixer, beat the softened butter on medium speed until smooth and paler in color, about 2 minutes. Add the peanut butter and beat until fully combined.
- Slowly add powdered sugar, one to two cups at a time, mixing on low speed to avoid a powdered sugar cloud. Add 6 tablespoons of water or milk and a pinch of salt. Beat on medium-high until light and fluffy, about 3-5 minutes. Add the final tablespoon of liquid only if needed to achieve a spreadable consistency.
- Why it matters: creaming incorporates air for a light buttercream; adding sugar gradually prevents mess and gives you control over sweetness and texture.
- Visual cue: frosting should be smooth, pipeable, but not runny. It will hold peaks when ready.
- Prepare the chocolate ganache
- Place the semi-sweet chocolate chips in a heatproof bowl. Heat the heavy cream until just simmering, then pour over the chocolate. Let sit 1 minute, then stir until smooth and glossy. Cool slightly until it thickens to a pourable but not runny texture.
- Why it matters: warm ganache drips beautifully; if it is too hot it will melt your frosting, too cool and it will not drip.
- Mini tip: if ganache thickens too much, gently warm it in short bursts in the microwave or over a hot water bath.
- Assemble the cake – layer and crumb coat
- If layers have domed, level them with a serrated knife or cake leveler. Place the first layer on your serving plate or turntable. Spread an even layer of peanut butter buttercream, about 1/2 to 3/4 inch thick. Sprinkle a handful of chopped Reeses into the filling layer if using. Repeat with the second layer.
- Apply a thin crumb coat of frosting around the whole cake to trap crumbs, then chill for 15-30 minutes until the crumb coat firms.
- Why it matters: levelling ensures even stacking; the crumb coat keeps the final finish clean and prevents crumbs in the top layer of frosting.
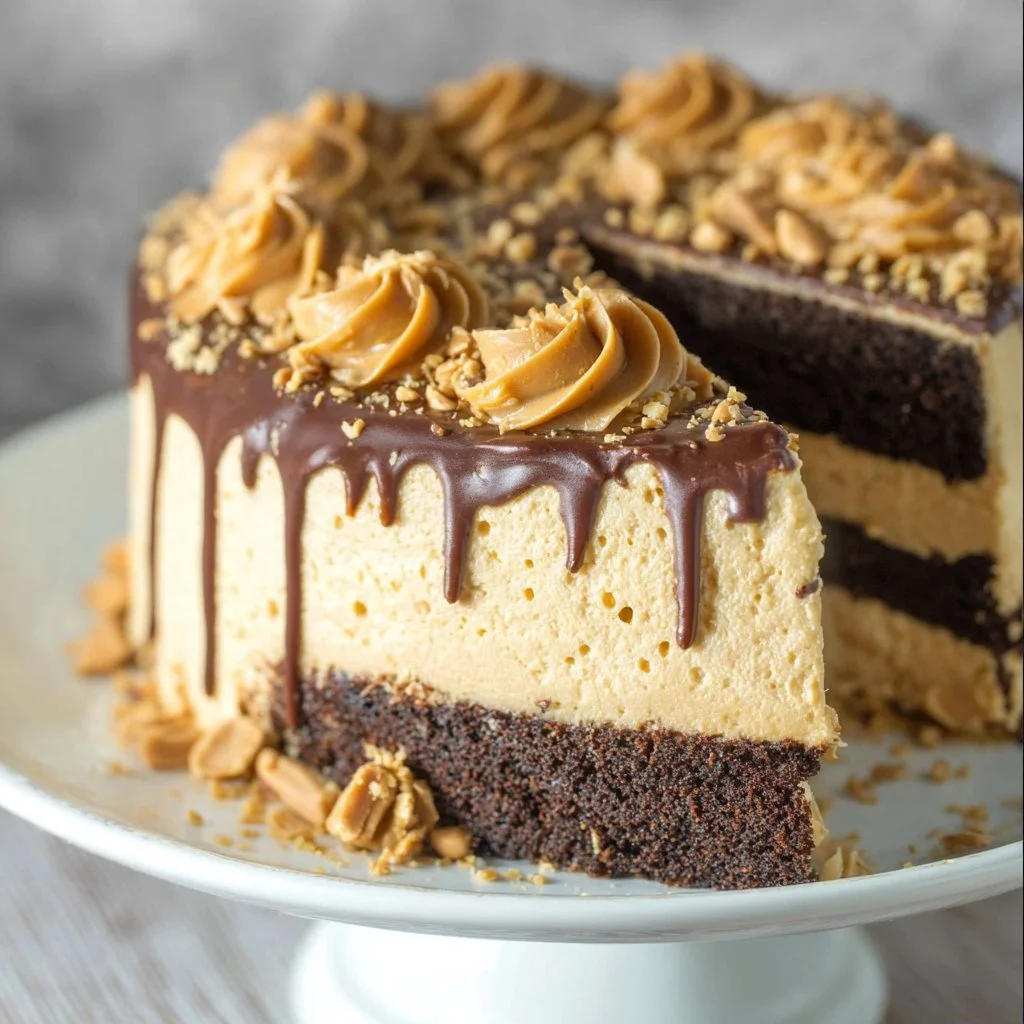
- Final frosting and ganache drip
- Apply a thicker final layer of peanut butter buttercream, smoothing the sides with an offset spatula and bench scraper. Chill briefly if the frosting gets soft. When ready, gently pour the ganache over the center of the cake and nudge it toward the edges to create drips – stop when you achieve the look you want. Smooth the top with an offset spatula.
- Why it matters: chilling between steps firms the buttercream and controls the drip. The contrast of chocolate shine and peanut butter pale frosting is the signature look.
- Decorate
- Press halved Reeses around the top edge, sprinkle crumbled Reeses over the top, and tuck a few extra chopped pieces into the sides or on top for texture. Keep the cake chilled briefly to set the ganache before serving.
- Mini tip: for a neat presentation, place the Reeses in a pattern or evenly spaced; rustic looks are beautiful too.
- Serve
- Slice with a sharp, warmed knife for clean cuts. Enjoy immediately or chill and bring to room temperature before serving to soften the buttercream if refrigerated.
- Why it matters: warming the knife with hot water and wiping between cuts gives tidy slices that show off the layers and bits of candy.
Serving Suggestions & Storage Tips
Serving ideas:
- Present this cake on a simple white cake stand to showcase the glossy ganache and peanut butter frosting contrast. A dusting of cocoa powder or a few whole peanuts can add a rustic touch.
- For an afternoon tea or coffee hour, serve thin slices with a small scoop of vanilla ice cream or a drizzle of caramel for extra decadence.
- For a birthday or celebration, arrange the halved Reeses in a circle and add a few chocolate shavings for flair.
Pairings:
- Coffee: a medium roast complements the chocolate and cleanses the palate between bites.
- Milk: cold milk is classic and highlights the peanut butter flavor.
- Unsweetened iced tea: cuts richness for larger slices.
Creative variations:
- Turn it into cupcakes by portioning batter into liners and adapting bake time to 18-22 minutes; top each with peanut butter buttercream and a drizzle of ganache.
- Add a layer of alternating texture with a thin spread of creamy caramel or jam between layers for a sweet surprise.
- Swap chopped Reeses for chopped toasted peanuts for a less sweet, nut-forward crunch.
Storage:
- Room temperature: keep covered for up to 24 hours in a cool place.
- Fridge: store covered for up to 5 days. Let slices sit at room temperature 20-30 minutes before serving to soften the buttercream.
- Freezer: you can freeze slices wrapped tightly in plastic wrap and foil for up to 2 months. Thaw overnight in the fridge, then bring to room temperature before serving.
Best reheating methods:
- For slices from the fridge, leave at room temperature 20-30 minutes. If slightly firm, microwave a single slice for 8-12 seconds on a microwave-safe plate to soften (watch closely to avoid melting).
- Avoid reheating the whole cake; instead slice first and gently rewarm individual portions if desired.
For ideas on serving this cake at brunch or pairing with breakfast-style sweets, check a flavor-contrast idea like this blueberry buttermilk pancake casserole for inspiration on sweet-savory balance.
Helpful Notes & Variations
Ingredient substitutions:
- Gluten-free: swap flour with a cup-for-cup gluten-free baking mix that contains xanthan gum. Expect slightly different crumb.
- Dairy-free: use plant-based milk and vegan butter; heavy cream in the ganache can be replaced with full-fat canned coconut milk for a coconut note. Use dairy-free chocolate chips.
- Lower sugar: reduce powdered sugar slightly in the frosting and add a touch more peanut butter or salt to balance.
Dietary adaptations:
- Nut allergies: replace peanut butter with sunflower seed butter for a similar texture and taste profile, and omit Reeses candies. Sunflower seed butter can turn green when combined with certain fruit, but with chocolate it stays brown-beige.
- Lower-fat: you can use light butter and a mix of milk instead of heavy cream for the ganache, but expect looser texture and less richness.
Flavor add-ins:
- Espresso: adding 1 teaspoon of instant espresso powder to the cake batter amplifies the chocolate depth.
- Sea salt: finish with flaky sea salt scattered on top for a gourmet balance of sweet and salty.
- Toffee bits: fold into the frosting for additional crunch.
Common mistakes and fixes:
- Dry cake: usually from overbaking. Test with a toothpick and remove when it has just a few moist crumbs.
- Runny frosting: too warm butter or too much liquid. Chill and rebeat, add more powdered sugar if needed.
- Sliding layers: caused by under- or over-filling, or warm frosting. Level layers, use a crumb coat, and chill briefly to firm before final frosting.
Experience-based tips:
- Always cool layers completely before frosting. The smell of warm cake is tempting, but frosting melts into crumbs.
- Be patient with the ganache drip; practice on a chilled mock-up cake or the backside of a spoon if you are new to drips.
- If you want tall, bakery-style layers, bake in three pans rather than stacking two. The original recipe scales well; divide batter evenly.
Conclusion
This Peanut Butter Chocolate Layer Cake stands out because it balances two beloved flavors — chocolate and peanut butter — while staying approachable for home bakers. The chocolate layers are deeply chocolatey and moist thanks to the hot water step, and the peanut butter buttercream is rich, silky, and perfectly pipeable. It is a dessert that brings joy at celebrations and quiet evenings alike, offering comfort, nostalgia, and a little showmanship with the ganache drip and Reeses decoration. If you want to explore similar takes and step-by-step inspirations, this recipe resonates with other classic versions like this Peanut Butter Chocolate Layer Cake or the elegantly balanced Chocolate Peanut Butter Cake (Recipe + Video), and you can compare frosting techniques with a Peanut Butter Layer Cake with Chocolate Frosting. Try the recipe, leave a comment and star rating to tell me how it turned out, and share your favorite photos on Pinterest or social media so we can all admire those glossy drips.
- Frequently Asked Questions (H2)
Can I make this recipe ahead of time?
Yes. You can bake the cake layers a day ahead, wrap them tightly in plastic wrap, and store at room temperature if your kitchen is cool or in the fridge. The frosting can also be made a day ahead and kept covered in the fridge. Assemble the cake the day you plan to serve for the best texture, or assemble and refrigerate for up to 2 days.
How should I store leftovers and how long do they last?
Store leftover cake covered in the fridge for up to 5 days. If you prefer to keep it at room temperature, store in a cool place and consume within 24 hours to maintain buttercream texture. For longer storage, freeze slices wrapped tightly for up to 2 months.
What is the best way to reheat or serve this recipe after storage?
For refrigerated cake, remove slices and let them sit at room temperature for 20-30 minutes before serving to soften the buttercream. For a quick warm-up, microwave a single slice for 8-12 seconds on a microwave-safe plate, watching carefully to avoid melting the frosting. Thawed frozen slices should be brought to room temperature before serving.
Can I adjust or substitute ingredients to fit my preferences?
Absolutely. You can use natural or commercial peanut butter depending on your taste, swap dairy for plant-based alternatives for a vegan option, or substitute gluten-free flour blends for a gluten-free cake. If you substitute, note that textures and flavors may shift slightly, so make small test tweaks if you are trying a new substitute for the first time.
Do you have tips to ensure the best texture and flavor every time?
Yes. Use room-temperature eggs and butter for better emulsification, measure flour by spooning it into the cup and leveling rather than scooping, and avoid overbaking the layers. Let cakes cool fully before frosting, and chill after the crumb coat for a cleaner finish. Taste and adjust the buttercream salt and liquid to get the peanut butter flavor you love.
If you try this Peanut Butter Chocolate Layer Cake, please come back and tell me which variation you made and how it felt to pull it out of the oven. I love hearing about the small, joyful victories in the kitchen.
Peanut Butter Chocolate Layer Cake
Ingredients
Method
- Preheat your oven to 350 F (177 C). Grease two 8 or 9-inch round pans and line the bottoms with parchment rounds.
- In a large bowl whisk together the flour, sugar, cocoa powder, baking soda, baking powder, and salt until evenly combined.
- In a separate bowl whisk together the milk, oil, vanilla, and eggs until combined. Pour into the dry mix and stir until just incorporated.
- Carefully whisk in the hot water until the batter is smooth.
- Divide batter evenly between prepared pans. Bake for 25-30 minutes. Check doneness with a toothpick.
- Let layers cool in pans for 10 minutes, then invert onto cooling racks.
- Beat softened butter until smooth. Add peanut butter and beat until combined. Gradually add powdered sugar and salt.
- Place chocolate chips in a heatproof bowl. Heat the heavy cream until just simmering, then pour over chocolate. Stir until smooth.
- Level cake layers if domed. Spread an even layer of peanut butter buttercream on the first layer. Add chopped Reeses if using. Repeat with the second layer.
- Apply a thin crumb coat of frosting around the whole cake and chill for 15-30 minutes.
- Apply a thicker layer of peanut butter buttercream still smoothing the sides.
- Pour ganache over the center and nudge it toward the edges to create drips.
- Press halved Reeses around the top edge and sprinkle crumbled Reeses over the top.
- Slice with a warmed knife for clean cuts. Enjoy immediately or allow to come to room temperature before serving.