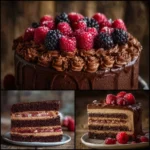
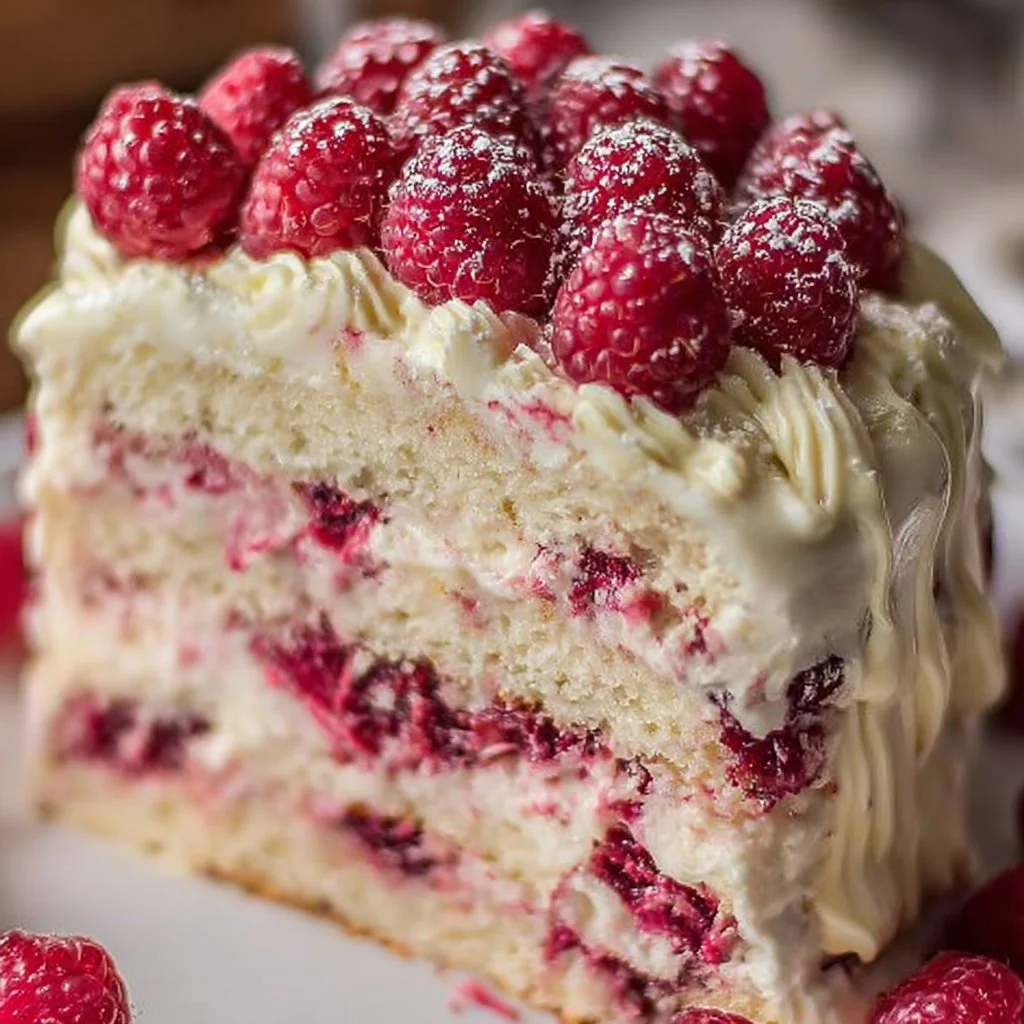
White Chocolate Raspberry Dream Cake — let me tell you, this is one of those recipes I pull out when I want to make someone feel instantly celebrated. You and I both know the comfort of a simple slice of cake that tastes like a small moment of joy, and this one hits that sweet spot. It starts with tender vanilla layers enriched with melted white chocolate, layered with bright raspberry jam that sings with lemon, and finished with a silky white chocolate buttercream. If you are browsing for inspiration, wander over to my dessert and drinks collection for more treats — but first, stay with me and let me walk you through how to make this dreamy, seasonal showstopper.
Why You’ll Love This Recipe
- Quick and easy to prepare for a layered cake project
- Uses simple pantry-friendly ingredients with one elegant twist
- Perfect for spring and summer gatherings, bridal showers, or holiday tables
- Comforting, impressive, and reliably satisfying for friends and family
What makes this version unique is the gentle addition of melted white chocolate right into the batter and again into the buttercream. That double-dose of white chocolate deepens the flavor and gives the crumb a tender richness without being overly sweet. The raspberry filling adds a bright contrast that keeps each bite balanced and refreshing. I trust this recipe because I have tested the textures and timing, and I’ll tell you what subtle cues to watch for, so you can feel confident in the kitchen even if you are not a baking expert.
Cake Components
Ingredients Needed
Below I break the ingredients into well-organized sections so you can shop or scale easily. I rewrote the list for clarity and included substitutions and notes where helpful.
Cake batter
- 2 1/2 cups (about 312 g) all-purpose flour — spoon and level for accuracy
- 2 1/2 teaspoons baking powder
- 1/2 teaspoon fine salt
- 3/4 cup (170 g) unsalted butter, softened to room temperature (see substitutions)
- 1 3/4 cups (350 g) granulated sugar
- 4 large eggs, at room temperature
- 1 1/2 teaspoons vanilla extract
- 1/2 cup white chocolate chips, melted and slightly cooled
- 1 1/4 cups (300 ml) whole milk, room temperature (or milk substitute)
Raspberry filling
- 1 1/2 cups fresh or frozen raspberries — fresh are great in season, frozen work excellently year-round
- 1/2 cup granulated sugar
- 2 tablespoons lemon juice, freshly squeezed for brightness
- 2 tablespoons cornstarch mixed with 2 tablespoons cold water to make a slurry
White chocolate buttercream
- 1 cup (227 g) unsalted butter, softened
- 4 cups (480 g) powdered sugar, sifted for a smooth finish
- 1/2 cup white chocolate, melted and cooled slightly
- 2 to 3 tablespoons milk, to reach the consistency you prefer
- 1 teaspoon vanilla extract
Garnish and finish
- Fresh raspberries, for topping
- White chocolate curls or shavings to decorate
- Fresh mint leaves for color and aroma
Substitutions and clarifications
- Raspberries: fresh give the freshest flavor and texture for garnish, but frozen raspberries are perfect for the cooked filling. Thaw and drain any excess liquid before cooking.
- Milk: whole milk gives richness. For a lighter crumb or dairy-free option, try unsweetened oat milk or almond milk.
- Butter: if you need a non-dairy option, use a high-quality plant-based butter that is suitable for baking. Note that flavor and texture may vary slightly.
- White chocolate: use high-quality white chocolate for melting; white chocolate chips often contain stabilizers and may take longer to melt. Chop a bar if possible for smoother melting.
Ingredients & Equipment Notes (Optional)
- Three 8-inch round pans: even layers make decorating easier. If you only have two pans, bake in batches and thin-slice the extra layer after cooling.
- Stand mixer or hand mixer: hand-crank freedom is fine, but a stand mixer yields consistent volume when creaming butter and sugar.
- Wire racks: allow air to circulate under cakes so they cool evenly.
- Pastry brush or offset spatula: useful for spreading filling and frosting smoothly.
- Parchment rounds and bench scraper: parchment prevents sticking; a bench scraper helps with a neat finish when smoothing frosting.
- Instant-read thermometer: optional, but cakes are done when the center reads about 205 to 210 F and a toothpick comes out clean.
Instructions – How to Make “White Chocolate Raspberry Dream Cake: A Heavenly Dessert”
- Preheat and prepare your pans.
- Preheat the oven to 350 F. Grease and flour three 8-inch round cake pans, or line bottoms with parchment rounds.
- Why it matters: a properly prepared pan ensures clean releases and preserves your layer edges.
- Mini tip: chill the pans briefly in the fridge after greasing for easier release.
- Mix the dry ingredients.
- In a medium bowl, whisk together the all-purpose flour, baking powder, and salt. Set aside.
- Visual cue: the mixture should look uniform and free of clumps; sifting helps if your flour is lumpy.
- Why it matters: evenly distributed leavening ensures consistent rise across layers.
- Cream butter and sugar until light and fluffy.
- In a large mixing bowl, beat the softened butter and granulated sugar on medium-high speed until pale, airy, and increased slightly in volume, about 3 to 4 minutes.
- Visual cue: the mixture will turn a lighter color and feel noticeably aerated.
- Mini tip: scrape the bowl a couple of times to ensure even mixing.
- Add eggs, vanilla, and melted white chocolate.
- Add the eggs one at a time, beating well after each addition so the batter emulsifies. Stir in the vanilla extract and the slightly cooled melted white chocolate until just combined.
- Why it matters: adding eggs slowly helps maintain the emulsion and prevents the batter from splitting.
- Visual cue: the batter will become silkier and deeper in color when the white chocolate is incorporated.
- Alternate dry ingredients with milk.
- Add the flour mixture in three parts, alternating with the milk, beginning and ending with the flour. Mix on low speed and stop as soon as the streaks of flour disappear.
- Why it matters: alternating preserves air in the batter and prevents overmixing, which can make the cake dense.
- Mini tip: fold the final addition with a spatula if a few streaks remain; overworked batter loses tenderness.
- Divide and bake.
- Divide the batter evenly between the three prepared pans. Smooth the tops with an offset spatula so layers bake evenly.
- Bake for 25 to 30 minutes, or until a toothpick inserted into the center comes out clean and the cakes spring back gently when touched.
- Visual cue: the edges will begin to pull slightly from the pan and the tops will be a pale golden color.
- Why it matters: even baking prevents domed layers that require heavy leveling.
- Cool the cakes.
- Let the cakes cool in their pans for about 10 minutes. Run a thin knife around the edges, invert each layer onto a wire rack, peel off the parchment, then cool completely.
- Mini tip: cool fully before frosting to avoid melted buttercream.
- Make the raspberry filling.
- In a medium saucepan, combine the raspberries, 1/2 cup sugar, and 2 tablespoons lemon juice. Cook over medium heat, stirring occasionally, until the berries break down and release their juices, about 5 to 8 minutes.
- Stir in the cornstarch slurry and continue to cook, stirring, until the mixture thickens and becomes glossy.
- Visual cue: the filling should cling to the spoon and no longer look watery.
- Why it matters: the cornstarch ensures the filling will hold between layers rather than run.
- Cool the filling completely.
- Transfer the raspberry filling to a bowl and refrigerate until fully cool and spreadable.
- Mini tip: spreading warm filling on frosting will melt it, so patience pays off here.
- Prepare the white chocolate buttercream.
- Beat the softened butter until creamy. Gradually add the powdered sugar and mix until combined and fluffy.
- Stir in the cooled melted white chocolate, the teaspoon of vanilla, and 2 to 3 tablespoons of milk until you reach the desired consistency.
- Visual cue: the frosting should be smooth and pipeable, not greasy or grainy.
- Why it matters: adding melted white chocolate after the powdered sugar helps build structure while keeping a silky mouthfeel.
- Level and assemble the layers.
- If the cake tops are domed, level them gently with a serrated knife or cake leveler. Place the first layer on a cake board or serving plate.
- Spread a thin crumb coat of frosting, then a generous layer of raspberry filling. Repeat with the second layer, and top with the final layer.
- Mini tip: save a couple of spoonfuls of filling for the decoration if you like a glossy center.
- Frost and finish.
- Apply a thin crumb coat all around and chill for 15 to 20 minutes to set. Then frost the outside smoothly, using a bench scraper for clean sides.
- Chill slightly to let the buttercream firm up, then decorate with fresh raspberries, white chocolate curls, and mint leaves as desired.
- Why it matters: chilling between coats reduces crumbs and helps build a neat, professional finish.
- Visual cue: the final cake should present with clean edges, bright spots of raspberry, and shimmer from the white chocolate curls.
Serving Suggestions & Storage Tips
Serving ideas
- Slice with a hot, dry knife for clean slices — dip the blade in hot water, wipe it dry between cuts.
- Present on a light-colored platter to showcase the pale white chocolate frosting and jewel-toned raspberries.
- For a tea party, serve petite slices with shortbread cookies; for a larger celebration, pair with a fruit-forward sorbet for contrast.
Presentation tips
- Pipe small rosettes of buttercream around the top edge and place a fresh raspberry on each for a classic look.
- Create a “naked” effect by leaving the sides lightly frosted to reveal the cake layers, then crown the top with a ring of white chocolate curls.
- Scatter tiny mint leaves for a pop of green and an aromatic lift right before serving.
Pairings
- This cake pairs wonderfully with light, fruity accompaniments like lemon curd or a raspberry coulis.
- For a cozy coffee moment, choose a mild-medium roast brewed gently to complement the white chocolate notes.
- If you want a playful snack pairing at a casual gathering, serve alongside savory bites like crispy taco crackers to offer salty contrast to the cake’s sweetness.
Storage
- Fridge: Store in an airtight cake box or loosely covered in the refrigerator for up to 4 days. Bring to room temperature for 30 to 60 minutes before serving for best flavor.
- Freezer: Wrap individual slices tightly in plastic wrap and foil for up to 3 months. Thaw overnight in the fridge before bringing to room temperature to serve.
- Note: the raspberry filling can make the layers a little softer after refrigeration; chilling does set the filling and frosting, so allow time to relax at room temperature.
Best reheating methods
- For a warm single slice, microwave for 10 to 15 seconds on low power so you warm without melting the frosting excessively.
- If thawing from frozen, allow it to reach room temperature slowly to preserve texture and prevent sogginess.
Helpful Notes & Variations
Ingredient substitutions
- White chocolate: use good-quality white baking chocolate. For a dairy-free alternative, use a vegan white chocolate and plant-based butter.
- Milk: swap with oat or almond milk; adjust by eye if the batter looks too thin or thick.
- Raspberries: if raspberries are not available, try halved strawberries or sour cherries for a similar tart-sweet profile.
Dietary adaptations
- Gluten-free: replace the all-purpose flour with a 1:1 gluten-free baking blend and add 1/4 teaspoon xanthan gum if your blend does not contain it.
- Vegan: use a vegan butter, a dairy-free white chocolate, and an egg replacer such as applesauce or a commercial substitute. Note that texture will vary, and you may need to adjust baking times.
Flavor add-ins
- Lemon zest: fold a teaspoon of fine lemon zest into the batter for an extra citrus lift that complements the raspberry.
- Almond: swap vanilla for a touch of almond extract (no more than 1/4 teaspoon) for a subtle nutty undertone.
- White chocolate chips: sprinkle a few hand-chopped chips into the batter for delightful pockets of white chocolate.
Common mistakes and how to avoid them
- Overmixing the batter: stop when the flour disappears to keep a tender crumb.
- Filling too warm: always cool the filling fully before layering or it will seep into frosting.
- Frosting too soft: chill the frosted cake to set the crumb coat and prevent frosting collapse during final decoration.
Experience-based tips
- Use room-temperature eggs and milk so they incorporate easily and the batter stays smooth.
- If your white chocolate seizes while melting, add a small splash of milk to loosen it and whisk gently until smooth.
- Keep a small offset spatula handy for nudging garnish into place and smoothing small imperfections.
Conclusion
This White Chocolate Raspberry Dream Cake is a true showstopper that balances the luxurious creaminess of white chocolate with the lively tartness of raspberries. It stands out because it marries simple, reliable techniques with one or two thoughtful flourishes — melted white chocolate in the batter and in the buttercream, plus a bright homemade raspberry filling. The result is a cake that feels indulgent but not heavy, perfect for celebrating birthdays, seasonal gatherings, or those days when you want to bring a little extra sweetness into the world. If you want more techniques and visual guides while you bake, I like to reference a few resources that inspired my process: a playful video-driven approach for a similar cake at White Chocolate Raspberry Cake (with VIDEO!) – Scientifically Sweet, a classic assembled version at Raspberry Dream Cake | Easy Vanilla Cake with Raspberry Filling, and a contrasting plant-based celebration cake idea at Raw Cashew Dreamcake – My New Roots. I hope you try this recipe, leave a comment and a star rating, and if it delights you, please share a photo on Pinterest or social media so others can discover it too.
- Frequently Asked Questions (H2)
Can I make this recipe ahead of time?
Yes. You can bake the layers a day or two in advance and wrap them tightly in plastic wrap, then refrigerate. Make the raspberry filling and buttercream up to 48 hours ahead and store them in airtight containers in the refrigerator. For the best presentation, assemble the cake on the day you plan to serve it or the evening before and refrigerate so the layers settle and the flavors meld.
How should I store leftovers and how long do they last?
Store leftover cake in the refrigerator in an airtight cake carrier or container for up to 4 days. If you want to freeze portions, wrap individual slices tightly in plastic wrap and aluminum foil and freeze for up to 3 months. Thaw overnight in the refrigerator before bringing to room temperature.
What is the best way to reheat or serve this recipe after storage?
For a warm slice, microwave a single serving on a low power setting for 10 to 15 seconds. For best flavor, allow refrigerated cake to sit at room temperature for 30 to 60 minutes before serving so the buttercream softens and the filling becomes luscious.
Can I adjust or substitute ingredients to fit my preferences?
Absolutely. Swap whole milk for a non-dairy milk, use a plant-based butter for a dairy-free version, or substitute the raspberries with strawberries or cherries if raspberries are not available. If you need gluten-free, choose a 1:1 gluten-free flour blend. Keep in mind that substitutions may slightly change texture and bake times.
Do you have tips to ensure the best texture and flavor every time?
Yes. Use room-temperature ingredients for even mixing, avoid overmixing the batter once you add the flour, and be patient cooling the cakes and filling before assembly. Use good-quality white chocolate for both batter and buttercream for a clean, creamy flavor. Finally, taste and adjust the raspberry filling for sweetness and acidity with sugar or lemon juice to get the bright contrast that makes this cake sing.

White Chocolate Raspberry Dream Cake
Ingredients
Method
- Preheat the oven to 350 F. Grease and flour three 8-inch round cake pans, or line bottoms with parchment rounds.
- In a medium bowl, whisk together the all-purpose flour, baking powder, and salt. Set aside.
- In a large mixing bowl, beat the softened butter and granulated sugar on medium-high speed until pale and fluffy, about 3 to 4 minutes.
- Add the eggs one at a time, beating well after each addition. Stir in the vanilla extract and melted white chocolate until just combined.
- Add the flour mixture in three parts, alternating with the milk, beginning and ending with the flour. Mix on low speed until just combined.
- Divide the batter evenly among the prepared pans and smooth the tops.
- Bake for 25 to 30 minutes or until a toothpick inserted comes out clean.
- Let the cakes cool in their pans for about 10 minutes. Then invert each layer onto a wire rack to cool completely.
- In a medium saucepan, combine raspberries, sugar, and lemon juice. Cook until the berries break down, about 5 to 8 minutes.
- Stir in the cornstarch slurry and cook until thickened and glossy.
- Refrigerate the filling until fully cool and spreadable.
- Beat the softened butter until creamy. Gradually add powdered sugar and mix until fluffy.
- Stir in the cooled melted white chocolate, vanilla, and milk until desired consistency is reached.
- Level the cake tops if domed and place the first layer on a serving plate.
- Spread a thin layer of frosting, then a generous layer of raspberry filling. Repeat with the second layer and top with the final layer.
- Apply a thin crumb coat and chill for 15 to 20 minutes. Frost the outside smoothly and chill slightly to let the buttercream firm.
- Decorate with fresh raspberries, white chocolate curls, and mint leaves as desired.