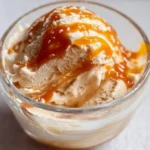
5 Ingredient Sea Salt & Honey Protein Ice Cream (Ninja CREAMi) — I still smile every time I scoop a bowl of this silky, slightly sweet frozen treat. The first time I whipped this up I was talking to a friend on the phone—“you’ve got to try cottage cheese as a base,” I said—and she laughed until she tasted it. If you’re curious, this recipe uses cottage cheese, honey, vanilla, sea salt, and dates to create a surprisingly creamy, high-protein ice cream that’s comforting and refreshing in equal measure. This post walks you through everything from why it works to foolproof instructions so your Ninja CREAMi gives you a restaurant-worthy scoop.
If you love creative Ninja CREAMi recipes and crave a protein-rich dessert without fuss, I think you’ll adore how accessible and reliable this one is. For more recipe inspiration that leans into comforting, made-from-scratch desserts, I like to reference some of my favorite bakes and savory meals while I experiment like my go-to chocolate cake.
Why You’ll Love This Recipe
- Quick and easy to prepare — just blend, freeze, and process in the Ninja CREAMi.
- Made with pantry-stable, accessible ingredients: cottage cheese, honey, vanilla, sea salt, and dates.
- High-protein and satisfying — perfect after a workout or as a lighter dessert option.
- Seasonal and versatile — bright, sweet, and lightly salted for spring and summer, but comforting any time.
- Impressive and approachable — it’s a conversation-starter when guests come over.
What makes this version unique is the cottage cheese base. Unlike heavy cream or milk-based ice creams, this one delivers protein and a velvety mouthfeel without tons of added sugar or dairy fat. The sea salt brightens the honey while the dates add chew and natural caramel notes. Emotionally, this is the kind of recipe that feels like a small kitchen victory—easy to make, nourishing, and indulgent enough to feel like a treat. It’s the confidence-builder that turns experimental home cooks into proud dessert makers. If you like bold, comforting flavors combined with smart, simple technique, you’ll find this recipe a keeper. Also, I sometimes reference savory one-pot meals when planning menus—it’s how I balance treats and main dishes like this flavorful dinner.
Ingredients Needed
For the base:
- 16 ounces (about 2 cups) of cottage cheese — use full-fat or low-fat depending on mouthfeel preference. If you prefer an ultra-smooth texture, choose small-curd cottage cheese or briefly blend it until creamy.
- 1/4 cup honey — for floral sweetness and flavor depth. Use runny honey for easy mixing.
- 1/2 teaspoon pure vanilla extract — enhances the flavors and rounds the sweetness.
- 1/4 teaspoon fine sea salt — flaky or finishing sea salt will be used at the end; this measured amount goes into the base.
For the mix-ins:
- 3 pitted dates, roughly chopped — they provide pockets of caramel-like chew and natural sweetness. Use Medjool if you want softer, stickier pieces; if your dates are dry, soak them briefly in warm water and drain.
Notes and clarifications:
- Cottage cheese: room temperature blends more smoothly; if refrigerated, a quick blitz in the blender eliminates curds for a finer texture.
- Dates: pit before chopping. If you prefer no chunks, mince them very fine or pulse with the cottage cheese.
- Honey: adjust to taste, especially if your dates are very sweet.
- Sea salt: we use a pinch inside the base to balance sweetness and a few flakes on top to finish.
A friendly reminder: this recipe follows a no-pork, alcohol-free approach—every ingredient here is compliant and suitable for homes avoiding those items.
Ingredients & Equipment Notes
Useful tools:
- High-speed blender or food processor — to puree cottage cheese into a creamy base. If you don’t own one, an immersion blender works but may require a little extra blending time.
- Ninja CREAMi pint container — crucial for processing to the right texture.
- Small mixing bowl and rubber spatula — for folding and measuring.
- Airtight container for freezing extras — keeps flavors fresh and avoids ice crystals.
How they help:
- A good blender ensures the cottage cheese is fully emulsified so your ice cream won’t have grainy curds.
- The Ninja CREAMi is designed to shave and aerate frozen bases into scoopable ice cream, giving that silkiness you want without churning on the stovetop.
- Using proper freezer-safe pints keeps the texture uniform and prevents freezer burn.
If you don’t have a Ninja CREAMi, you can still adapt this recipe using a high-powered blender and a good freezing/thawing technique, but the instructions below are optimized for the Ninja CREAMi.
A quick note on kitchen resources and friendly reminders — I like to document my process so I can reproduce textures and results next time.
Instructions – How to Make “5 Ingredient Sea Salt & Honey Protein Ice Cream (Ninja CREAMi)”
- Prepare your pint container and ingredients.
- Why this matters: Having everything measured and ready prevents over-processing and ensures your base is consistent.
- Visual cue: The cottage cheese should look smooth and not lumpy when you begin. If it’s very cold and lumpy, let it sit for 5 minutes.
- Blend the base ingredients (except the dates).
- Add the 16 oz cottage cheese, 1/4 cup honey, 1/2 tsp vanilla extract, and 1/4 tsp sea salt into a high-speed blender or food processor.
- Blend on medium-high until the mixture is entirely smooth — about 30–60 seconds depending on your appliance.
- Why it matters: Blending eliminates curd textures and creates the emulsion necessary for a creamy frozen result. You’re essentially creating a custard-like base without eggs or added cream.
- Visual cue: The mixture should be pale, glossy, and pourable, without visible curd pieces.
- Transfer to your Ninja CREAMi pint and freeze.
- Pour the blended base into a pint-sized Ninja CREAMi container. Level the top with a spatula, secure the lid, and freeze upright.
- Freezing time: Freeze for about 4 hours or until fully solid. Overnight is fine and often produces a more uniform freeze.
- Why it matters: A fully frozen pint is critical so the CREAMi blades can shave the frozen base into a creamy texture.
- Thaw briefly before processing.
- Remove the pint from the freezer and let it sit at room temperature for 10–15 minutes to slightly soften. Alternatively, run the outside of the sealed pint under warm tap water for 2 minutes to loosen the frozen surface.
- Why it matters: Slight thawing makes the base easier to process and reduces stress on the machine, resulting in a smoother churn.
- Visual cue: You should still see a solid top but the sides may have softened slightly; press the center gently and it should give a bit.
- Process in the Ninja CREAMi on the “Lite Ice Cream” setting.
- Lock the pint into the CREAMi and run the “Lite Ice Cream” program once.
- If the texture is crumbly or powdery after the first spin, run a second brief cycle or use the “Mix-In” or “Re-Spin” function as needed.
- Why it matters: The CREAMi is designed to aerate and shave frozen bases; using the lite setting makes a softer, more scoopable ice cream that still holds shape.
- Add the dates and use the “Mix-In” feature.
- Add the chopped dates (3 pieces or more to taste) into the finished ice cream, then lock the pint and use the “Mix-In” function to distribute them evenly without pulverizing them.
- Why it matters: Adding dates at the mixing stage preserves their chew and allows you to control how much texture you want in each bite.
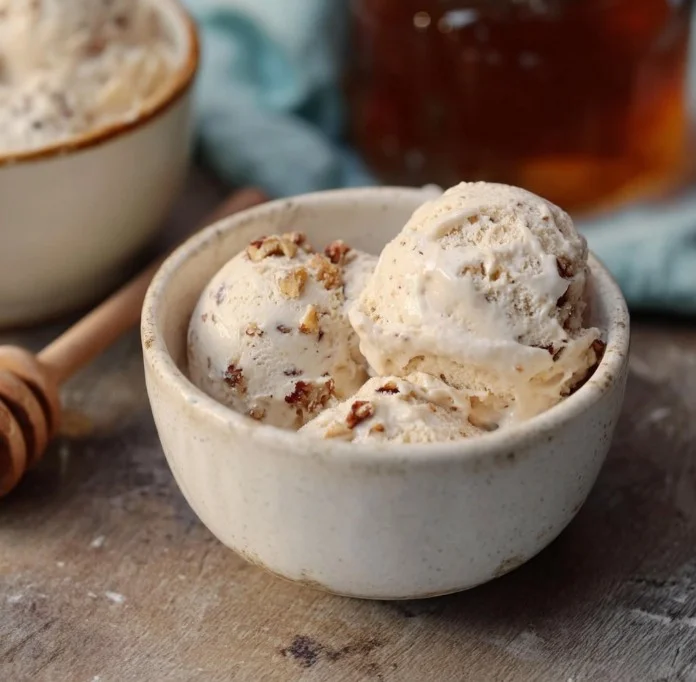
- Visual cue: You should see little pockets of caramel-colored date pieces throughout the ice cream.
- Serve immediately with flaky sea salt.
- Scoop into bowls and finish each serving with a small pinch of flaky sea salt to elevate the honey and add contrast.
- Why it matters: Flaky sea salt adds crunch and an immediate bright note that accentuates flavor layers.
- Mini-tip: If you prefer firmer scoops, return the pint to the freezer for 20–30 minutes to set before serving.
- Troubleshooting mini-tips:
- If the base is too icy: Re-blend and add 1–2 teaspoons of honey or a tablespoon of milk of choice to loosen — then re-freeze and re-spin.
- If it’s too soft: Freeze an extra 30–60 minutes; the Ninja CREAMi can over-aerate on very soft bases.
- To adjust sweetness: Taste the blended base before freezing. If your dates or honey are very sweet, reduce honey by a tablespoon.
Serving Suggestions & Storage Tips
Serving ideas and presentation:
- Classic bowl: Serve scoops in chilled bowls with a light sprinkle of flaky sea salt and a drizzle of extra honey for shine.
- Fruit-forward: Top with sliced peaches, berries, or figs for a bright, seasonal contrast. The honey and sea salt pair beautifully with stone fruits.
- Nutty crunch: Sprinkle toasted almonds, pistachios, or pecans for texture and earthy flavor contrast.
- Elegant parfait: Layer scoops with granola, a few chopped dates, and a smear of Greek yogurt for a layered dessert breakfast.
- On a cone: If you want a portable treat, use a wafer cone and press extra chopped dates into the rounded top.
Pairings and accompaniments:
- A hot cup of espresso or strong tea cuts through the sweetness and complements honey.
- Serve after a citrusy or herb-forward main (lemon chicken, herb-roasted vegetables) to finish a meal on a light, sweet note.
- A small side of biscotti or almond tuile adds a lovely crunch.
Storage and make-ahead tips:
- Refrigerator: This ice cream is best kept frozen; only store it in the refrigerator if you plan to eat within a few hours (it will melt).
- Freezing: Store leftovers in the original Ninja CREAMi pint or an airtight, freezer-safe container. Press plastic wrap directly onto the surface to minimize ice crystals, then seal with the lid.
- Freezer storage duration: For best texture and flavor, eat within 1–2 weeks. It will remain safe longer but may develop more frost and lose creaminess.
- Thawing and reheating: To soften frozen leftovers for a scoopable texture, set the pint on the counter for 10–15 minutes or microwave in 10–15 second bursts (not recommended for large amounts). For the best texture, re-spin in the Ninja CREAMi using the “Re-Spin” or “Lite Ice Cream” program rather than heating.
Make-ahead and entertaining:
- You can prepare the blended base in advance and freeze it in pints up to 24–48 hours before serving; this is perfect if you’re prepping desserts for guests.
- For parties: make multiple pints ahead of time and add mix-ins just before serving to keep textures fresh. Offer toppings in small bowls for an interactive sundae station.
Helpful Notes & Variations
Ingredient swaps and substitutions:
- Cottage cheese alternatives: If you want a milder tang, try blending low-fat Greek yogurt in place of cottage cheese (note: slightly different texture and less protein per scoop if you use lower-protein yogurts).
- Sweetener swaps: Maple syrup is a delicious alternative to honey for a richer, slightly woodsy flavor. Use the same volume but adjust to taste.
- Dates swaps: If you prefer a different fruit mix-in, chopped dried apricots or figs add similar chew and natural sweetness. For a chocolate twist, fold in cacao nibs or mini chocolate chips (ensure no alcohol in the product ingredients).
- Vanilla swap: Swap vanilla extract for 1/2 teaspoon almond extract for a nutty twist—use sparingly.
Dietary adaptations:
- Lower-sugar: Reduce the honey by a tablespoon and rely more on the dates for sweetness, or swap a portion of honey with a zero-calorie sweetener that tolerates freezing well (like monk fruit or stevia blends).
- Lower-dairy or dairy-free: This recipe is built on cottage cheese, so for a dairy-free version you’ll need a different base (silken tofu blended with a little plant-based milk can work but will shift taste and texture). Note: that adaptation would not be a cottage-cheese-based protein ice cream.
Flavor enhancements or add-ins:
- Citrus zest: Add 1 teaspoon of lemon or orange zest to the base for a bright, aromatic pop.
- Spice: A pinch of cinnamon or cardamom warms the flavor and pairs well with honey.
- Crunch: Swirl in chopped, toasted seeds (sunflower or pumpkin) for extra texture.
Common mistakes to avoid:
- Freezing too briefly: The pint must be fully frozen for the Ninja CREAMi to produce smooth results. Under-freezing leads to crumbly or icy textures.
- Not blending the cottage cheese enough: Visible curds lead to grainy ice cream; blend until silky.
- Over-salting: Sea salt in the base should be subtle—flaky salt at the end provides the intended highlight.
- Adding mix-ins too early: If you process dates before mixing them in, they’ll break down; add them during the “Mix-In” step to preserve texture.
Pro tips from experience:
- For the creamiest result, room-temp blending followed by a full freeze gives the best structure for the CREAMi to work its magic.
- Taste the base before freezing. Tiny adjustments make a world of difference once frozen.
- Keep a small jar of flaky sea salt on hand—sprinkled at the last minute, it’s transformative.
Conclusion
To sum up, 5 Ingredient Sea Salt & Honey Protein Ice Cream (Ninja CREAMi) is an easy, impressive dessert that balances sweetness, a hint of salt, and wholesome protein from cottage cheese. It’s a dependable recipe when you want something nourishing yet indulgent—ideal for warm-weather cravings, after workouts, or to satisfy a sweet tooth without heavy cream or complicated steps. I love that it’s quick to make, requires only pantry staples, and gives you a creative way to enjoy high-protein ice cream at home. If you try this recipe, I’d be thrilled to hear how it turned out—please leave a comment and a star rating, and share your photos on Pinterest or social media so others can get inspired.
For more inspiration or a similar take on honey-and-cheese-style frozen desserts, you might like this 5 Ingredient Sea Salt & Honey Protein Ice Cream (Ninja CREAMi) post that mirrors several techniques I mention, or explore a variation with goat cheese and honey at 5-Ingredient Goat Cheese Honey Ice Cream • The Bojon Gourmet. If you want a quick save for later or an alternate source, this saved page also covers similar ingredients and method notes 5 Ingredient Sea Salt & Honey Protein Ice Cream (ninja … – Cooked.
Frequently Asked Questions
Can I use Greek yogurt instead of cottage cheese?
Yes, you can substitute full-fat or thick Greek yogurt for the cottage cheese. The texture will be a bit different—slightly less dense and with less protein per volume than cottage cheese, depending on the yogurt you choose. If you substitute, blend and taste the base before freezing; you may want to reduce the honey slightly because many Greek yogurts have natural tang that plays differently with sweeteners.
How do I get the creamiest texture with the Ninja CREAMi?
The three most important things are: blend the cottage cheese until smooth, freeze the pint fully (about 4 hours or overnight), and use the “Lite Ice Cream” setting as instructed. If the result is crumbly, use the CREAMi’s “Re-Spin” or add a teaspoon or two of honey or a splash of milk and run again. Avoid processing a partially frozen pint—either fully frozen or slightly thawed for the right consistency as described.
Can I make this dairy-free or vegan?
This exact recipe relies on cottage cheese, so it’s not dairy-free as written. For a vegan adaptation, you could experiment with silken tofu blended with a thick plant-based milk and a bit of coconut cream for body, but the flavor profile and protein content will change. Dates and honey would also need swapping if you want strict vegan (use maple syrup instead of honey).
How long will this protein ice cream keep in the freezer?
For the best texture and flavor, plan to enjoy frozen leftovers within 1–2 weeks. The ice cream will remain safe longer but may develop more ice crystals and lose some creaminess over time. Always store in an airtight container and press plastic wrap directly onto the surface to reduce freezer burn.
What’s the best way to sweeten this less?
Reduce the honey by a tablespoon and rely more on the natural sweetness of the dates; alternatively, taste the blended base and make adjustments before freezing. You can also substitute part of the honey with a liquid monk fruit or erythritol-based sweetener if you want fewer sugars but maintain scoopable texture.
My ice cream became icy—how do I rescue it?
If it’s icy, try adding 1–2 teaspoons of honey or a tablespoon of milk (dairy or plant-based) and re-blend in the Ninja CREAMi. If you don’t have the machine, briefly thaw and re-blend in a high-speed blender, then refreeze. Preventive measures include blending the base well and freezing pints fully.
If you try this recipe, please come back and tell me which variation you loved most—dates for chew, citrus for brightness, or toasted nuts for crunch. I genuinely enjoy hearing how readers make recipes their own.

5 Ingredient Sea Salt & Honey Protein Ice Cream
Ingredients
Method
- Prepare your pint container and ingredients.
- Blend the base ingredients (except the dates) until smooth.
- Transfer to your Ninja CREAMi pint and freeze for about 4 hours or until fully solid.
- Thaw briefly before processing for 10-15 minutes at room temperature.
- Process in the Ninja CREAMi on the 'Lite Ice Cream' setting.
- Add the chopped dates and use the 'Mix-In' feature to distribute them evenly.
- Serve immediately with a sprinkle of flaky sea salt.