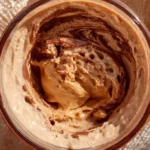
Ninja Creami Salted Caramel Protein Ice Cream is one of those recipes I whisper about when friends ask for something both indulgent and sensible. “Is it really possible to have velvet-smooth salted caramel ice cream that’s higher in protein and lower in guilt?” you might ask. I’ve made a batch after late-night cravings, and we talked through texture, sweetness, and portion satisfaction like two cooks plotting dessert diplomacy. This recipe centers on creamy skim milk, sugar-free salted caramel syrup, a touch of vanilla, and an optional scoop of protein powder—simple components that transform into a luscious frozen treat in your Ninja Creami machine. If you love comforting, from-scratch desserts with a nutritious twist, you’re in the right place. For inspiration on bold dessert pairings, check out this playful twist on a classic chocolate cake that I love sharing with guests: Guinness Chocolate Cake with Irish Buttercream.
Why You’ll Love This Ninja Creami Salted Caramel Protein Ice Cream (protein ice cream, sugar-free salted caramel)
- Quick and easy to prepare with just a few pantry-friendly ingredients
- Uses sugar-free salted caramel syrup so you can enjoy big flavor with fewer carbs
- Perfect for warm-weather cravings, post-workout treats, or cozy nights when you want something comforting without overindulgence
- Impresses guests while being simple enough for weeknight whipping
What makes this version unique is the balance: creamy skim milk keeps it light, sugar-free caramel adds a deep, buttery flavor without excess sugar, and an optional scoop of protein powder converts dessert into a satisfying post-exercise snack. Emotionally, it’s the kind of recipe that brings comfort—a little ritual of stirring together simple things, freezing, and then rewarding yourself with a silky spoonful that tastes like a hug. It builds confidence in the kitchen because the method is forgiving, and the Ninja Creami does most of the hard work.
Ingredients Needed (for the base) (Ninja Creami recipes)
Below are the components you’ll need to make this sugar-smart, protein-boosted salted caramel ice cream. I’ve rephrased and clarified each item so there’s no confusion at scoop time.
For the creamy base:
- 2 cups high-protein skim milk (I use Fairlife skim milk for its creamier mouthfeel; any skim milk with a bit of protein will do)
- 1/2 cup sugar-free salted caramel syrup (choose a brand you enjoy; the flavor of this syrup really carries the recipe)
- 1 tablespoon pure vanilla extract (real vanilla lifts the caramel notes and rounds flavors)
- Pinch of fine sea salt (balances sweetness and enhances the salted caramel profile)
Optional for protein boost:
- 1/4 cup unflavored or vanilla whey protein powder (optional—adds protein and slightly firms the texture; use a neutral or caramel-friendly flavor)
Notes and substitutions:
- If you prefer a dairy-free version, see the Variations section below for swaps; this base is written for skim milk to keep calories moderate while still retaining creaminess.
- For a thicker, creamier texture without using higher-fat milk, consider using a slightly higher-protein skim milk (like Fairlife) or add the optional protein powder.
- If you don’t have sugar-free salted caramel syrup, you can use a lower-sugar caramel sauce sparingly, but that will change the calorie count.
For sourcing and terms about how I share recipes and tips, I often refer readers to site info and guidelines: terms and details.
Ingredients & Equipment Notes (useful tools for Ninja Creami recipes)
Small tools make a big difference. Here’s what helps this recipe shine:
- Ninja Creami machine and pint container: obviously central for the method and texture. The Creami’s program creates the scoopable, sorbet-like quality that’s hard to get by hand.
- A sturdy mixing bowl and whisk or spatula: for blending milk, syrup, salt, and protein powder thoroughly.
- Measuring cups and spoons: precise measurement matters more with frozen desserts than you might expect.
- A small sieve (optional): if you use protein powder that tends to clump, sieving it into the milk can keep things smooth.
- Freezer space: you’ll need a flat, undisturbed area so the pint freezes evenly.
These tools make the process faster and improve texture—especially ensuring the mix is homogeneous before freezing.
Instructions – How to Make “Ninja Creami Salted Caramel Protein Ice Cream” (step-by-step Ninja Creami instructions)
- Prepare and taste the base. In a mixing bowl, combine 2 cups of skim milk, 1/2 cup of sugar-free salted caramel syrup, 1 tablespoon of vanilla extract, the optional 1/4 cup of protein powder (if using), and a pinch of salt. Whisk until everything is evenly incorporated and the protein powder has dissolved. Why this matters: blending well before freezing prevents icy pockets and ensures the protein is distributed so each scoop tastes consistent. Visual cue: the mixture should look smooth, pale caramel in color, and slightly glossy from the syrup.
- Taste and adjust. Take a small spoonful and taste. If you prefer stronger salted caramel flavor, add a teaspoon more syrup (keeping in mind sweetness) or another tiny pinch of salt to enhance the savory notes. Why this step helps: flavors mute when frozen, so starting slightly stronger than you want at room temperature compensates for that.
- Transfer to the Ninja Creami pint. Pour the thoroughly mixed base into your Ninja Creami container, leaving the fill line clear if your pint has one. Smooth the top with a spatula so it freezes with an even surface—this helps the Creami spin and shave uniformly.
- Freeze completely. Place the sealed container in the coldest part of your freezer, flat and undisturbed, for at least 24 hours. Why 24 hours: the Creami requires a fully solid pint to properly churn and create that signature creamy texture. Visual cue: the entire surface and sides of the pint should look rock-solid with no give when pressed.
- Process in the Ninja Creami. Remove the pint from the freezer and place it into the Ninja Creami machine. Select the ‘Ice Cream’ function according to your model’s instructions. Why this function: the Ice Cream program uses the blade and paddles to rework the frozen block into a scoopable, aerated ice cream without over-melting it.
- Evaluate texture and remix if needed. After the initial cycle, check the texture. If it’s crumbly or grainy, use the “Re-spin” function once or twice until smooth. Mini-tip: if it looks too stiff, add a teaspoon of milk to the pint and re-spin—this helps rehydrate the mix and yields a creamier result.
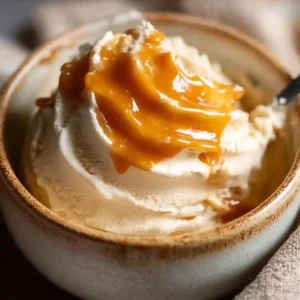
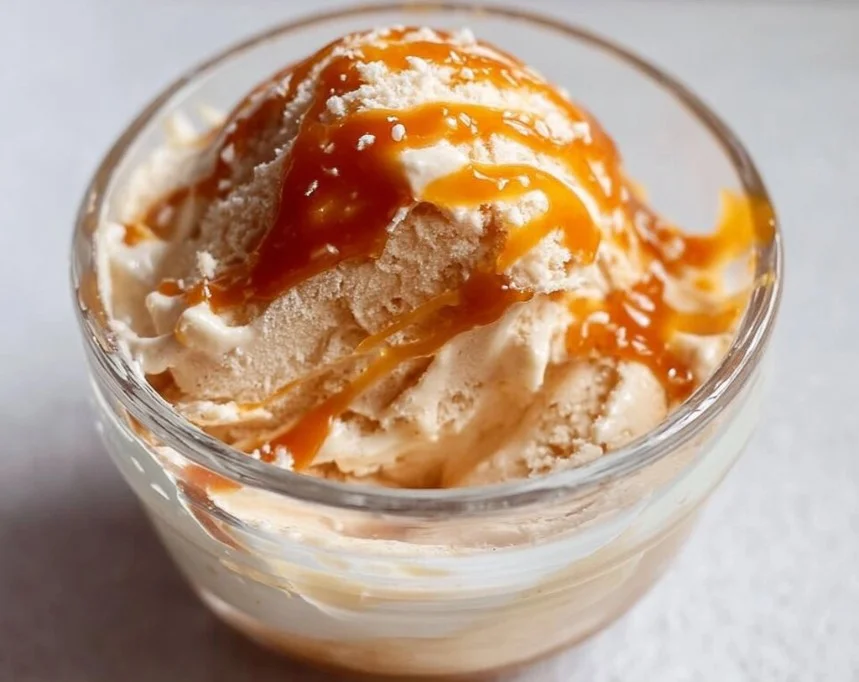
- Serve or make mix-ins. Once the texture is creamy and smooth, scoop into bowls or cones and serve. You can fold in small mix-ins like chopped nuts or a light drizzle of extra sugar-free caramel if desired. Why the order matters: adding fragile mix-ins after the primary spin preserves their texture; heavy additions during the spin can overwork the ice cream or dull the nuts.
- Enjoy mindfully. This salted caramel delight is meant to be savored—use small bowls, enjoy the aroma of vanilla and caramel, and notice the balance of sweet and salty in each spoonful.
Serving Suggestions & Storage Tips (presentation, pairings, and make-ahead advice)
Serving ideas and presentation:
- Classic bowl: scoop into chilled dessert bowls and finish with a light sprinkle of flaky sea salt for that beautiful contrast of sweet and salty.
- Fancy glass: layer small scoops with crushed toasted nuts (almonds, pecans) and a ribbon of additional sugar-free caramel for a parfait effect.
- Protein-friendly sundae: top with fresh sliced banana, a handful of granola, and a drizzle of warmed sugar-free caramel—great after workouts.
- For kids or celebrations: use a waffle cone or mini cones and stick a few little chocolate chips (or cacao nibs) on top for crunch.
Pairings and accompaniments:
- Hot espresso: salted caramel ice cream melts beautifully over a shot of espresso for an impromptu affogato.
- Warm apple compote: the cozy fall flavors of cinnamon apples work brilliantly against the caramel.
- Crisp cookies: shortbread or oat cookies add a comforting, buttery counterpoint.
Storage and make-ahead tips:
- Short-term refrigerator: once scooped, store any leftover ice cream in an airtight container in the freezer; do not store scoops in the fridge as they’ll melt quickly.
- Freezer storage: keep the original Ninja Creami pint in the freezer for up to two weeks for optimal texture. Over several weeks, ice crystals may develop and texture will firm—this is normal.
- To revive: if the ice cream has become too icy or firm after storage, put the pint in the refrigerator for 5–10 minutes to soften slightly, then use the Creami’s Re-spin function with a teaspoon or two of milk to reincorporate creaminess.
- Make-ahead tip: prepare several pints with different flavor add-ins (chopped toasted nuts, a swirl of peanut butter) and freeze them as ready-made portions for quick desserts or post-workout snacks.
Best practices to preserve texture and flavor:
- Avoid leaving the lid off the pint in the freezer—exposure to air increases ice crystallization.
- Keep the pint away from strong freezer smells; sealed storage prevents flavor transfer.
Helpful Notes & Variations (swaps, additions, and troubleshooting)
Ingredient swaps and substitutions:
- Milk alternatives: for a dairy-free variation, swap skim milk for unsweetened oat milk or a high-protein pea milk; note that textures will differ and you may need to experiment with an extra tablespoon of oil or a stabilizer for richness. (More on dairy-free below.)
- Protein powder: unflavored whey works best for neutral taste; if you use plant-based protein, choose one labeled “smooth” or “blended” to avoid gritty textures. Start with 1/4 cup and adjust next time based on texture preference.
- Sweeteners: the recipe is built around sugar-free salted caramel syrup; if you use a non-sugar-free caramel, reduce other sweet components accordingly.
Dietary adaptations:
- Dairy-free option: replace the skim milk with a creamy oat or soy milk and use a dairy-free sugar-free caramel syrup; add 2–3 tablespoons of full-fat coconut milk for body. For a fully plant-based protein boost, choose a smooth pea protein powder. Note: this will alter both taste and mouthfeel—see external recipe examples for dairy-free inspiration.
- Lower-sugar: keep the sugar-free syrup and skip any extra sweet add-ins. Using a flavor-forward salted caramel syrup is the key to keeping the dessert satisfying while minimizing sugars.
Flavor enhancements or add-ins:
- Toasted nuts: fold in 1/4 cup finely chopped toasted pecans or almonds after the first spin for a nutty crunch.
- Chocolate ripple: fold in 1–2 tablespoons of melted sugar-free chocolate and swirl gently for a salted caramel-chocolate combo.
- Sea-salt flakes: finish scoops with a tiny pinch of Maldon sea salt to elevate the caramel notes.
Common mistakes to avoid:
- Freezing less than 24 hours: the Creami requires a fully frozen pint to create a good texture—less time leads to grainy or incomplete processing.
- Not fully dissolving protein powder: lumps lead to gritty texture; dissolve or sift powders before freezing.
- Over-spinning: if you run the spin repeatedly without checking, the mix can aerate too much and become foamy. Use a gentle re-spin only as needed.
Troubleshooting texture:
- Too icy: add 1 teaspoon of milk and re-spin; a little fat or a tiny bit of glycerin (food-grade) can also interfere with large ice crystals.
- Too soft: put the pint back in the freezer for 30–60 minutes, then re-spin. If that doesn’t help, check freezer temperature and ensure the pint froze solid for a full 24 hours next time.
Conclusion
Ninja Creami Salted Caramel Protein Ice Cream is a comforting, satisfying, and surprisingly simple way to enjoy a decadent-tasting dessert with a protein-friendly twist. It’s perfect for warm evenings when you want something sweet with substance, or as a post-workout treat that feels like indulgence without overdoing it. The recipe’s clarity and forgiving nature make it an approachable project for anyone with a Ninja Creami—start with the basic mix, experiment with a favored protein powder, and slowly personalize the flavor to match your cravings. For more ideas that explore salted caramel with different dietary angles and inspiration, I often look to reliable recipe sources; here are a few favorites that influenced my tweaks and variations: Easy Salted Caramel Keto Protein Ice Cream Recipe – low calorie …, The Best Salted Caramel Protein Ninja Creami Ice Cream | Hayl’s …, and Salted Caramel Ninja Creami (dairy-free) | Feasting on Fruit. Try this recipe, tweak it, and come back to tell me which variation is your new favorite. If you make it, leave a comment and a star rating — I love hearing how people customize these comforting, kitchen-tested treats. Share the recipe with friends who need a cozy dessert upgrade!
Frequently Asked Questions
Q: How long should I freeze the pint before processing in the Ninja Creami?
A: The pint needs to be completely solid—plan for at least 24 hours in the coldest part of your freezer. This ensures the Creami can properly shave and churn the block into smooth ice cream. If you pull it out early, the texture will be inconsistent and likely grainy.
Q: Can I use plant-based milk instead of skim milk?
A: Yes, you can use unsweetened oat, soy, or pea milk for a dairy-free version. Bear in mind plant milks often have lower protein and different fat content, so texture may be looser or icier. Add a small amount (1–2 tablespoons) of full-fat coconut milk for body if needed, and consider a smooth plant-based protein powder to improve structure.
Q: My ice cream came out too icy or grainy—what went wrong and how do I fix it?
A: Icy texture often results from incomplete dissolving of powders, insufficient freezing time, or exposure to air. For fixes: re-spin the pint in the Ninja Creami with 1 teaspoon of milk added to help smooth it, ensure protein powders are fully mixed before freezing (sieve them if needed), and keep pints sealed to avoid freezer burn.
Thank you for spending time with this long-form, friendly guide to making Ninja Creami Salted Caramel Protein Ice Cream. If you try it, I’d love to hear how you customized the recipe—did you add nuts, chocolate, or make a dairy-free swap? Share a photo and your notes so others can learn from your delicious experiments.
Ninja Creami Salted Caramel Protein Ice Cream
Ingredients
Method
- In a mixing bowl, combine skim milk, sugar-free syrup, vanilla extract, optional protein powder, and a pinch of salt. Whisk until smooth.
- Taste and adjust flavor by adding more syrup or salt if desired.
- Pour the mixture into the Ninja Creami pint, smoothing the top.
- Freeze completely for at least 24 hours.
- Remove the pint from the freezer and place it into the Ninja Creami machine.
- Select the 'Ice Cream' function.
- Check texture; if too grainy, use the 'Re-spin' function until smooth.
- Scoop into bowls or cones and enjoy. Consider adding mix-ins like chopped nuts or a drizzle of caramel.