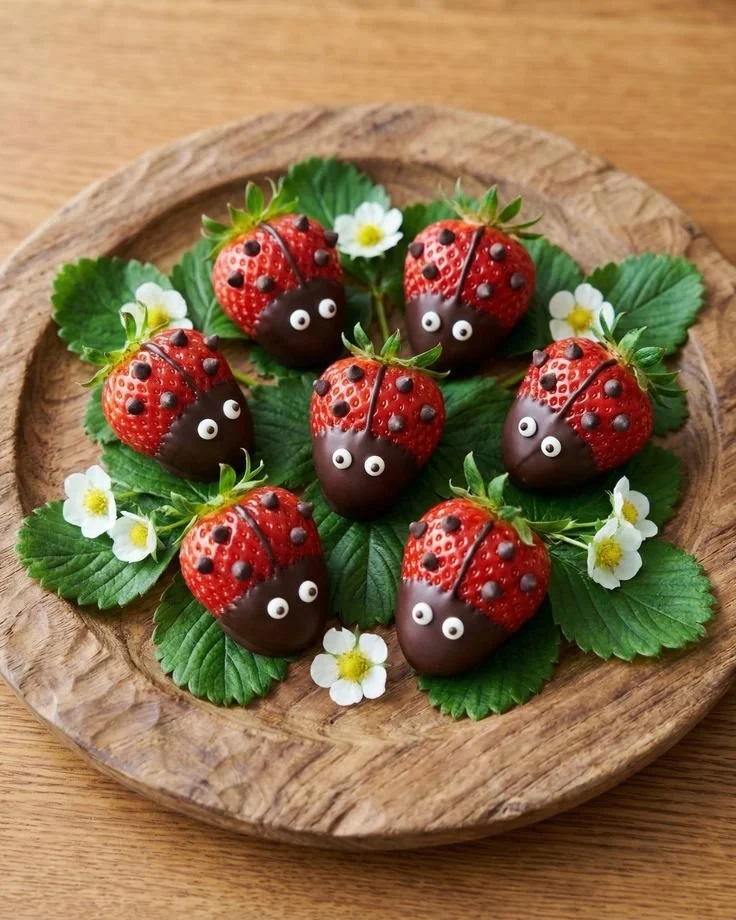
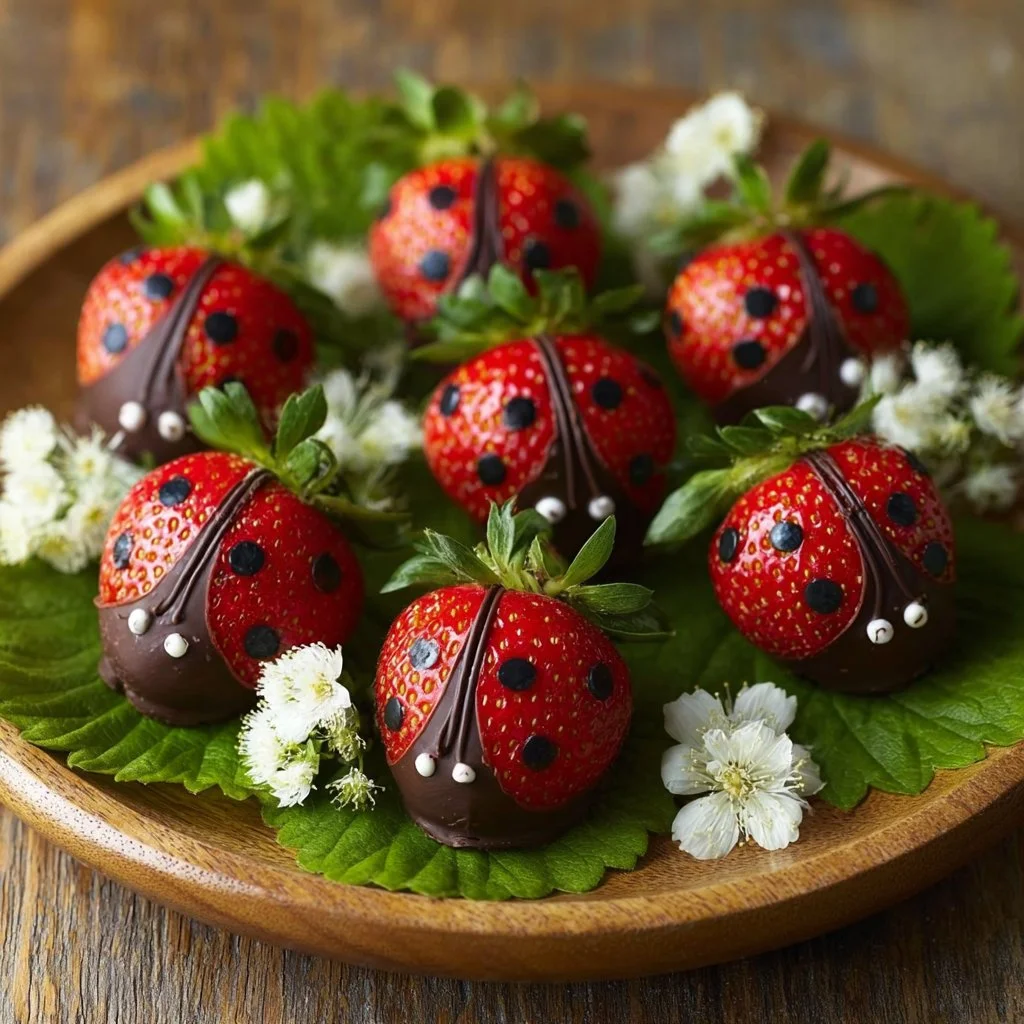
There’s something instantly joyful about tiny, brightly colored treats that look almost too cute to eat — enter Strawberry Ladybugs. These chocolate-dipped strawberry bites are a seasonal favorite: fresh, juicy berries dressed up in glossy dark chocolate and playful icing spots that make them perfect for spring picnics, kids’ parties, or a simple weeknight smile. If you love the classic pairing of fruit and chocolate, this easy recipe brings that comfort with a creative twist; it’s fast to make, visually delightful, and highlights the main ingredient — ripe fresh strawberries — at their best. If you enjoy playful chocolate-fruit creations, you might also like this chocolate-strawberry bruschetta for another fun take on the combo.
Ingredients & Equipment
Ingredients:
- Fresh strawberries — Choose firm, ripe strawberries with their green tops (hulks) intact for easy handling and visual charm.
- Dark chocolate — A good-quality dark chocolate bar or chips (60–70% cacao recommended) for a rich coating.
- Icing (for decoration) — Ready-made piping icing, royal icing, or a simple icing you can make from powdered sugar and a little milk; use colored icing for the head and spots.
Notes:
- Quantity: For about 12 medium strawberries, use 6–8 ounces (170–225 g) of chocolate and a small tube of icing. Adjust up or down for larger batches.
- Chocolate variety: If you prefer sweetness, use semi-sweet or milk chocolate; for a more sophisticated contrast choose dark chocolate with higher cacao.
Helpful tools:
- Double boiler or microwave-safe bowl for melting chocolate
- Baking tray lined with parchment paper or a silicone mat
- Toothpicks or small offset spatula for icing details
- Piping bag with a tiny round tip or a small zip-top bag with the corner snipped
- Thermometer (optional) for tempering chocolate if you want a professional shine
- Cooling rack (optional) to free up tray space
Step-by-Step Instructions (with tips)
- Wash and dry the strawberries.
- Rinse strawberries gently under cool running water and pat dry with paper towels. Make sure berries are completely dry — any surface moisture can cause the chocolate to seize or not adhere smoothly.
- Tip: Dry them on a clean kitchen towel and leave them for 15–30 minutes to air-dry if you want extra assurance.
- Melt the dark chocolate in a microwave or double boiler.
- Microwave method: Chop chocolate into even pieces, place in a dry, microwave-safe bowl, and heat in 20–30 second bursts, stirring between each until smooth.
- Double-boiler method: Place chopped chocolate in a heatproof bowl set over (not touching) simmering water. Stir until melted and glossy.
- Tip: Keep water out of the chocolate to avoid seizing. If you want a shiny, firm finish that doesn’t melt at room temperature, consider tempering the chocolate using a thermometer (aim for the correct tempering temperature for dark chocolate: roughly 88–90°F/31–32°C for final working temperature).
- Dip each strawberry into the melted chocolate, coating it thoroughly.
- Hold the berry by the green top and dip tip-first into the chocolate, twisting slightly to coat evenly. Allow excess chocolate to drip back into the bowl.
- Tip: Use a fork or dipping tool if you prefer, but be gentle to keep the stem intact for the ladybug look. If stems are removed, you can insert small toothpicks after setting for handling.
- Place the chocolate-dipped strawberries on parchment paper to cool and harden.
- Arrange dipped strawberries stem-side up on a lined baking tray. If you’re short on space, use a cooling rack over a sheet pan to allow air to circulate.
- Tip: Chill briefly in the refrigerator (about 10–15 minutes) to set the chocolate faster, but avoid long refrigeration which can cause condensation when returned to room temperature.
- Use icing to add details like eyes and spots to make them look like ladybugs.
- Once chocolate is set, add a small dollop of colored icing near the top to form the ladybug’s head, then pipe two tiny white dots for eyes and add a dab of dark or black icing for pupils. Use red icing for additional color if desired, and pipe small black spots down the back.
- Tip: If you only have white icing, tint small portions with food coloring. For a more rustic look, try fine-melted white chocolate for eyes and dark chocolate dots for spots.
- Allow the icing to set before serving.
- Let the decorated strawberries rest at room temperature until the icing firms fully (about 15–30 minutes), or chill briefly to speed up setting.
- Tip: Keep them on parchment to avoid sticking. If you’re transporting them, pack them in a single layer in a shallow container with parchment between layers.
Variation ideas:
- Roasted strawberries: For a deeper, caramelized flavor, roast hulled strawberries for 10–12 minutes at 375°F (190°C) to concentrate their sweetness before chilling and dipping. Roasting changes texture — they’ll be softer — so handle gently and consider larger berries.
- Poached or macerated strawberries: For a sweet syrupy twist, macerate strawberries with a little sugar and lemon for 15–30 minutes; drain well and pat dry before dipping. Avoid excessive liquid.
- Alternative coatings: Try white chocolate, milk chocolate, or even a flavored chocolate (orange or mint) for different flavor profiles. You can also roll the freshly dipped strawberries in crushed nuts, shredded coconut, or cookie crumbs before they set for extra texture.
- Kid-friendly twist: Use fun, colorful sprinkles instead of spots, or let kids draw faces with edible markers for a creative activity.
Kitchen tips for success
– Chocolate: If your chocolate thickens, add a teaspoon of neutral oil or cocoa butter to loosen it (only a little).
– Dryness: Moisture is the enemy — make sure the strawberries and bowls are completely dry.
– Storage before serving: Don’t dip strawberries too far in advance; dipped berries are best eaten within 24 hours for texture and freshness.
– Presentation: Leave the green tops on for easier handling and a whimsical, natural look that complements the ladybug design.
Storage, Freezing & Make-Ahead Tips
Storing leftover Strawberry Ladybugs:
- Short-term fridge storage: Arrange the decorated strawberries in a single layer in an airtight container lined with parchment paper. Place additional layers separated by parchment. Store in the refrigerator for up to 24–48 hours. Beyond that, strawberries soften and release juices that can dull the chocolate.
- Room temperature: If your kitchen is cool (below 70°F/21°C) and you plan to serve within a few hours, you can keep them at room temperature on a covered platter. Avoid direct sunlight or heat.
Freezing:
- Freezing chocolate-dipped strawberries is possible but not ideal because the freezing and thawing process changes texture. If you must freeze, flash-freeze the plain chocolate-dipped strawberries (without icing) on a tray until solid, then transfer to a sealed freezer-safe container with parchment layers. Freeze for up to 2 months.
- Thawing: Thaw in the refrigerator for several hours, then bring to room temperature before decorating with icing. Expect a slightly softer berry texture and possible moisture; decorating after thawing helps preserve appearance.
Make-ahead strategy:
- Make components ahead: You can melt and temper chocolate ahead of time, but it’s best to dip and decorate within the same day. Prepare icing in advance and store covered at room temperature or refrigerated per recipe instructions.
- Assemble close to serving for the freshest texture: If you need to make parts ahead, wash and dry strawberries a few hours before and keep them refrigerated until ready to dip and assemble.
Portioning advice:
- Serving size: Plan on 1–3 Strawberry Ladybugs per person, depending on whether they are a snack, dessert, or party treat. For a dessert course alongside other sweets, 1–2 pieces is usually enough.
- Batch scaling: Multiply ingredients proportionally. Use multiple bowls or a double boiler setup to speed up work for larger parties.
How to Use / Serve This Dish
Plating and pairings:
- Simple platter: Arrange Strawberry Ladybugs on a white tray or wooden board for contrast; scatter fresh mint leaves or edible flowers for a seasonal touch.
- With cheese: Serve alongside soft cheeses like mascarpone or ricotta and crusty slices of baguette for an unexpected sweet-savory grazing option.
- Party ideas: Make a themed platter with other fruit shapes or chocolate-covered treats. They’re a hit for baby showers, garden parties, or a picnic.
- Kid-friendly snack: Place a few on a decorative plate with toothpicks; they’re an easy-to-hold, low-mess treat that looks festive for little ones.
Creative variations:
- Yogurt clusters pairing: Serve alongside homemade yogurt fruit clusters or chocolate fruit skewers for variety — for inspiration on similar treats, see this chocolate-strawberry yogurt clusters recipe.
- Salad integration: Add a few undecorated, sliced fresh strawberries (not chocolate-dipped) to a light cucumber-strawberry salad to bring a fresh contrast; try this cucumber-strawberry salad as a bright side.
- Dessert board: Include Strawberry Ladybugs on a summer dessert board with small tartlets, lemon bars, and berry parfaits; for more summer dessert inspiration, check this collection of summer strawberry desserts.
FAQ
Q: Can I use frozen strawberries for Strawberry Ladybugs?
A: Frozen strawberries are not recommended because they release too much moisture when thawed, which prevents chocolate from adhering cleanly and changes texture. If you must use frozen berries, thaw completely and pat very dry for a prolonged period, though results will still be softer.
Q: What can I use instead of icing for the eyes and spots?
A: Good alternatives include melted white chocolate for eyes and a toothpick dot of dark chocolate for black spots. Edible markers also work on set white chocolate or fondant. For a healthier option, try tiny dots of Greek yogurt mixed with a touch of powdered sugar and colored as needed, but remember yogurt-based decorations are perishable.
Q: How long do chocolate-dipped strawberries last?
A: Decorated strawberries are best eaten within 24–48 hours when stored properly in the refrigerator. The berries start to soften and release juices after that, which can make the chocolate soggy.
Q: Why did my chocolate turn grainy or seize?
A: Chocolate seizes when a small amount of water comes into contact with it. Make sure all utensils and bowls are dry and avoid steam from a double boiler touching the chocolate. If it seizes, stir in a small amount of neutral oil, cream, or cocoa butter to smooth it, but note flavor and texture may change.
Conclusion
Strawberry Ladybugs are a simple, charming way to celebrate seasonal berries and bring a smile to any gathering. They combine the fresh sweetness of strawberries with the richness of dark chocolate and let you get playful with decorations to match any occasion. If you want more inspiration or alternative ways to shape fruit into fun snacks, see this creative guide to Strawberry Ladybugs – The Soccer Mom Blog, and for a kid-friendly, step-by-step take on the same idea try the Strawberry Ladybugs Recipe (Fun & Easy Kids Snack). Gather your berries, melt some chocolate, and enjoy making a little edible joy — then share your creations with friends or tag someone who’d love a batch.
Strawberry Ladybugs
Ingredients
Method
- Wash and dry the strawberries thoroughly to ensure they are completely moisture-free.
- Melt the dark chocolate either in the microwave or using a double boiler, ensuring to keep water out of the chocolate.
- Dip each strawberry into the melted chocolate, twisting slightly to coat evenly, then place them on parchment paper to cool and harden.
- Once the chocolate is set, use icing to add details like eyes and spots to create the ladybug look.
- Allow the icing to set fully before serving, either at room temperature or briefly chilling in the refrigerator.