Viral Gelatin Trick Recipe: The Ultimate Homemade Gelatin Hack Everyone’s Talking About in 2025
A comforting, foolproof pink gelatin trick for home cooks who love simple, from-scratch treats
Viral Gelatin Trick Recipe: let me tell you—this tiny gelatin hack changed my weeknight snack game and became my go-to for quick, feel-good desserts. “Wait, that little packet?” you might ask. Yup. I remember saying that to my sister the first time she watched me make it; she laughed until she tasted it and asked for the recipe. If you’re curious about how a simple mix of water, a touch of acid, and a bit of sweetener can create a silky, bouncy treat people obsess over, you’re in the right place.
This recipe leans into the comforting, seasonal charm of homemade gelatin—think bright, tender cubes that feel nostalgic and tidy enough for guests. The main ingredients are unflavored gelatin, water, a squeeze of lemon or apple cider vinegar, and a gentle sweetener (honey or stevia). If you’re new here and want to know a little about me and why I test silly kitchen tricks until they work, check out my story here: about my story. In the sections below I’ll walk you through the entire process, share why this version stands out (yes, even compared to the pink gelatin trick trends), and give practical tips so you get it right every time.
Why You’ll Love This Viral Gelatin Trick Recipe Everyone’s Talking About in 2025 (and How to Do It Right!) — quick wins and cozy reasons
- Quick and easy to prepare: just one bowl, a spoon, and a fridge wait.
- Made with minimal, pantry-friendly ingredients that you likely already have.
- Perfect for spring and summer when chilled, light desserts hit the spot; also cozy for year-round snackers.
- Comforting and nostalgic—this one evokes childhood plates while feeling grown-up enough to serve guests.
- Impressive presentation: clear, shiny cubes that feel homemade and special.
What makes this version unique:
- It focuses on texture control—achieving a soft, tender set without rubberiness.
- The tiny splash of acid (lemon or apple cider vinegar) brightens flavor and helps the gelatin set with a cleaner taste.
- It’s intentionally flexible: use honey for a mild floral sweetness or stevia for a low-calorie option.
Emotionally, this recipe is about simple confidence: the kind of small success that makes you smile in the kitchen and want to share a plate with someone you love. It’s a cozy ritual, fast enough to be daily and pretty enough to feel celebratory.
Ingredients Needed for the Homemade Gelatin Trick (pink gelatin trick / gelatin trick for weight loss friendly)
For the classic, simple set:
- 1 cup water, divided (½ cup hot, ½ cup cold) — hot water to dissolve the gelatin and cold to bring the mixture down to a safe temperature before setting.
- 1 tablespoon unflavored gelatin (about 1 packet of Knox) — unflavored keeps the base neutral so you can flavor however you like.
- 1–2 teaspoons apple cider vinegar or freshly squeezed lemon juice (optional) — brightens flavor and balances sweetness; choose lemon for a brighter citrus tone or apple cider vinegar for a gently tangy finish.
- 1 teaspoon honey or stevia (or sweetener of choice) — honey adds warmth and mouthfeel; stevia or other zero-calorie sweeteners keep it light.
Clarifying notes and swaps:
- Hot vs. boiling: use water that is steaming and just under a boil—boiling can weaken gelatin’s setting ability.
- Gelatin type: use unflavored powdered gelatin, not flavored gelatin mix. If you only have gelatin sheets, the conversion is roughly one tablespoon powdered = one gelatin sheet (but follow packet directions).
- Sweeteners: maple syrup or agave are fine in place of honey. If using granulated sugar, dissolve it in the hot water with the gelatin.
- Acid choice: lemon juice will give a fresher citrus note; apple cider vinegar keeps flavors rounder and works well if you plan to pair the cubes with savory notes (like a fruit-forward cheese board).
(If you like browsing dessert ideas while you cook, take a look at my desserts & drinks collection here: desserts & drinks collection.)
Ingredients & Equipment Notes (useful tools for the perfect gelatin texture)
- Small saucepan or kettle: to heat the ½ cup of water until steaming.
- Heatproof bowl: to combine the gelatin and hot liquid safely.
- Whisk or small spoon: a whisk helps eliminate graininess and incorporate air if you like a slightly foamy top.
- Glass dish or silicone mold: glass gives a pretty, classic slab to cut into cubes; soft silicone molds make fun shapes and unmolding easier.
- Measuring spoons and cups: accuracy matters with gelatin—too much water or too little gelatin will change the set.
- Refrigerator with reliable, steady temperature: chilling time requires a cold, consistent fridge at about 35–40°F (1.5–4.5°C).
How these tools help:
- A whisk disperses gelatin granules quickly so you avoid lumps.
- Glass dishes show the set and allow for neat cutting.
- Silicone molds make single-serving presentation easy and minimize waste.
Instructions – How to Make "The Viral Gelatin Trick Recipe Everyone’s Talking About in 2025 (And How to Do It Right!)"
-
Heat the water: Measure ½ cup of water and bring it to steaming—hot enough to send off wisps of steam, but not boiling. You want it very hot because gelatin dissolves best in hot liquid. (Why this matters: boiling temps can slightly degrade gelatin proteins and make the texture less ideal.)
-
Sprinkle and bloom the gelatin: Place the tablespoon of unflavored gelatin in a medium heatproof bowl. Slowly sprinkle the gelatin evenly across the surface of the steaming hot water while stirring gently. Continue stirring until the granules disappear and the mixture is clear or only slightly foamy. A little foam on top is fine; it will settle. (Visual cue: you’ll see the powder dissolve and the water take on a glossy sheen.)
-
Add acid and sweetener: Stir in 1–2 teaspoons of fresh lemon juice or apple cider vinegar and your chosen sweetener—1 teaspoon honey or a pinch of stevia. Mix until everything is fully incorporated. Taste a tiny bit (careful—it’ll be hot) and adjust sweetness if needed. The acid brightens and keeps the flavor from tasting one-note. (Mini-tip: if using honey, warm it slightly first so it blends smoothly.)
-
Cool with cold water: Pour in the cold ½ cup of water and stir to cool the mixture. This step brings the liquid down to a temperature that won’t shock the gelatin proteins and ensures more even setting. (Why it matters: rapid temperature changes can create an inconsistent texture.)
-
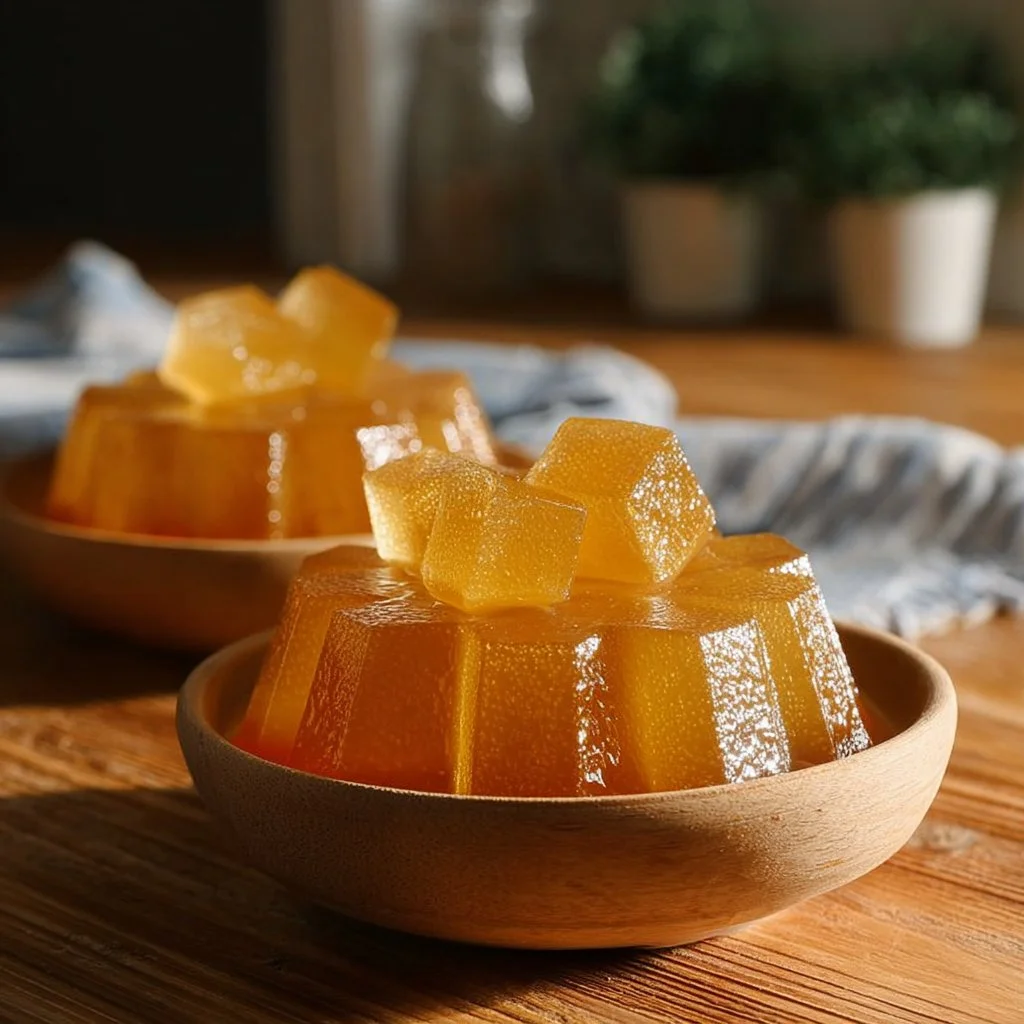
Transfer to molds/dish: Pour the gelatin mixture into a glass baking dish for a classic slab or into silicone molds for shaped jellies. If you want neat cubes, a shallow 8×8 or similar pan works best. For layered or marbled effects, you can pour part of the mixture, let it set slightly, and then add another flavor or color. (Visual cue: the liquid should be glossy and smooth; if there are undissolved bits, strain it through a fine sieve.)
-
Chill and set: Place the dish or molds in the refrigerator and chill for at least 2 hours, or until fully set. For thicker molds or deeper pans, it may take up to 4 hours. (Patience pays: a full set ensures clean cuts and ideal texture.)
-
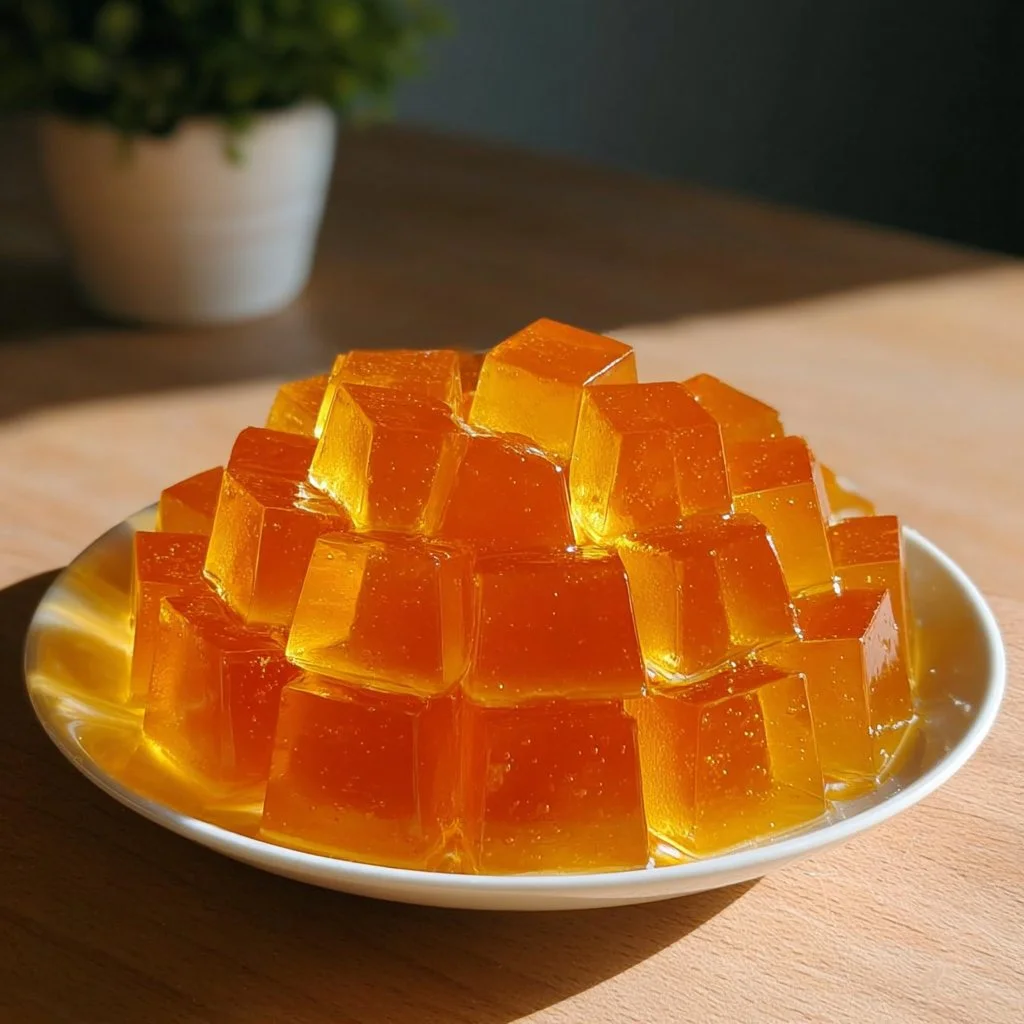
Unmold and cut: For slabs—run a thin knife around the edges if needed, invert briefly onto a cutting board, and cut into cubes with a sharp knife. For silicone molds, gently push from the base to release shapes. (Presentation tip: wiping the knife between cuts gives tidy cubes.)
-
Store: Place cubes in an airtight container and keep them in the fridge for up to 5 days. If you’re planning to make them ahead for a party, keep them chilled until just before serving to preserve the best texture. (Mini-tip: place parchment between layers if stacking in a container.)
Why each step matters, summarized:
- Steaming (not boiling) water dissolves gelatin without damaging it.
- Even sprinkling prevents clumps.
- Acid and sweetener are balance points—too much of either changes texture or flavor.
- Cooling with cold water prevents temperature shock and encourages an even set.
- Proper chilling time is essential for the right firmness and mouthfeel.
Serving Suggestions & Storage Tips for the Homemade Gelatin Trick (presentation, pairings, and make-ahead ideas)
Serving ideas and presentation
- Simple cubes: Serve chilled in a small bowl or on a pretty platter. They’re charming on a dessert board alongside fresh berries, sliced stone fruit, and a few mint leaves.
- Dressed-up dessert: Layer cubes in a stemmed glass with whipped coconut cream (dairy-free) and macerated berries for a parfait that looks elegant and tastes bright.
- Kid-friendly snacks: Thread small gelatin shapes onto skewers with fruit for a fun, portion-controlled snack.
- Party bites: Use mini silicone molds to create bite-sized jewels—serve on a tray with toothpicks for easy picking.
Pairings and accompaniments
- Fresh fruit: Strawberries, raspberries, or diced mango pair beautifully with the clean gelatin base.
- Creamy elements: Dollops of thick yogurt or whipped coconut cream add richness and contrast.
- Nuts and granolas: For texture, sprinkle chopped toasted almonds or a spoonful of granola when serving.
- Savory boards: If serving as part of a spread, pair small gelatin shapes with mild cheeses and crackers for an unexpected sweet note.
Creative serving variations
- Citrus-scented: Add citrus zest (lemon or orange) to the hot liquid before chilling for a fragrant twist.
- Herbal-infused: Steep a sprig of rosemary or basil in the hot water for a minute, remove, then proceed—this gives a subtle herbaceous note.
- Layered colors: Tint batches with natural juices (pomegranate, light berry purée, or diluted carrot juice) and set in layers for a striped effect.
- Light and bright: Reduce sweetener and increase a teaspoon of lemon for a tart, more adult-friendly bite—this is often preferred by those watching sugar.
Storage and make-ahead tips
- Refrigerator: Store gelatin cubes in an airtight container for up to 5 days. Keep them chilled and covered to prevent absorption of fridge odors.
- Freezing: Freezing gelatin is not recommended—ice crystals and thawing harm the texture and make it watery.
- Make-ahead: You can prepare the base up to 48 hours in advance and keep it chilled, or make it the day before a gathering to save time.
- Transporting: For picnics, pack molded shapes in a rigid container with a cushioned layer of paper towel to avoid sloshing.
Best practices to preserve texture and flavor
- Keep them cold until serving; warmth will soften the set and change the mouthfeel.
- Avoid high-acid fruit placed directly on gelatin for long periods, as some fruits (like fresh pineapple, kiwi, or papaya) contain enzymes that can interfere with gelatin’s ability to set. Canned or cooked versions of those fruits are usually fine.
- If stacking shapes, a thin sheet of parchment between layers prevents sticking and keeps edges clean.
Helpful Notes & Variations (ingredient swaps, dietary adaptations, and pro tips)
Ingredient swaps and substitutions
- Gelatin alternatives: If you need a vegetarian/vegan option, agar-agar is a plant-based gelling agent. Note: agar sets firmer and at a higher temperature; follow package directions and expect a slightly different texture.
- Sweetener swaps: Granulated sugar dissolves well in the hot water; for lower sugar, use stevia or erythritol—adjust to taste. Honey gives a smoother mouthfeel than some artificial sweeteners.
- Acid adjustments: If you don’t like tang, omit the apple cider vinegar and use only a splash of lemon juice or none at all; the acid is optional but recommended for flavor brightness.
- Flavor infusions: Instead of just lemon, stir in a small amount of pure vanilla extract (¼ teaspoon) after the mixture cools slightly for a warm, comforting note.
Dietary adaptations
- Sugar-free: Use stevia or monk fruit extract for a near-zero sugar version.
- Dairy-free serving: Pair with coconut whipped cream or a non-dairy yogurt.
- Vegan: Substitute agar-agar but be mindful of texture differences. Agar tends to be firmer and less “melt-in-the-mouth” than gelatin.
Flavor enhancements and add-ins
- Fruit purées: Blend berries and fold a small amount into the cooled mixture for color and flavor—strain to remove seeds if you want a smooth set.
- Spices: A pinch of ground cardamom or ginger can make a surprising and delightful difference.
- Extracts and essences: Rose water or almond extract (tiny amounts) can add depth; use sparingly to avoid overpowering.
Common mistakes to avoid
- Using boiling water: As mentioned, boiling can affect gelatin’s setting power; use steaming-hot water instead.
- Not blooming evenly: Sprinkle the gelatin evenly across the surface; dumping it in one spot leads to lumps.
- Over-diluting: Follow the 1:1 water ratio as a baseline; more water will yield a weaker set.
- Rushing the chill: Cutting before fully set leads to sloppy edges and sticky cubes.
Troubleshooting
- Gelatin didn’t set: Check that your gelatin was fresh (packets can lose gelling power over time), that you used hot enough water to dissolve it fully, and that you didn’t add enzymes from raw pineapple or other fresh protease-rich fruits. If you used too little gelatin, warm the mixture, add dissolved extra gelatin, and re-chill.
- Gritty texture: This means the gelatin didn’t fully dissolve—reheat gently and whisk until smooth. If already set, melt gently and redo.
- Too firm: If your set is rubbery, you may have used too much gelatin or cooked it at too high a temperature; next time reduce the gelatin slightly or avoid boiling.
Cooking with confidence: small wins
- Make a small trial batch if you’re trying an alternate sweetener or adding fruit purée—this helps you dial in flavor and texture without wasting ingredients.
- Keep notes: I write temperatures and tweaks down; after a couple of tries you’ll have your perfect ratio and flavor mix.
If you’re in the mood for another cozy, from-scratch treat while gelatin chills, one of my favorite indulgences is a dense, chocolate-rich cake—here’s a special treat I’ve tested and love: a moist chocolate cake recipe (great for when you want bold flavors alongside light gelatin bites).
Conclusion
This Viral Gelatin Trick Recipe is a brilliant little method that proves simple pantry ingredients—unflavored gelatin, water, a touch of acid, and your chosen sweetener—can yield impressive, comforting results. It’s perfect for busy home cooks who want something pretty, nostalgic, and reliably good without fuss. You get bright flavor, a soft, tender set, and endless ways to customize: layer it, mold it, dress it up for guests, or keep it as your everyday chilled treat.
If you’d like to learn the background on the trend, read more about What’s The Pink Gelatin Trick? For a closer look at claims about gelatin and diets, see The Gelatin Trick For Weight Loss: Analysis. And if you want research-style breakdowns and cautions before you try trendy methods, this piece on Gelatin Trick for Weight Loss: 7 Must-Know Facts is worth a read.
If you tried this viral gelatin trick, I’d love to hear how it went—leave a comment and a star rating, and if you took pretty photos, share them on Pinterest or social media so we can all get inspired.
Frequently Asked Questions
How long does the gelatin need to chill before it’s fully set?
Typically at least 2 hours for a thin slab in a shallow pan; up to 4 hours for deeper molds. Trust the visual cue: it should be firm to the touch and not jiggle excessively in the center.
Can I use flavored gelatin packets instead of unflavored gelatin?
You can, but using unflavored gelatin lets you control sweetness and flavor. Flavored packets often contain added sugar and color and make it harder to tweak the result.
What if my gelatin turns out rubbery—how can I fix the texture?
Rubbery gelatin usually means too much gelatin or the mixture was overheated. Unfortunately you can’t fully reverse rubberiness once set. For future batches, reduce gelatin slightly or ensure you only use steaming-hot water rather than boiling.
Can I make this recipe vegan using agar-agar?
Yes—use agar-agar, but note it sets firmer and often requires boiling and settling at higher temperatures. Follow the agar-agar package directions and expect a slightly different mouthfeel.
Is it safe to use lemon juice or apple cider vinegar with gelatin?
Yes—adding a small amount of acid (1–2 teaspoons) brightens flavor and is safe. Avoid adding strong protease-rich fresh fruits (like raw pineapple or kiwi) directly to the gelatin base before it sets, as they can prevent firming.
How should I store leftover gelatin cubes?
Store in an airtight container in the refrigerator for up to 5 days. Keep them cool until serving for the best texture.
Viral Gelatin Trick
Ingredients
Method
- Measure ½ cup of water and bring it to steaming, but not boiling.
- Sprinkle the unflavored gelatin evenly across the surface of the hot water while stirring gently until dissolved.
- Stir in 1–2 teaspoons of lemon juice or apple cider vinegar and your desired sweetener.
- Pour in the cold ½ cup of water and stir to cool down the mixture.
- Transfer the mixture into a glass baking dish or silicone molds.
- Refrigerate and chill for at least 2 hours or until fully set.
- Once set, cut into cubes or unmold the jellies.